Tail Hooks for Fly Baby Hand-Propping
February 2004
No, this isn't a primer on how to party with a bunch of carrier
pilots.
A lot of Fly Babies don't have electrical systems or starters,
and must be hand-propped. Hand-propping isn't that tough or
dangerous...it's pretty easy, and you can always count on some
shocked attention from other pilots in the vicinity.
It's funny to consider, but most hand-prop accidents don't
involve the person losing their footing or whatever and falling
into the spinning prop (though it *is* a hazard to watch out
for). Most hand-prop accidents involve the airplane getting
loose and hitting something.
It's vitally important to secure the airplane when you're
hand-propping. Attach tiedowns, use chocks.
However, after the engine's running, there's that awkward moment
where you untie the last rope or remove the last chock, and you
have to trot into the cockpit before the plane starts rolling
away.
 The
best
solution for hand-propping is a remote-release tail hook.
This allows you to tie a loop in a tiedown rope, slip it into the
hook, start the engine, climb into the cockpit, and release the
tail hook by pulling a handle attached to a cable.
The
best
solution for hand-propping is a remote-release tail hook.
This allows you to tie a loop in a tiedown rope, slip it into the
hook, start the engine, climb into the cockpit, and release the
tail hook by pulling a handle attached to a cable.
The picture on the right is the hook on N500F, the prototype Fly
Baby. This is a sailplane release hook, installed by Pete
during the 1960s and actually used to tow sailplanes for one
weekend. Pete had requested a sailplane tow waiver from the
local FSDO. The inspector granted it on Friday, and Pete
spent the weekend towing sailplanes with the Fly Baby.
But when the FDSO inspector got in Monday morning, he started
digging into the stack of backed-up material in his
in-basket...and found a notice that FAA Headquarters had decided
to ban sailplane-tow waivers for homebuilts!
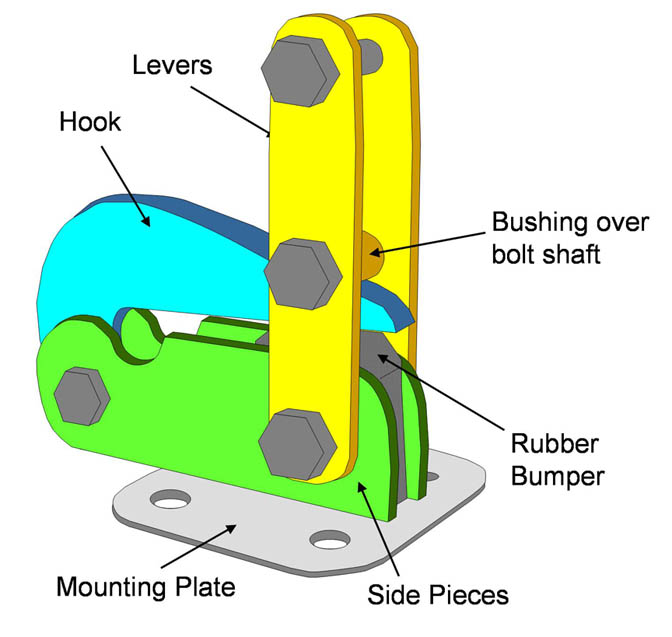
Anyway, the hook above is a commercial unit, available from
places like Wag-Aero. Unfortunately, they charge about $250 for
one of these. I've seen a number of Fly Babies and other
homebuilts with scratch-built release hooks. They all seem
to work OK. They basically have to be strong enough to
withstand the thrust of the engine at full throttle (about 500
pounds or so), yet release with a fairly gentle tug on the cable.
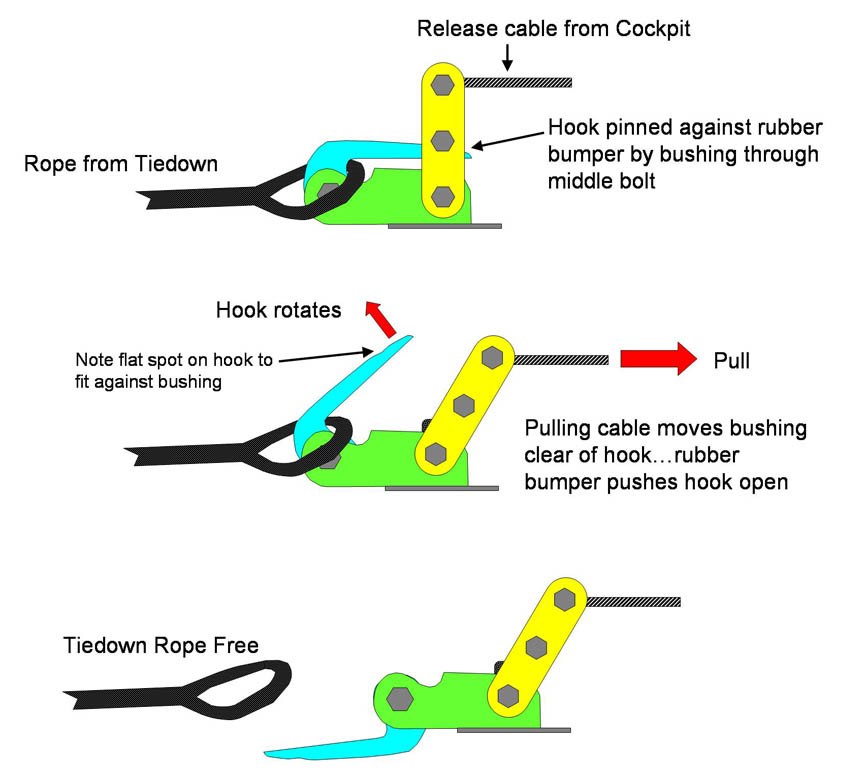
Here's an illustration of how they work:
The nice thing is that they DON'T have to be desiged to be easily
releaseable at full load. If you've accidentally started the
engine at full throttle, take it from me: you'll throttle
that thing back down as quickly as you can. Been there, done
that, and am enduringly grateful that the tail hook and the
tiedown rope held for the ten seconds or so it took to reach the
cockpit.
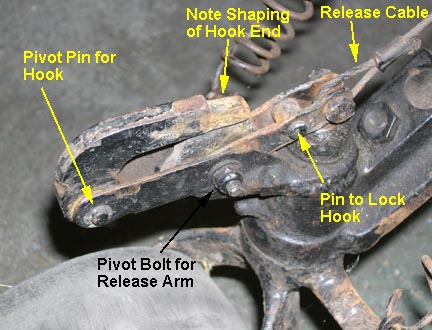
Here's a photo of a homebuilt tailhook used on the Story
Special. Like just about all of these kinds of hooks, it's
bolted to the tailwheel bracket: Unlike the commercial one
above, though, the hook opens horizontally instead of
vertically. This eliminates the need for welding.
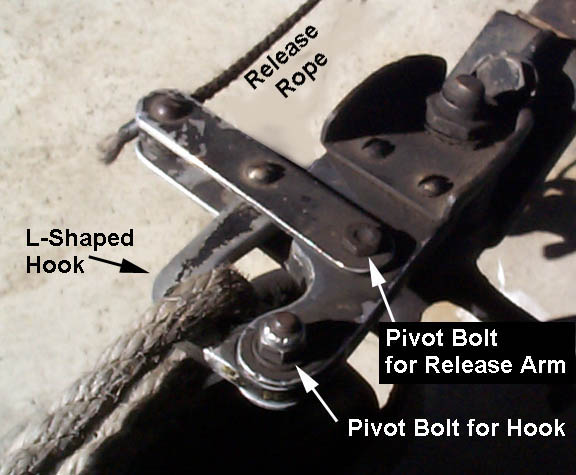 The Story's hook was made out of 4130 steel. Don't know the
thickness, but, from the photo, I suspect most of it is 0.063"
sheet. The main component is that L-shaped hook; that seems to
be 1/8" or even a bit thicker. The bottom end of the hook has
a hole for the pivot bolt. The release arm is two parallel
steel straps, with a pivot bolt at one end and a rivet and spacer at
the other end. About midway is another rivet, again, with a bit of
spacer. The hook fits inside the middle rivet...tension on the
rope wants to make the hook open, and the release lever and its
middle rivet keeps the hook in place. When the pilot tugs on
the rope, the release lever pivots forward, moving the middle rivet
forward until the hook can pop free. Like the commercial hook
above, the end of the hook is shaped to aid in the easy release of
the hook.
The Story's hook was made out of 4130 steel. Don't know the
thickness, but, from the photo, I suspect most of it is 0.063"
sheet. The main component is that L-shaped hook; that seems to
be 1/8" or even a bit thicker. The bottom end of the hook has
a hole for the pivot bolt. The release arm is two parallel
steel straps, with a pivot bolt at one end and a rivet and spacer at
the other end. About midway is another rivet, again, with a bit of
spacer. The hook fits inside the middle rivet...tension on the
rope wants to make the hook open, and the release lever and its
middle rivet keeps the hook in place. When the pilot tugs on
the rope, the release lever pivots forward, moving the middle rivet
forward until the hook can pop free. Like the commercial hook
above, the end of the hook is shaped to aid in the easy release of
the hook.
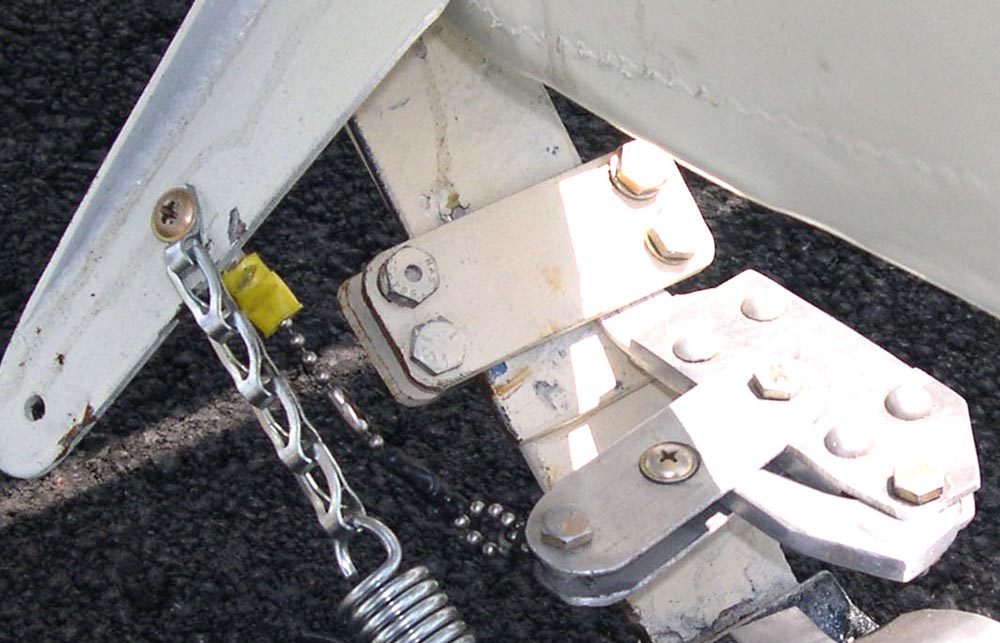
Whatever type of hook you install, you'll need some way of
activating the release. Most builders run some sort of cable
from a handle in the cockpit. Mike Proshold, on the other
hand, uses a clip to the tailwheel control horn. As you can
see from the next picture, Mike's hook is off-center a bit to give
the release chain a straight shot to the horn. The
chain connects to the norn with a c-clip selected so that it
releases at a moderate level of tension. All Mike has to do
is press his left rudder pedal...the horn turns forward,
tightening the chain until the hook releases. As the rudder
keeps moving, the tension eventually overcomes the capabily of the
C-clip and the whole chain drops free of the rudder horn.
Obviously, this setup has to be carefully balanced to ensure the
clip doesn't stay connected and mess up the rudder control.
It's probably a bit safer to keep it isolated from the rudder
system and run a separate cable, but Mike's hasn't given him any
problems.
Bob Hoover's
Tailhook Drawings
Bob Hoover (aka "The Other Bob
Hoover") posted a neat set of Deltacad drawings for making a
tailhook from scratch. You can find those Deltacad
drawings on the
Groups.io
page (look in the Files section, under "Yahoo Transfer"), or you
can download a
PDF version.
Here's a drawing of Bob's design:
Ron Wanttaja