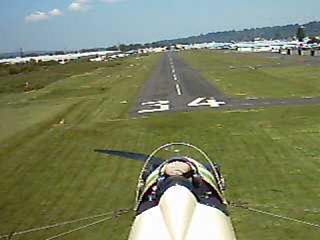
Screen Capture from from Tail-Mounted Video Camera
Screen Capture from from Tail-Mounted Video Camera
I have always wanted to strap a video camera on my Fly Baby and shoot some in-flight footage. I've finally managed my wish, with a surprisingly low cost. This article discusses how I did it, and at the end, includes some links to the videos I've shot with the camera strapped to my airplane.
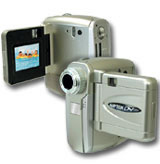
Then I went to Fry's Electronics and found the Aiptek DV3100 Digital Video Camera. $120.
That was just within my "toy" threshold, especially since I took advantage of the same visit to buy my wife a 19" LCD computer monitor ("Look Honey, I bought you this neat monitor for only $600. Oh, by the way, I picked up a $100 video camera, too....'). The camera records up to 40 minutes on a 256 MB Compact Flash card. The CF card cost me more money, of course, but since I use the same card with my ordinary digital camera, I could justify it.
 The
DV3100 is
a cute lil' thing. It is called a pocket camera, and it fits
quite
nicely into one's shirt pocket. It's the size of a typical
billfold...about
3" square, and about 1.25" thick. The lens is mounted on the thin
edge, so the skinny side of the camera faces the wind. It
operates
on 2 AA batteries, and, ready to run, weighs about eight ounces.
It includes a fold out LCD screen. Cables are provided for direct
video/audio output and for interfacing to the computer's USB port for
transferring
the output.
The
DV3100 is
a cute lil' thing. It is called a pocket camera, and it fits
quite
nicely into one's shirt pocket. It's the size of a typical
billfold...about
3" square, and about 1.25" thick. The lens is mounted on the thin
edge, so the skinny side of the camera faces the wind. It
operates
on 2 AA batteries, and, ready to run, weighs about eight ounces.
It includes a fold out LCD screen. Cables are provided for direct
video/audio output and for interfacing to the computer's USB port for
transferring
the output.
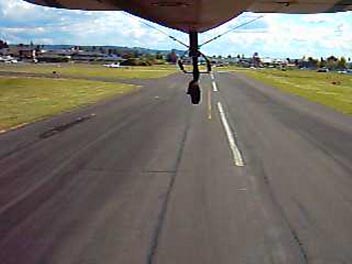
Drawbacks? Well, it is a low-cost camera. The digital video output is only 320x240 pixels at about 10 frames per second. The capture above is the size of the output video...so you know you're not getting big, razor-sharp images. The 10 FPS output rate is abou 1/3rd that of standard NTSC, so the video is a bit jerky.
All this causes some output problems that I'll discuss in a bit. But even with its faults, it's a fun little thing to play with. I'd sure love more resolution and a higher frame rate, but I know I won't get it in an 8-ounce package. It's all in fun, and the price was right.
First concern was that viewfinder. The camera automatically powered up when the viewfinder was opened, and powered-down when the viewfinder was closed. Obviously, unless I built a big fairing, the camera couldn't fly with the viewfinder in the open position...the slipstream would push it closed, and hte camera would shut down. The slipstream would probably wrench the viewfinder right off the camera, if the camera was mounted backwards.
So: I had to defeat the viewfinder turn-off feature.
Reading the manual, I discovered that the camera had an alternate turn on/turn off mode. The "Menu" button also doubled as a Power-On or Power-Off control...hold the button for three seconds, and the camera would turn on or turn off. Looking closely at the LCD viewfinder, it was obvious that a small plastic pin contacting a microswitch on the frame controlled the automatic power on/power off feature.
I did some experimentation, and verified that the camera could indeed be turned on and off without moving the viewfinder. However, I opted to cut off the plastic pin to completely eliminate the turn-off-when-viewfinder-closes mode. While the camera could be started 'blind," I figured I'd want to check the viewfinder and verify everything was working prior to takeoff. The camera includes a switch that turns off the viewfinder to save power, so my plan was to open the viewfinder, manually power-on the camera, check the viewfinder to ensure everything was working, then close the viewfinder and fly.
The camera has one additonal feature to support this mode: It powers down if the "Start Video" button isn't pressed within ~20 seconds of power-on.
Since the camera does not include any remote control features, there was no reason to try to string any control wiring to the cockpit. The camera had ~40 minutes of record time. Obviously, I'd want to mount the camera, preflight the airplane, and then, just before climbing into the cockpit, start the camera. Fortunately, I'm based at an uncontrolled field and can count on being able to take off relatively quickly.
One thing that made the process difficult is the fact that there is not a single flat surface on the camera. The top is curved, the bottom is curved, the ends are curved. The sides are (kinda) flat, but one side has the fold-out viewfinder and there are no potential attachment points on the other. The camera includes a standard 1/4-20 threading on the bottom to fit a tripod screw, but the bottom is convex. All of the camera assembly screws are tiny, about #2 size.
So the tripod mounting point was the only spot. Still, looking closely, I noticed the threads were plastic. I didn't trust that in the full slipstream. The design requirements were getting pretty long...use the tripod point to mount, but reduce/eliminate the stress by shielding the camera from the wind. And "bed" the camera to damp out any slipstream or engine-related vibration.
The scrap bin provided the solution. I found a hunk of 1.5" square tubing of 7075 aluminum. With one edge cut off, it gave me a nice bit of channel just a bit wider than the camera itself. A second piece of the channel was bolted to the front, leaning back slightly as a windbreak with a notch cut from the top to give the camera lens an unimpeded view. The camera could be mounted either way, looking forward or looking aft.
To bed the curved-bottom camera on that flat channel, I used a piece of leftover Temperfoam. I figured it should provide a perfect combination of dampening and support.
The separate mount, makes thing easier, when working to put the camera in a new location. The channel gives me a lot more options than the single bolt sticking out of the botom of the camera does. Beside, after the second mounting, I did manage to strip out those plastic threads in the camera. A ~2" long stud was epoxied into the hole (with a nut added to provide a solid stop) and the mount is still the optimal way to go.
If you do epoxy a stud, take care that you don't bond the battery door in place....like I did. It took just five minutes' work to cut out around the epoxied section to allow the battery case to open again, but I felt awful stupid....
 For
the first
attempt at mounting the camera, I wanted something quick and
easy.
I wasn't sure if the camera was going to work at all, and didn't want
to
spend hours on a fancy installation only to discover that the camera
doesn't
work well enough. I needed a solid part of the airplane that
didn't
vibrate, wouldn't need any mounting holes drilled, and could be
attached
to without damaging the paint.
For
the first
attempt at mounting the camera, I wanted something quick and
easy.
I wasn't sure if the camera was going to work at all, and didn't want
to
spend hours on a fancy installation only to discover that the camera
doesn't
work well enough. I needed a solid part of the airplane that
didn't
vibrate, wouldn't need any mounting holes drilled, and could be
attached
to without damaging the paint.
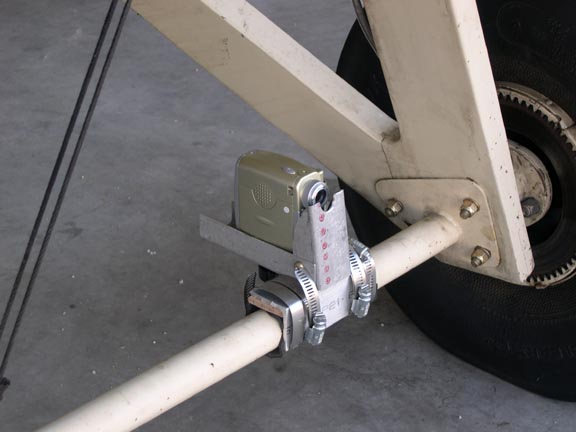
The axle turned out to be the perfect solution. With a section of angle aluminum installed crossways to the mount, I was able to wrap the axle with rubber and clamp on the mount using four hose clamps. It gave an unimpeded view forward, though the lens was only 10 or so inches above the asphat.
Once in place, it seemed as solid as all getout. After I ran the preflight, I powered up the camera, checked the viewfinder, started the recording, turned off the LCD backline, and closed the viewfinder. Not fully trusting the tripod mounting threads, I wrapped the whole assembly with that homebuilder's standard...duct tape.
Then fire it up, and go flying. I made one circuilt of the airport, then landed, taxied off the runway, and shut the engine down. I climbed out and checked the camera mounting. It was still secure, so I fired up again and flew 25 minutes or so of touch and goes. Then back to the hangar, shut off the camera, remove the flashcard, and head home to download and view.
Watching some scenes, though, revealed a weird effect. Sometimes, the ground appeared to have a slow shake...a bit of a slow jiggle, like a minor earthquake. It's distracting, but not that bad...it's most apparent when the plane is high, and mostly disappears during the climbout and final approach. It might be a vibration effect, with perhaps the slow frame rate coupled with a given vibration frequency to kind of "sample" the motion of the camera, kind of like the way a strobe light can apparently stop motion but shows slow movement if the strobe frequency isn't quite match.
Also, the vibration effect might be related to the sampling rate of the camera Charge-Coupled Device (CCD...the electronic component that acts as "film"). The CCD might be getting sampled at a slow enough rate that the forward motion of the aircraft makes objects get sampled sequentially on separate rows.
No matter...the effect is minor, and is not apparent all the time.
One other weird effect: The propeller tip was just barely in the camera field of view, and the slow frame rate occasionally "stopped" the prop. It was subtle, and really kind of looked neat.
 Next
came the
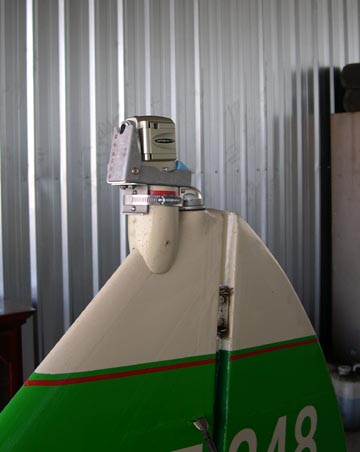
mounting I was really looking forward to: The camera on the tail,
looking forward, capturing the cockpit and forward fuselage against the
horizon.
Next
came the
mounting I was really looking forward to: The camera on the tail,
looking forward, capturing the cockpit and forward fuselage against the
horizon.
My Fly Baby is a bit non-stock, with a strobe light and a navigation light atop the vertical stablizer. I quickly centered on the strobe mount. A bit of twiddling revealed that the strobe fairing was held on to the fin with just two screws, and a cautious lift showed that the strobe lamp had a three-pin connector inside the mount. A few minutes' work, and I had the whole assembly off the airplane.
The basic mount from the axle was used...the base channel, and the wind-breaker channel. I used a section of the same box extrusion for a front attachment.angle...but leaving a bit of "lip" on the lower edge so that it couldn't slip past a hose clamp. Another angle in back holds the rear of the mount in place. The hose clamp is just a backup...both front and rear angles are held to the fairing by screws. I had a little trouble with the back of the basic mount hitting the top of the navigation light behind the strobe fairing. The solution was to slightly shorten the mount (it was quite a bit longer) and offset the rear angle to clear the lamp.
There is one odd effect. The slow frame rate of the camera and the access rate of the CCD does *very* weird things to the propeller. The left-side blade is often scimitar shaped. But the "scimitar" isn't necessarily anchored on the hub of the prop! Sometimes, the prop forms a sort of tilde symbol ("~") that rises up and down the prop disk.
Also, sometimes the blade on the right side of the disk is smeared to about a quarter of the prop arc, kind of in an arrowhead shape. I'm sure this is the CCD being sampled downward, catching the downward-going blade of the prop.
The effects are short-lived, but they are pretty obvious...and distracting.
Ah, well. Once you get used to it, you can pay attention to the passing terrain, instead.
 I
felt I
needed a rearward-looking view as well, so I strapped the mount back
onto
the axle, but with the camera pointed the other way. I adjusted
the
pointing so that the rear parts of the horizontal stabilizers were just
in view.
I
felt I
needed a rearward-looking view as well, so I strapped the mount back
onto
the axle, but with the camera pointed the other way. I adjusted
the
pointing so that the rear parts of the horizontal stabilizers were just
in view.
This video was fun, too. You can see the tail lift on takeoff, and, while the airplane is in two-point attitude, the tailwheel turns left and right to match the rudder work I'm doing to keep straight. On final approach, one gets a great view of the parking lot just beyond the runway threshold.
While the Aiptek camera comes with a video-editing program, it is one of the infamous "light" versions of a commercial product (PowerDirector). It may have done the job...but I decided to buy a full-featured commercial product instead.
I ended up buying Pinnacle's "Studio," version 9. It does everything I wanted to do...makes it easy to break up the original video into "scenes," and string scenes together from the two flights so the viewpoint switches seamlessly from the two cameras. It let me import music from a CD, and adjust timing to synchronize camera switches to "stings" in the soundtrack.
Two drawbacks. First, Studio won't recognize the existing soundtrack from the camera. I'd like to run the engine and wind sounds in the background, at a much-muted level, but Studio won't play them. I've pinged the Studio technical assistance on this, and they claim it's because of the Aiptek camera's non-standard frame rate. It makes sense...but the RealVideo player, Windows Media Player, and Quicktime all have no problems with the audio. For that matter, neither does PowerDirector, the video-editing software that came with the camera.
Considering the specific application I bought the camera for...recording video in a "garbage noise" environment...it's not a major drawback. I could re-record the soundtrack as a WAV file and re-import it, if I really wanted. But Studio wouldn't work, if someone used the Aiptek to interview a person.
The second drawback isn't Studio's fault. Video editing take a lot of computing power, and my 800 Mhz Pentium 3 is right at the ragged lower edge of usability.
Since I just shot touch and goes when I had the video camera running, my "Music Video" consists of various shots strung together to show one circuit of the pattern. It begins with the taxi onto the runway, and ends when land and turn back off onto the taxiway again.
Some people have had trouble loading them. This seems to be about the best procedure:
1. Go to the links below.
2. Right-click on the link and select, "Save to Disk" or "Save
Target As"
3. Save the file to your hard disk.
4. Ensure it saves with an "*.MPG" extension, rather than as
an "*.MP4" file...if it does anyway, just change the extension to *.MPG
when it gets done saving.
5. Double-click the file to run it.
The first is from the axle-mounted camera, and shows the view during a slip to a landing. It includes the original audio. It's about 1.8 Meg.
The second is from the tail-mounted camera, showing a takeoff. I dubbed a bit of music, with this one. It's about 2 Meg.
The third, from the rearward-mounted camera, is only about 1 Meg in size. This one was shot on takeoff.
I've got two "music videos" on YouTube:
Ron Wanttaja
May 2004
- Updated Feb 2010