I remember reading, a long time ago, that the definition of a gentleman was someone who knew exactly when to leave a party.
There's probably some sort of similar definition for a homebuilt owner who decides a funny problem is potentially serious enough to ground his airplane. Whatever it is, I am it...because I've grounded my Fly Baby, Moonraker.
Perhaps "Still alive and probably going to stay that way" is enough of a moniker. Still, it's a tough decision to make, especially when there's a strong argument that says the problem is merely cosmetic; that the safety of the aircraft is unchanged.
Back when I bought Moonraker about four years ago (I'm the fourth owner), I noticed a small crease in the paint on the landing gear legs above the axle. I didn't think much of it...it ran in a dead-straight line across both struts of the left gear assembly, so it obviously wasn't a crack in the wood.
Earlier this year, though, I noticed the crease seemed to be getting wider. Another crease appeared an inch or so down, paralleling the first one. The edges of the first one appeared to get ragged...or maybe that was just the highlighting effect of some engine oil that had oozed down the leg into the crease.
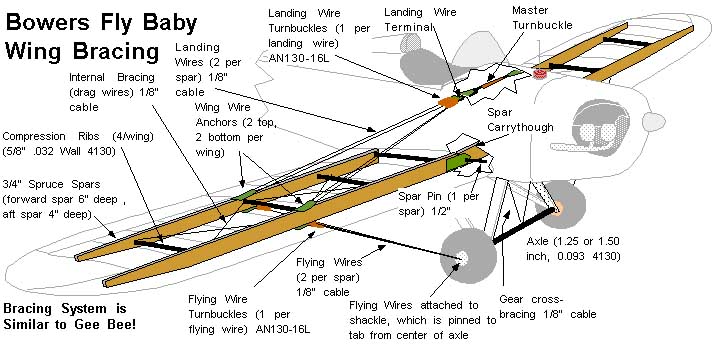
A note or two about the gear in the Fly Baby: The two struts form an inverted "V", with the legs sloping out about 15 degrees from the vertical and the front strut much shorter than the aft one. The "V"s are made up of four laminations in both the front and aft strut...and the laminations are overlapped between the front and rear struts to interlock them. Bowers says the fuselage longerons will yield before the "V"s will, and I believe him.
However, failure of the "V"s can result in much more than a groundloop and a scraped wingtip. The "V"s are a central element in the wing-bracing system...If a "V" breaks in flight, the wings collapse upward.
So the funny area started to weigh heavier in my mind. I still
couldn't accept it as a flaw in the wood...the raggedness appeared to be
paint flaking away, and maybe a little Bondo.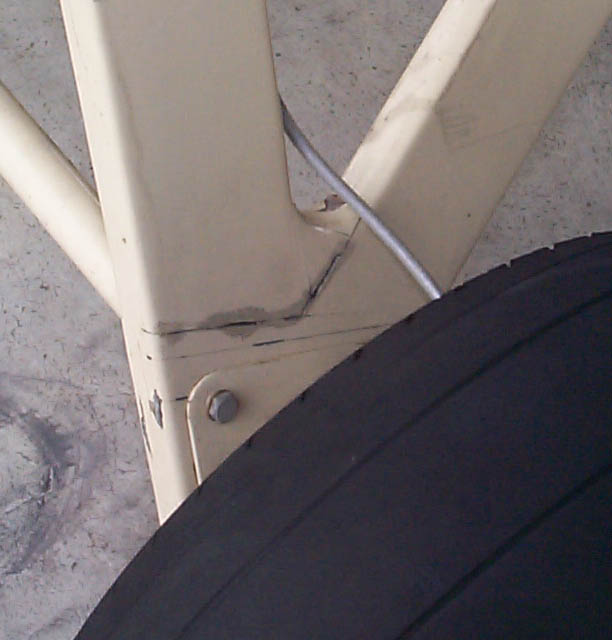
Two weeks ago, I decided to take a closer look. Getting down and peering closely at the area, I realized that a thin extension of the "crease" actually went AROUND the corner of the surface...stopping at the underlying lamination. It looked very much like the crease was a break in the outer lamination of the gear leg. Time to ground Moonraker!
After I got home from the airport, the phone rang. It was David "Nauga" Hyde, in town for a visit. So I picked him up and we went airport crawling.
Nauga brought all his F/A-18 flight test experience into play, and pointed out that the "crack" was *sharp edged*. It didn't look like a break...it looked like a gap had opened between two cut pieces, glued in place.
There is an interesting set of notes in Moonraker's first logbooks. The aircraft is flown regularly by the original builder, then, after June 1983, there is a three-year gap in the entries. A new owner made this notation in June 1986: "In June 1983, he replaced the axle after a hard landing at Paso Robles. The aircraft was then stored in a hangar until it was flown again in June 1986."
So: Moonraker had suffered a hard landing...and then didn't fly for three years. How hard *had* that landing been? Both gear "V"s show some scraping behind the axle position. The scraping probably happened when the axle was removed, but was the removal in question part of the repair...or was the axle wrenched out of place by the hard landing?
And during that three years idle...what sort of repairs were done on the gear legs?
To me, the creasing on the gear legs started to appear like the seventeen-year-old repairs were starting to unravel. The "flaking Bondo" appearance started to make sense...it might well be Bondo, part of the final cosmetic repairs after the structural repairs.
What to do? Well, if there were old repairs there, it didn't make much sense to try to slap on repairs OVER them. I remembered that David Munday had picked up a variety of Fly Baby parts over the years. David had a pair of landing gear "V"s, and offered to ship them to me. So the repair course was obvious: Replace the questionable gear leg with a brand new one.
The following weekend, a couple of airport buddies held their annual hangar cookout. I met Cecil, one of our EAA Chapter's Tech Counselors there, and asked him to take a look.
It's always a joy to watch a master at work. Cecil got low, scraped the area with a fingernail, rubbed his chin, scratched his head, and said, "You've got fiberglass here."
Sure enough, he'd scraped away enough paint to show the distinctive weave pattern of fiberglass cloth, snugged up against the wood.
"In fact, note that there's a whole set of those lines running down the gear leg, spaced about an inch apart. It looks like someone 'glassed down a bunch of fiberglass tapes."
Of course! *That's* what the "cut lines" were...they were just the edges of the tapes. Feeling down the outside of the gear leg, I could feel the increase of thickness underneath the top crease. Oddly enough, there wasn't a corresponding increase on the inside of the leg...I would have wrapped the tapes all the way around.
Yet, that explained how the lines seemed to end at the "first lamination"...the tapes came around the edge, and the repairman had run a single strip of 'glass up the edge of the leg to hold the ends down.
There was no sign of delamination or lifting of the glass tapes...just the epoxy around the edges.
"It's probably not a catastrophic failure," said Cecil, "But you'd probably want to inspect it further just to make sure.
The way things look right now, I probably didn't need to ground the airplane. There's no structural deterioration of the repaired area, just some cosmetic problems. But when I fly, I have enough to worry about with my shaky piloting skills. I'd just as soon not wonder if my inspection of the gear let was good enough. There's a replacement gear leg on the way, and I'm going to use it.
I'll inspect the leg, all right...once I get it off, and can dig into it in the warmth and security of my home workshop. I plan on keeping Moonraker quite a while longer; a month or two on the ground won't matter in the long run.
The Story Thus Far....
A few months back, I announced that I was grounding Moonraker (the Fly Baby I purchased about four years ago) due to some unusual marking that had appeared on one gear leg. The plane had been damaged in a landing accident about eighteen years ago, and my fear was that the repair (whatever it was...the owner didn't document the work in the logbooks) was deteriorating with age.
Basically, a set of horizontal lines had appeared above the plate where the axle bolts to the gear leg. They weren't "cracks"...they were straight lines, across the grain of both legs of the landing gear Vee. That's basically what was throwing me off...cracks I could believe, but these were razor-straight lines. Not only that, but when you looked closer, there were a series of them, about three-quarters of an inch apart. I finally decided it was time to look more closely into the problem when I noticed the lines went AROUND the edge of the gear leg. It wasn't just a cosmetic line in the paint.
Fortunately, David Munday had an extra set of gear legs, which he graciously offered to give me for the price of shipping.
So... I flew the plane one or two more flights to use up the gas, then started looking for a way to hoist up the aircraft. The landing gear is an integral part of the wing bracing system, so whatever I came up with had to work with the fuselage only. The easiest answer was an engine hoist.
I didn't like the idea, though. My plan was to get one of Dave's gear blanks ready, hoist up the plane, take the bad leg off, take it home, match drill it, and take it back to the airplane immediately. The plane might have to dangle from the hoist for a week or so, and I didn't like that idea. I really preferred to have it sitting *on* something rather than just dangling.
I considered building a cradle of 2x4s, or a platform of cinder blocks, both of which I could find a use for at home afterwards.
I discussed it with my flying buddies. Two had engine hoists and offered to lend them. The other had something more...interesting. It was a hydraulic lift table; a steel table about 15"x30" that had an oversized bottle jack underneath and a set of retractable wheels below. It looked like a perfect solution; now I needed to figure out how to lift the airplane on it.
I didn't like trying to lift on the lower longerons; they were curved, and I was afraid something would slip and they'd get damaged. Eventually, I lit upon lifting by the lower engine mount bolts; they both had a big washer at the end, and it looked like if I lifted the plane with wood blocks under the engine mounts, the washers would dig in and lift the airplane.
So I borrowed the table. It was about two inches too tall to run under the fuselage. Agrrrh.
No problem. I picked up some 4x4 and cut some 2' long section. Back to the airport with my floor jack. Jack up one wheel, slide a section of 4x4 into it, then let the jack down and do the same thing on the other side. Enough room now to run the table underneath the plane.
Lifting the plane? A section of 4x4 fix crossways on the tabletop just under the firewall, and sections of 2x4 just about came to the engine mount bolts. As I raised the jack, though, it was obvious that the 4x4 was going to hit the gascolator bowl on the left, the carb-heat manifold on the left, and probably come all too close to the stringers heading back along the bottom of the fuselage.
No problem. The gascolator would have to come off for the annual anyway. The shroud came off easily enough. A bracket still had the potential for interference, but since I had to trim the 4x4 to clear those stringer anyway, I just marked the spot and whipped out my trusty Gerber. After gouging my left hand, thus accomplishing the usual sacrifice to the maintenance gods, I deemed the project ready to start. As it was Saturday, I decided to wait a week to let my knuckle heal up a bit.
As I was preparing to lower the plane, it started rolling forward on the 4x4 blocks it was resting on. I shoved the big 4x4 in front of the side the wheel was closest to coming off. Obviously, when I did this for real, I'd have to make sure the plane didn't move.
A week later, I was rarin' to go. My hangar floor has some extra tiedowns up front from when I shared with a Long-EZ, so I tied the 'Baby's tailwheel fore-and-aft to try to stop it from rolling. Into the cockpit to back off on the master turnbuckle and slacken the wing bracing. Jack up the wheels and put blocks underneath. Slide the table under, slip the now-carved 4x4 and the little 2x4s underneath. Step on the pump a few times, and the 'Baby rose smoothly into the air. Off with the wheel. Cut away the safety wire on the turnbuckles for the cross-bracing between the gear legs, and back them off.
The Vee itself is held in three places: The top of each leg is bolted to the fuselage with a sort of hinge arrangement (U-shaped bracket bolted to the leg, with steel tube bushings welded to the top, matching a similar bracket on the fuselage, with a 3" AN4 bolt slid through like a hinge pin)) and three bolts into a flange welded to the axle itself.
The wheel holder slides over the end of the axle. Disconnect the brake line, letting the fluid drain into a can. Remove the bolt that pins the wheel holder and brake assembly to the axle. The holder has a matching flange on the other side of the gear leg from the axle flange. I started backing off the bolts. They turned reluctantly, and reddish dust drifted downward from the bolt holes.
Finally the bolts came free. They were pretty rusty, from twenty years' direct contact with the wood. I muttered something about installing bushings in the new leg.
Removing the hinge pins at the top was the next step. Unfortunately, they just didn't want to slide out. I resorted to unbolting the U-brackets from the gear legs (with another shower of rust from the bolt holes). Finally, the leg was free to move fore and aft, and I slid it out from the brackets. With no pressure on the brackets themselves, I was able to remove them from the fuselage.
All done, now let's get the new leg ready to go. I laid the old leg atop the new, and match-drilled all the holes. On with two coats of urethane varnish and it's ready for paint.
The paint. Ah, that was an interesting situation. Moonraker is painted with Aerothane, which, nearly two decades after the plane's first flight, still shines like crazy.
However, Aerothane is expensive...$40 per quart, plus shipping. All I needed was a dollop to do one gear leg! Besides, I was having trouble matching the beige the gear legs are painted in. Aerothane comes in about four shades of beige, and I wasn't quite able to figure out which shade the plane used (the logbook identifies the process, but not the colors).
So...off to Home Depot Aerospace. Turns out Rustoleum enamel in "Almond" is pretty darn close. Six bucks. I pick up a couple of rattle-cans of gray primer, and set up my "paint booth."
I haven't painted anything big since the N500F wing repair almost eight years ago. I was now living in a different house; one which actually left room for parking CARS in the garage. So I banished my wife's SUV to the cold and wet, and draped a blue tarp over the side of my POS pickup truck. A rope from the ceiling to a hook temporarily screwed into one leg of the Vee, with a short brad sticking out one end for me to hold it steady while painting. Newspapers on the floor, and the side of the pickup itself (covered with a tarp) for a backcloth.
Back when I'd repainted the wing, I'd used mostly borrowed gear. By now, I owned my own, except for a respirator. I hesitated on buying one (since I was just going to paint a little 3" wide gear leg) but figured I'd go whole-hog.
The rattle-can gray went on, taking a bit of time to dry in the coolness and high humidity in a garage in the fall of the Pacific Northwest. Then I was ready to use the compressor to paint the trim.
I cut the Rustoleum about 40% with thinner, loaded it up into my paint gun, put on my old shop coat and a baseball cap, then set up by the truck.
Mash the button. Paint comes out in a cloud, the Vee rocking in the stream no matter how I hold on to the little brad. I let it spin a bit to try get all sides. Beige fog envelops the garage.
Finally, the first coat is done. I open the door to let the cloud and smell dissipate a bit.
A few things occurred to me, afterwards.
First, I got to thinking that, perhaps, I used a weeeee bit too much pressure in the gun. I hadn't adjusted the compressor from the setting I use to fill tires and clean the shop floor: 100 PSI. I check the manual for the (brand-new) spray gun. Yep, 20 to 40 PSI recommended. Maybe the cloud will be less if I crank down the pressure.
Second, rubber gloves might be a good idea. My left hand, trying to hold Vee steady in a force-ten gale, had a remarkable amount of beige paint on it.
Heading inside to try to scrape the paint off my hand brings a third insight. I'd debated buying a respirator. As it turned out, I apparently hadn't tightened mine quite enough. Beige tracks circled my nostrils and trailed down from either side of my nose, like an art deco Fu Manchu mustache.
Mark Twain once said, "A person who has tried to put a bobcat into a gunny sack knows one thing more than someone who has never tried." I might say the same for people who have never cleaned paint from around their noses with Lava soap.
The Vee was taking a long time to dry in the garage, so I found an open corner inside the house and hung the Vee up to dry. Two evenings later, it was ready for the final coat. Backing off on the pressure did wonders, and I both tightened the straps on the respirator and wore rubber gloves.
A couple more days to dry inside, and it would be ready for installation. It was past the first weekend already, so I planned on getting done for reinstallation on the next one.
That Saturday, I pulled the Vee down from its drying place, and grabbed the end brackets.
They wouldn't side down. I'd partially test-fit them before I'd painted, and had figured they'd open up enough to fit. I'd never worked with steel brackets before, and the aluminum ones on the Nieuport had been pretty obliging. But the 1/8" steel wouldn't budge.
Agrrrh. I took the freshly-painted Vee to the bench sander and set to work. A few minutes later, they were thin enough for the brackets to side into place.
One problem: The bolt holes didn't match.
Agrgggh!
There's a big lesson for homebuilt-aircraft maintainers here. I had read the landing-gear installation instructions from the manual, and nothing had really caught my attention as a potential problem. If I'd originally DONE it myself, I probably would have known: The holes through the legs had been drilled in-place on the airplane. Thus, the holes weren't necessarily exactly perpendicular to the wood. My trying to match-drill the new leg had put the holes even more off than they should be.
If I'd actually built the airplane, I probably would have remembered this. I might even had bought new brackets rather than try reuse the old. I probably would have drilled it in place, again.
But...nothing for it, now. The holes in the aft leg weren't that far off; I'd leave them and try to drill through on the next larger size when I installed them on the plane.
For the front leg, though: epoxy dowels into the bolt holes, let them cure, sand them down, then slide the bracket over the gear leg and drill in place. I oversized-drilled the holes for some bushings while I was at it.
With the bushings in place, it was time to repaint. On with one coat of varnish, rattle-can the primer, then hang to hit it with the color enamel.
Between various work projects, holiday, trips, etc., I wasn't ready to install the leg until this weekend. The top brackets went into the fuselage with about the same degree of difficulty they came out. I slid the wheel holder into place.
AGGRRRHHHHHH! WHY didn't I think of that?
The thicker gear leg didn't just affect the upper brackets. The two axle flanges were held slightly further apart, too. I'd bought slightly longer bolts in anticipation, but that didn't help the bolt that pins the wheel holder to the axle...the hole was about half-diameter out of position.
Back home with the leg. Run the OTHER end through the belt sander, get it thinned down to the same thickness as the old leg. Take it back to the airport for a fit check (getting smarter). It'll slide down to the proper position, now, but I noticed the three bolt-holes that go through the bottom of the Vee to bolt the flanges together are slightly off-position. Relative to both sides.
Oh, well. Right now I've got dowels in those holes, too, with epoxy setting up. Sand it down tonight, varnish it, and hit it with the rattle-can primer on Christmas Eve.
One...more....time.....
Ron "I'm dreaming of a beige Christmas" Wanttaja
(wanttaja@halcyon.com)
Well, it's finally over. My Fly Baby, Moonraker, is no longer a Hangar Queen.
It's been a struggle. To recap, about five months back, I announced that I was grounding Moonraker due to some unusual marking that had appeared on one gear leg. The plane had been damaged in a landing accident about eighteen years ago, and my fear was that the repair (whatever it was...the owner didn't document the work in the logbooks) was deteriorating with age.
I'd obtained a replacement leg through the good offices of David Munday. My plan had been to paint and prep the new leg, jack the plane up, pull off the bad leg, match-hole drill the new one, and install it. Shouldn't take more than one or two weekends.
Along the way, though, I encountered mis-drilled holes, slow-drying paint, ill-matched brackets, and a myriad of unforeseen problems. The two weekends stretched into two months, then on and on. Holidays interrupted my weekends, and a new job started stealing Saturdays as well.
My last posting was just before New Years. Ever the optimist, I felt the worst was over. The new leg had been pared, top and bottom, and the dowels to plug the old drilled holes were curing in a bed of epoxy.
And son of a gun. I was right, this time.
Reinstallation went fairly smoothly. The leg slid into place, the outer axle slid into place and lined up perfectly with its cross bolt into the main axle. Two brackets very much like hinges attach the leg to the fuselage. I slid the hinge bolt through the front bracket, then wiggled the leg to try get the rear one to line up. The "hinge lines" of the two brackets do not align, so it wasn't something I could have set up easily on the workshop. Still, a wooden pin and a rubber hammer helped the rear bolt slide into place. The rear corner of the leg actually went past where the nut was supposed to go, and blocked access to the nut. Rather than pull the whole leg off, I chopped the corner off in place with a small hacksaw. The upper brackets were set.
The new boring bit cut smoothly through the end of the metal plates on either side of the bottom of the leg. I slobbered varnish on the 5/16" bolts and slid them through. Washers, nuts, a little twist with the ratchet, and the bolts were all installed.
Time to reinstall the wheel. Moonraker had been carrying 700x6 tires, a bit small for a plane that relies solely on the tire rubber for absorbing landing shocks. A friend had given me a good set of used 800x6s. I had debated NOT putting them on...I thought, maybe, that I'd want to keep the old tires to be able to more quickly tell if anything had changed relative to the wheel alignment or ground handling.
But Moonraker's left wheel was ALWAYS a bear to re-install. I didn't look forward to having to pull it off again just to put the new tires on. Besides, the annual was due, and I was going to have to pull the right wheel off to repack the bearings, anyway. So on went the new tires.
Finally, the installation work was done. All that was left was to re-tighten the landing gear brace wires and to refill the left wheel brake.
I debated tightening the brace wires while Moonraker was still suspended on the lift table. But they were awkward to get to while the plane still sat with its engine mounts supported by the table. Besides, wiggling the gear showed that the structure was pretty tight already...the trapezoid formed by the fuselage, gear legs, and cross-axle was pretty sturdy, since the axle plates set the angle of the two bottom edges.
I raised the lift table slightly, put blocks under the wheels, lowered the table out of the way, and eased Moonraker back to the asphalt using a floor jack. After three and a half months, the plane finally rested on its own gear again.
Four bracing wires (two per side) run from the upper side of the gear legs to the center of the cross-axle (forming an upside down "W"). I attached a level to the cross axle and held another to the bottom longerons. I tightened the two front turnbuckles, keeping the fuselage bubble at the same position as the axle bubble. I safetied the front turnbuckles, then tighten the two aft ones to approximately the same tension.
That left just the brakes. Moonraker's Goodyears have just a bleeder screw at the wheel, with no built-in provision for pumping the brake fluid from below. Another builder down the way had been successful in filling HIS Goodyears from the master cylinder, then bleeding from below like one does car brakes. I tried that, but the pedal stayed soggy. So I drilled a Zerk fitting out and threaded the end for 10-32. I installed it in place of the bleeder screw, and pumped the brake fluid in with the usual oil-can and hose setup. I quickly swapped the Zerk for the original screw, and the brakes worked perfectly.
The gear work was done...but my annual had expired, in the meantime. So I did the usual annual work, and gave my A&P buddy a call when I'd finished the basic cleaning an scut work. He came, inspected the leg and the rest of the airframe, checked and compression-tested the engine, and signed off the log.
Finally, after two months, I could dig the cowling out of the crawl space and reinstall it. I pulled the tarp off the side of my old pickup...I'd thrown the tarp over the left side of the truck to use it as a backdrop when painting. I threw the cowling into the back of the truck, backed out of the garage...and realized that the right side of the window was awfully beige.
Yep. Overspray from painting the gear leg had curved around the windshield and fogged the side NOT covered by the tarp.
No matter. Five minutes work with a scraper cleared the glass, and off we went to the airport to reinstall the cowling and go fly.
The new, bigger tires definitely affect forward visibility, but I felt no real to the ground handling. Since the engine hadn't run for four months (save a ten-minute ground run prior to the annual) I warmed it up well prior to the takeoff.
The takeoff and climbout was exactly how you'd expect: "Had that vibration been there before? What was that creak? Doesn't it seem like I have to hold more rudder than normal?" It didn't help that I hadn't flown it for over four months.
But, all in all, pretty uneventful. When it came down to brass tacks, the plane handled exactly like it did before. I did one touch-and-go, landed and inspected the gear, then went off for a longer flight to get the engine up to temperature.
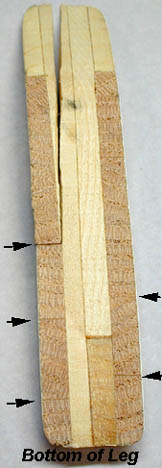 `Tonight, I took
the bandsaw to the old gear leg. What I found jibed exactly with
what the consensus was, regarding the old repair.
`Tonight, I took
the bandsaw to the old gear leg. What I found jibed exactly with
what the consensus was, regarding the old repair.
The two legs of the Vs are interleaved 1/4" laminations of spruce, four on each leg. But the outer two laminations had been removed, replaced with strips of 1/4" oak. Actually, more than the outer two laminations had been removed...there are slight notches in the center spruce laminations, and the oak is slightly thicker than 1/4". The oak itself consists of 3/4" wide segments, butt-joined. One of the center laminations actually terminates about 1.5" from the bottom of the gear leg, with a segment of some other wood (pine?) filling the gap to the bottom of the leg.
Repaired to AC43-13? No. Airworthy...well, there seemed to be little wrong, structurally, with the repair. The area is mostly under compression, so the butt-joints probably make little difference. The visible lines were the edges of the oak strips, though, so something...epoxy, bondo, whatever...had been flaking out.
No matter. It's fixed now. I can go back to worrying about my OWN clumsy flying, rather than fretting about some funny lines on my gear leg...:-)
Ron Wanttaja
wanttaja@halcyon.com
http://www.halcyon.com/wanttaja/
Comments? Contact Ron Wanttaja.
