Last year, I noticed that my starter was spinning the engine slower and slower. It was acting just as if the battery was slowly losing capacity. As my battery was several years old, I anticipated that this was the problem and replaced it.
However...it didn't help. Finally, it got to the point where the starter could barely turn the engine. Oddly enough, my timing my pulls on the cable, I was able to rock the prop back and forth until it had gained enough momentum to flip past the compression stroke. My engine is *very* easy-starting, and that was usually enough to get it going.
Still, it was not a state of affairs that could be allowed to continue. I considered biting the bullet and buying one of the fancy lightweight starters available for these engines... though they cost $500 and up, they apparently really spin the engine over.
But there was a problem. Both B&C and Skytec offered starters for my engine, but they required the engines be converted to key-start first. As part of the conversion, a pilot shaft in the engine accessory case would have to be cut away. They gave instructions for how to do this with the engine still in place on the airplane...but I was uncomfortable with the procedure. You had to apply clay and cardboard dams to keep from dropping metal bits into the innards of the engine. Obviously, if I had the engine apart, I'd made that modification in a flash. But I didn't want to take the chance with my otherwise-good engine.
Fortunately, one of the guys on the Fly Baby mailing list suggested it was the starter clutch. I bit the bullet, ordered a rebuilt one from Niagara Air Parts, and installed it. Problem solved!
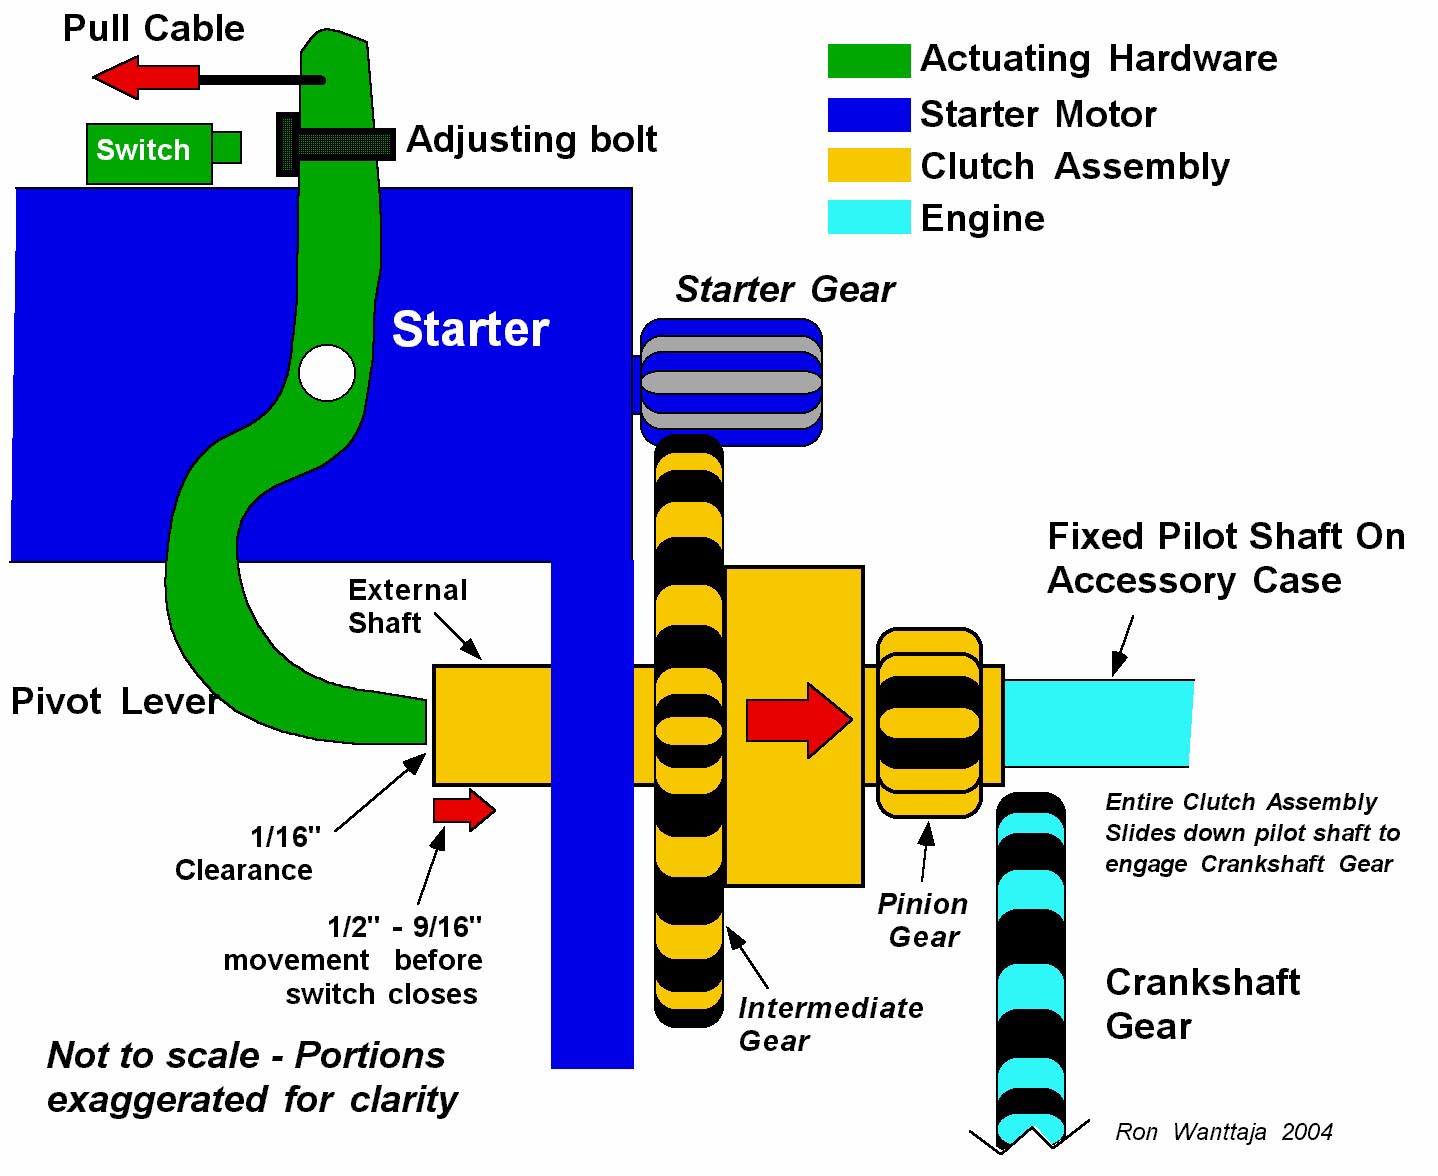
The figure below is a schematic of the system. When the pilot pulls the starter T-handle, the cable pulls the Pivot Lever back. The Pivot Lever does two things: It shoves the clutch assembly (consisting of an intermediate gear that is engaged with the starter-motor gear and a pinion gear) inward along the affore-mention pilot shaft fixed to the engine until the pinion gear engages the rankshaft gear, and it closes an electrical switch that applies power to the starter motor.
The starter switch is a triangular device (instead of the box shown above) held to the starter by two screws. One side of the triangle has the mounting stud for the aircraft power. The other side has a plunger switch that is contacted by the adjusting bolt on the Pivot Lever.
First thing, ensure you've actually got 12 volts being delivered to the switch...clip the red lead of a voltmeter to the stud on the switch and the black lead to a convenient ground. It should read the full battery voltage.
Stand clear of the prop, and depress the plunger itself with your fingers. If the starter spins, you need to run the adjustment procedure. If the starter doesn't turn, either the switch is bad or the starter itself if burned out. If the starter doesn't turn, disconnect the starter power cable and remove the two screws that hold the switch onto the starter.
Take the switch off the starter, turn it over, and examine the contacts. These are pretty big hunks of copper. If they're pitted and burned, it might explain why power isn't getting to the starter.
Here's what Harry Fenton had to say about the switch on his C-125:
"In troubleshooting my starter problem on the C125, I found that the faces of the contact blocks were severely worn, about 1/2 of the stud block was gone and about 1/3 of the button contact face was gone. Additionally, the end of the actuating arm that pushed the clutch in was peened over and the arm itself was bent. "In less-severe cases, Harry says "I'm told that the cure is to pop off the little cap that covers the contact blocks and simply invert the blocks to restore clearances. Apparently, new blocks are not available, but somehow the existing ones can be flipped over to get another 50 years of service life."
The problem is basically caused by bad clutch adjustment. Before running the adjustment procedure, though, the internal components should be inspected for damage. This includes the pinion gear on the clutch, the crankshaft gear on the engine, and the pilot shaft. The starter must be removed to be make this inspection, but that's relatively straightforward.
If the parts look good, run the adjustment procedure.
The contacts in the switch can wear, and change the relationship of the switch and the gear-pusher that may keep your starter from working. To quote Harry Fenton again:
"The plunger switch is pretty crude- basically two copper blocks that get pushed together when the plunger is depressed. A spring beneath the plunger pushes it upwards at rest and keeps the two blocks separated. From what I'm told, the copper blocks sometimes wear, which means that the actuating arm needs to travel further to engage the plunger switch. If the blocks are worn enough, the pinion gear may bottom out in the engine before the plunger switch is depressed to make contact to engage the motor. Hence, nothing happens when the starter cable is pulled.So there's a chance your clutch slipping could just be adjustment... run the adjustment procedure."The bottom side of the stud that the power cable attaches to is wedged shaped. The spring loaded button is also has a wedge shaped feature, and when the bottom is depressed the two wedge shaped surfaces make contact, completing the circuit to the motor.
However, if the procedure doesn't help, you've probably got a cracked clutch body. The external shaft is actually an outer section around a central shaft...the pivot arm contacts the central shaft. If the clutch is good, the outer/inner parts move together. In my case, though, the pivot lever shoved the central shaft inward WITHOUT moving the outer section. I suspect this is a symptom of a cracked clutch body, since that's what Niagara said was wrong with mine. Replacement is the only fix. Niagara charges about $450 for a clutch, including a $150 core charge. If your clutch does have a cracked body, you'll only get half the core charge back.
There is a positioning relationship between the arm that actuates the solenoid and pushes the pinion for the starter clutch into the cam/starter gear in the engine. In short, when the starter cable is pulled, the arm needs to push the starter clutch pinion in 7/16" before the opposite end of the arm pushes the switch plunger down to engage the starter motor.Here is the correct set up:
- Remove the power cable from the starter!! During the course of adjustment it is possible to engage the starter if power is applied.
- The starter pinion (labeled external shaft in the illustration), needs to be pushed in by the actuating arm 7/16" before the bolt at the top of the actuating arm contacts the starter plunger switch. Full travel of the starter pinion shaft is 9/16".
- Loosen the pull cable connection on the arm and adjust the travel with the bolt at the top of the actuating arm.
- Push the starter pinion shaft into the engine 7/16". The actuating arm should contact both the end of the pinion shaft and the top of the starter plunger button.
- Once the arm travel is adjusted, the cable needs to be adjusted so that there is 1/16" freeplay between the end of the actuating arm and the pinion shaft. The actuating arm should be touching, but not engaging the starter plunger switch.