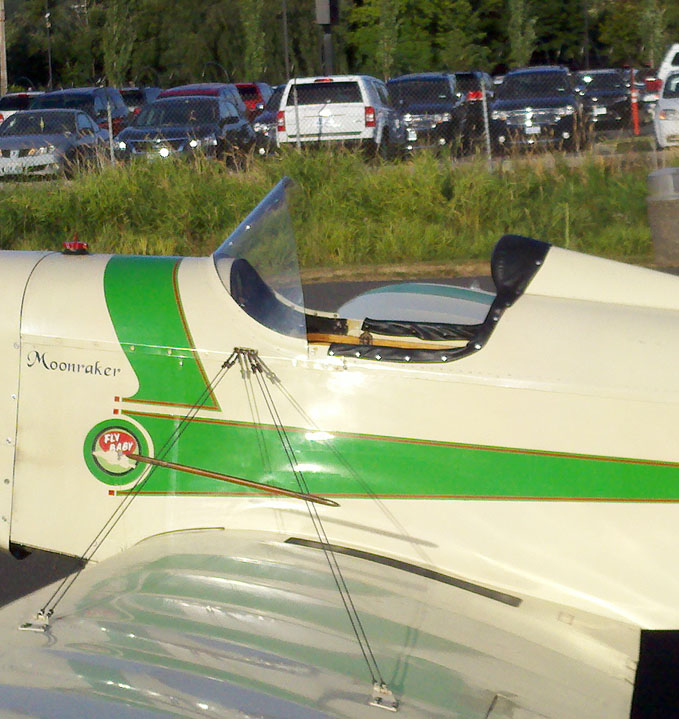
As most of you know, I'm a rather
large man. Coupled with my ongoing knee problems, this has
made ingress and, especially, egress from my Fly Baby
increasingly difficult. I've made a lot of changes to the
aircraft in the last year and a half, mostly aimed at making the
plane more comfortable.
Still, there was one thing I missed. And I think it's going to turn out to be pretty useful.
Been working on the padding for my "ejection seat" lately. On the advice of a physical therapist, I added increased padding on the seat bottom and am "sculpting" it to give better support.
I got in the airplane last week to test the new padding. The therapist mentioned that bad support in one area can result in pain in an apparently-unrelated one, so I did a "full body" check as I sat there.
Hmmm. My shoulders were really compressed, pinched tight by the coaming (the cockpit opening).
Too much padding? I crawled out, measured the distance from the upper longerons to the top of the padding, then stuck my old seat back in.
Less than a half-inch difference.
I then started to realize that this had been a long-time problem. That I'd been ignoring.
You see, I've got very broad shoulders. About 25 years ago, my company was doing an ergodynamic study related to Space Station design. They ran a bunch of us through a special machine that measured many body dimensions (anthropometric measurements). My shoulder width came out in the greater than 99th percentile...in other words, my shoulders were wider than more than 99% of the adult males in America. Can't remember the exact measurement, something like 21 inches.
The upper longerons on the Fly Baby fuselage are 24.25" apart, outside measurement. The longerons are 3/4" square, there's 1/8" plywood on the inside, so that still gave me more than 22 inches.
However, this doesn't take into account the coaming. The coaming is the opening in the turtledeck for the pilot. The stock open shape, viewed from above, is a semi-circle with the curved part facing aft. On a Fly Baby, the coaming opening is reinforced with wood. Since it's a complex curve, the builder constructs the coaming reinforcement with multiple laminations of 1/8" plywood.
The problem is, the curved shape makes the cockpit opening
narrow towards the back. It doesn't affect things is you
sit very low in the cockpit, but if you're tall or sit a bit
higher, your shoulders or upper arms are constricted by the
opening. And if your shoulders are wide, it can cause some
problems.
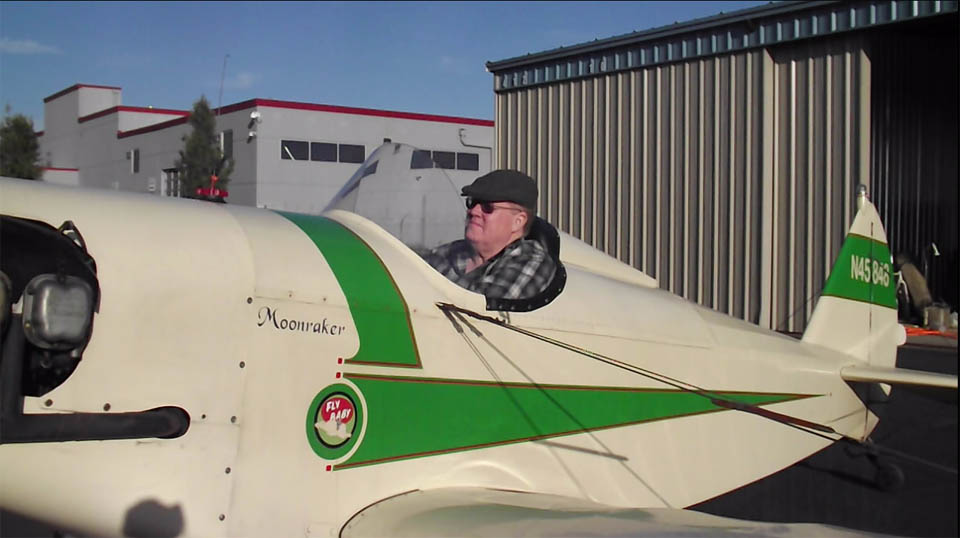
I'd realized that I'd had those problems for a while. Folks had sent pictures of me in my airplane, and I'd noticed that the coaming would be pinching my flying jacket. Even without the jacket, the coaming was tight. Notice how my left shoulder is hunched forward, in the photo above
And worst of all, my wife bought me a beautiful reproduction B-3 flying acket a few years back (the real thick shearling coat, with the broad turnback collar) and it was so tight in the cockpit I couldn't fly comfortably wearing it. B-3 jackets are kryptonite for wind: NOTHING gets through them.
When I thought about it more, I realized how that tight coaming was affecting my posture in the airplane. I couldn't sit comfortably back on the seat, I was always hunched forward. The seatback on my new seat had INVERSE lumbar support, to let my rump go back further (for leg room) while my shoulders hunched forward.
So: That coaming had to be modified. I had seen numerous Fly Babies with more generous cockpit openings over the years, but my particular inspiration was Russ Sharp's:
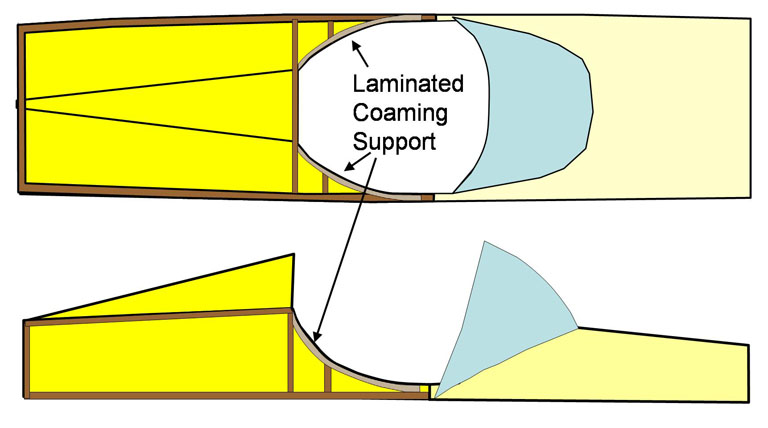
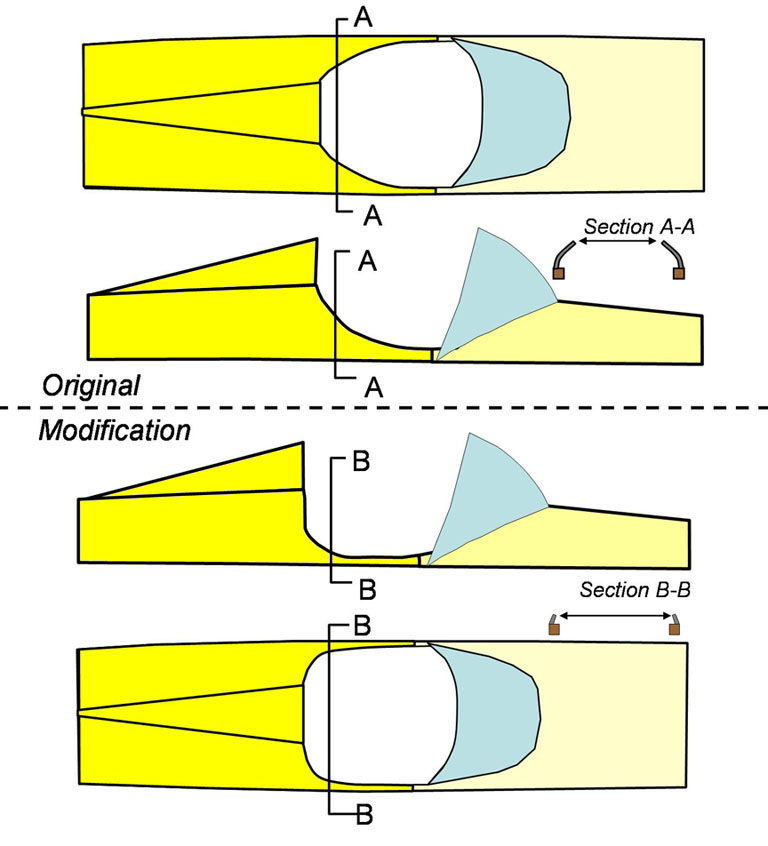
The only thing I wanted different was just a little curvature in the back, rather than squaring off the rear opening. Here's the basic drawing I came up with, comparing the previous coaming to my planned modification:
The darker yellow was the removable turtledeck section...and the
first step was to remove it from the aircraft and place it on a
work table for easy access. After removing the vinyl
padding cover, I contemplated the laminated reinforcement.
It was attached to the other parts of the structure only at the
start and end of its arch. I decided to leave the portion
glued to the turtledeck base and a short section at the bulkhead
which had a snap for the vinyl cover (which I hoped to be able
to re-use).
But how to cut it away? My Dremel has a fairly nice cutting blade, but this wood was almost 3/4" thick and the Dremel couldn't handle it. I pulled out a small hobbyist razor saw, but a few minutes work convinced it'd take forever and a day.
Damn. What I needed was a BIG Dremel.
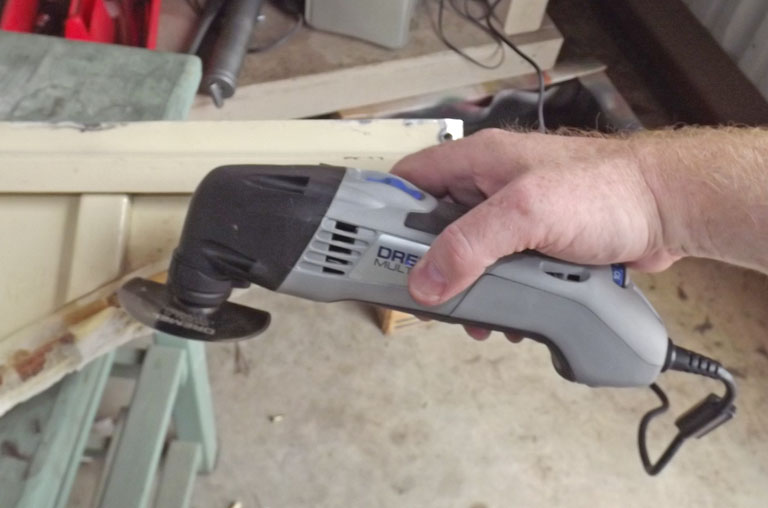 I went to the local hardware store to see what
options I had...and found out that the company MADE a "big
Dremel": The Dremel Multi Max.
I went to the local hardware store to see what
options I had...and found out that the company MADE a "big
Dremel": The Dremel Multi Max.
It had an interesting approach. Instead of spinning a circular saw blade, it used a half-circle blade and vibrated it back and forth. The blade could be installed at almost any angle to accommodate awkward locations.
What the hey: I dropped the Mastercard on the counter, and bought one ($85).
And, you know, it did the trick. It was pretty fast, but it was slow enough that I could carefully monitor the cut to keep from cutting through into the aluminum.
Soon I had the wood cut away. So, what do I do about a pattern for the cut?
I had brought some brown wrapping paper, but it really was a hassle. I needed to trace the shape of the structure first, but getting it to lie flat inside the coaming was a real pain. The heck with it...freehand!
The beige paint of the turtledeck was a perfect medium. I laid a wooden ruler along the top of the turtledeck base and traced the horizontal part. I measured two inches out from the bulkhead on the aft side, and would trace a line down from the remaining bit of wood and snap.
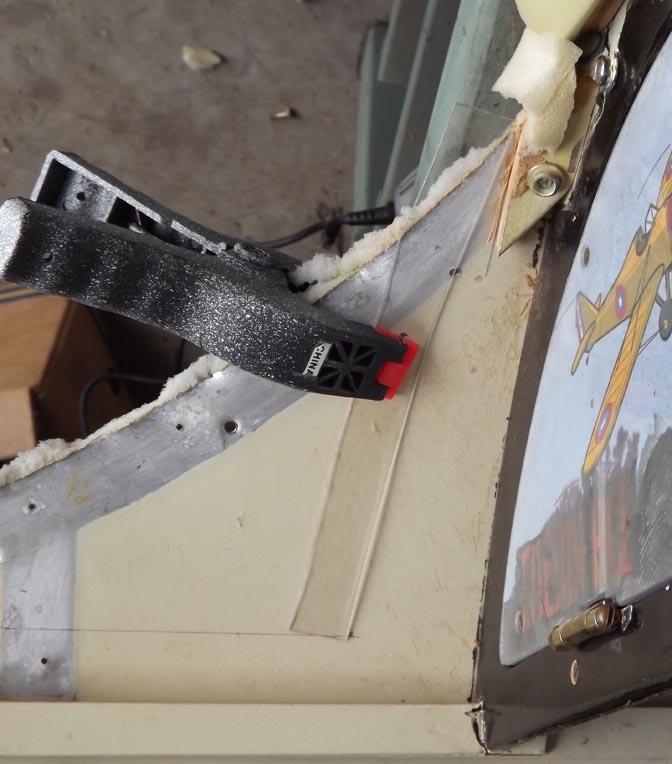
Hmmm. how to trace this line over a curving surface? I dug up a bit of the clear plastic wallpaper corner protector I used to make my Proshold gap seals, cut of one edge, and clamped it in place:
I wanted the intersection to be a gradual curve, so I used the classic Fly Baby drawing compass for a pattern: A half-used roll of duct tape.
I'd bought a new set of aviation snips at the hardware store (wanted them new and sharp) and got to work. As I neared the curve, I realized that this was still a bit too tight with the shears and the 0.040 aluminum on the turtledeck, so I cut the curve a bit broader.
Turned out pretty good. This picture shows the new cutout near the camera, with the far side yet unmodified.
Back onto the bench, and back at it again.
The first side came up with a pretty good cut, but the second side was absolutely horrid. Very rough cut, quite jaggy, and the metal bent over. Wasn't sure what went wrong. I worked on it a bit, but finally realized that cosmetics didn't really matter...the area was going to be covered by a padded cover anyway. So I smoothed edges and bent things
back a bit.
As mentioned, the original coaming reinforcement was multiple laminations of 1/8" plywood. I didn't think I'd need that in this case, the new flat part of the coaming paralleled the turtledeck base and a straight piece of wood would do the business, there. I figured the aft section wouldn't see much stress and didn't need the reinforcement.
So, throw the turtledeck into the car (bless hatchbacks with folding seats), stop by Lowes' Aerospace for a bit o' Fir, and home to where the table saw lay waiting.
I brought the Mini Max home as well. The front part of the old coaming was still attached to the base, and I needed to shape it so I could add the new Fir strip up close. But as I worked on it a bit, I realized the old bit was loose...it wasn't glued, just held on to the metal with the same #2 screws the rest of the coaming had, and a couple of nails into the base. Off the old bits came.
I protractor showed that the coaming aluminum came in at about a
75 degree angle, so I cut the bottom of a long strip of Fir off
at that angle. I laid it in place, and traced out the top
so it was ~1/8" above the cut metal. Cut, sand, and test
fit the pieces into place:
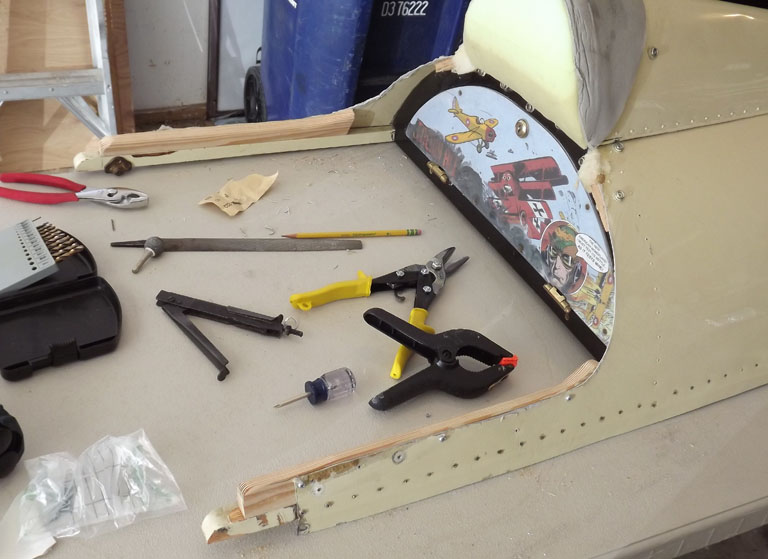
Take 'em out, varnish them, paint them beige to match the existing color, and reinstall with #4 screws. These are actually pretty important, as they're my hand-holds when I get in and out. I didn't use
nails into the base, but installed some #8 wood screws from below, counter-sunk so the base still rested flat on the upper longerons.
Finally, the vinyl cover. I had had this made just last year, and it fit smoothly on the old opening. But the new opening was shaped different; it was a near-right angle instead of a diagonal curve. I was *very* worried about how it'd fit.
The center part (at the headrest) wasn't changed, so I started there. I noticed the little blocks of leftover wood with the snaps (first contact outside the headrest) were a bit loose. There was plenty of slack on the cover, so I removed the blocks and installed snaps directly on the rear bulkhead. I eased the "arms" of the cover along the new edge of the coaming to determine how far the sides could reach, then added snaps to the Fir strips to match the spacing.
This left only the aft curved section. How to attach the snaps? There wasn't any wood to screw the bases in to. I bought snap bases with holes rather than screws, and found that a 5/32" pop rivet fit through the hole. The manufactured head stayed above the end of the rivet, but a quick bit of experimentation seemed to indicate this wouldn't be a problem.
However, when I actually put them on the Turtledeck, the manufactured ends refused to accept a snap. Obviously, the end of the snap base was being distorted by the riveting tool. I drilled them out, sanded down the rim of the rivet so it fit INSIDE the snap, and re-installed. Worked fine.
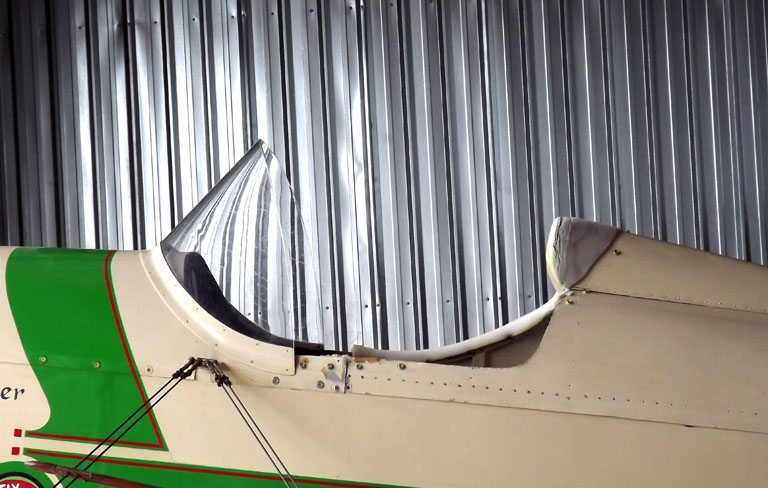
And...here's how it turned out:
The vinyl cover is horribly wrinkled. I may have a new one
made this winter...or maybe not. I *am* a cheap SOB.
One bad feature is that the cover got, essentially, shortened by having to take the angle rather than the diagonal curve down. You can see the beige paint, between the end of the cover and the start of the windshield. This area was covered, before.
Though I recently realized a nickel or so of black paint would go a long way toward hiding this....
I managed a quick test flight on Thursday. Amazingly better around my shoulders. No more hunching! I had added lumbar support to the seat in anticipation (remember, before it arched AWAY from my back) and the back was very comfortable.
Getting out was a LOT better. Before, I had to grab the coaming at the front of the section, to push down on the part where the coaming reinforcement was directly against the turtledeck base. I had to basically brace myself against the headrest and "caterpillar" upward. Now, I can slide my hands aft, and support myself directly along my centerline. The support is a lot easier.
Yes, it was a bit breezier around the shoulders. But that's why I wear a leather jacket, when the weather gets cool.
I really like the mod...we'll see how it ultimately turns out.
Ron Wanttaja
Still, there was one thing I missed. And I think it's going to turn out to be pretty useful.
Been working on the padding for my "ejection seat" lately. On the advice of a physical therapist, I added increased padding on the seat bottom and am "sculpting" it to give better support.
I got in the airplane last week to test the new padding. The therapist mentioned that bad support in one area can result in pain in an apparently-unrelated one, so I did a "full body" check as I sat there.
Hmmm. My shoulders were really compressed, pinched tight by the coaming (the cockpit opening).
Too much padding? I crawled out, measured the distance from the upper longerons to the top of the padding, then stuck my old seat back in.
Less than a half-inch difference.
I then started to realize that this had been a long-time problem. That I'd been ignoring.
You see, I've got very broad shoulders. About 25 years ago, my company was doing an ergodynamic study related to Space Station design. They ran a bunch of us through a special machine that measured many body dimensions (anthropometric measurements). My shoulder width came out in the greater than 99th percentile...in other words, my shoulders were wider than more than 99% of the adult males in America. Can't remember the exact measurement, something like 21 inches.
The upper longerons on the Fly Baby fuselage are 24.25" apart, outside measurement. The longerons are 3/4" square, there's 1/8" plywood on the inside, so that still gave me more than 22 inches.
However, this doesn't take into account the coaming. The coaming is the opening in the turtledeck for the pilot. The stock open shape, viewed from above, is a semi-circle with the curved part facing aft. On a Fly Baby, the coaming opening is reinforced with wood. Since it's a complex curve, the builder constructs the coaming reinforcement with multiple laminations of 1/8" plywood.
I'd realized that I'd had those problems for a while. Folks had sent pictures of me in my airplane, and I'd noticed that the coaming would be pinching my flying jacket. Even without the jacket, the coaming was tight. Notice how my left shoulder is hunched forward, in the photo above
And worst of all, my wife bought me a beautiful reproduction B-3 flying acket a few years back (the real thick shearling coat, with the broad turnback collar) and it was so tight in the cockpit I couldn't fly comfortably wearing it. B-3 jackets are kryptonite for wind: NOTHING gets through them.
When I thought about it more, I realized how that tight coaming was affecting my posture in the airplane. I couldn't sit comfortably back on the seat, I was always hunched forward. The seatback on my new seat had INVERSE lumbar support, to let my rump go back further (for leg room) while my shoulders hunched forward.
So: That coaming had to be modified. I had seen numerous Fly Babies with more generous cockpit openings over the years, but my particular inspiration was Russ Sharp's:
The only thing I wanted different was just a little curvature in the back, rather than squaring off the rear opening. Here's the basic drawing I came up with, comparing the previous coaming to my planned modification:
But how to cut it away? My Dremel has a fairly nice cutting blade, but this wood was almost 3/4" thick and the Dremel couldn't handle it. I pulled out a small hobbyist razor saw, but a few minutes work convinced it'd take forever and a day.
Damn. What I needed was a BIG Dremel.
I went to the local hardware store to see what
options I had...and found out that the company MADE a "big
Dremel": The Dremel Multi Max.It had an interesting approach. Instead of spinning a circular saw blade, it used a half-circle blade and vibrated it back and forth. The blade could be installed at almost any angle to accommodate awkward locations.
What the hey: I dropped the Mastercard on the counter, and bought one ($85).
And, you know, it did the trick. It was pretty fast, but it was slow enough that I could carefully monitor the cut to keep from cutting through into the aluminum.
Soon I had the wood cut away. So, what do I do about a pattern for the cut?
I had brought some brown wrapping paper, but it really was a hassle. I needed to trace the shape of the structure first, but getting it to lie flat inside the coaming was a real pain. The heck with it...freehand!
The beige paint of the turtledeck was a perfect medium. I laid a wooden ruler along the top of the turtledeck base and traced the horizontal part. I measured two inches out from the bulkhead on the aft side, and would trace a line down from the remaining bit of wood and snap.
Hmmm. how to trace this line over a curving surface? I dug up a bit of the clear plastic wallpaper corner protector I used to make my Proshold gap seals, cut of one edge, and clamped it in place:
I wanted the intersection to be a gradual curve, so I used the classic Fly Baby drawing compass for a pattern: A half-used roll of duct tape.
I'd bought a new set of aviation snips at the hardware store (wanted them new and sharp) and got to work. As I neared the curve, I realized that this was still a bit too tight with the shears and the 0.040 aluminum on the turtledeck, so I cut the curve a bit broader.
Turned out pretty good. This picture shows the new cutout near the camera, with the far side yet unmodified.
Back onto the bench, and back at it again.
The first side came up with a pretty good cut, but the second side was absolutely horrid. Very rough cut, quite jaggy, and the metal bent over. Wasn't sure what went wrong. I worked on it a bit, but finally realized that cosmetics didn't really matter...the area was going to be covered by a padded cover anyway. So I smoothed edges and bent things
back a bit.
As mentioned, the original coaming reinforcement was multiple laminations of 1/8" plywood. I didn't think I'd need that in this case, the new flat part of the coaming paralleled the turtledeck base and a straight piece of wood would do the business, there. I figured the aft section wouldn't see much stress and didn't need the reinforcement.
So, throw the turtledeck into the car (bless hatchbacks with folding seats), stop by Lowes' Aerospace for a bit o' Fir, and home to where the table saw lay waiting.
I brought the Mini Max home as well. The front part of the old coaming was still attached to the base, and I needed to shape it so I could add the new Fir strip up close. But as I worked on it a bit, I realized the old bit was loose...it wasn't glued, just held on to the metal with the same #2 screws the rest of the coaming had, and a couple of nails into the base. Off the old bits came.
Take 'em out, varnish them, paint them beige to match the existing color, and reinstall with #4 screws. These are actually pretty important, as they're my hand-holds when I get in and out. I didn't use
nails into the base, but installed some #8 wood screws from below, counter-sunk so the base still rested flat on the upper longerons.
Finally, the vinyl cover. I had had this made just last year, and it fit smoothly on the old opening. But the new opening was shaped different; it was a near-right angle instead of a diagonal curve. I was *very* worried about how it'd fit.
The center part (at the headrest) wasn't changed, so I started there. I noticed the little blocks of leftover wood with the snaps (first contact outside the headrest) were a bit loose. There was plenty of slack on the cover, so I removed the blocks and installed snaps directly on the rear bulkhead. I eased the "arms" of the cover along the new edge of the coaming to determine how far the sides could reach, then added snaps to the Fir strips to match the spacing.
This left only the aft curved section. How to attach the snaps? There wasn't any wood to screw the bases in to. I bought snap bases with holes rather than screws, and found that a 5/32" pop rivet fit through the hole. The manufactured head stayed above the end of the rivet, but a quick bit of experimentation seemed to indicate this wouldn't be a problem.
However, when I actually put them on the Turtledeck, the manufactured ends refused to accept a snap. Obviously, the end of the snap base was being distorted by the riveting tool. I drilled them out, sanded down the rim of the rivet so it fit INSIDE the snap, and re-installed. Worked fine.
And...here's how it turned out:
One bad feature is that the cover got, essentially, shortened by having to take the angle rather than the diagonal curve down. You can see the beige paint, between the end of the cover and the start of the windshield. This area was covered, before.
Though I recently realized a nickel or so of black paint would go a long way toward hiding this....
I managed a quick test flight on Thursday. Amazingly better around my shoulders. No more hunching! I had added lumbar support to the seat in anticipation (remember, before it arched AWAY from my back) and the back was very comfortable.
Getting out was a LOT better. Before, I had to grab the coaming at the front of the section, to push down on the part where the coaming reinforcement was directly against the turtledeck base. I had to basically brace myself against the headrest and "caterpillar" upward. Now, I can slide my hands aft, and support myself directly along my centerline. The support is a lot easier.
Yes, it was a bit breezier around the shoulders. But that's why I wear a leather jacket, when the weather gets cool.
I really like the mod...we'll see how it ultimately turns out.
Ron Wanttaja
 Return to the Tech Page