Rotating Fly Baby Tires
Posted September 2005
Tires on many aircraft do not wear evenly. On Cessnas, for instance,
the tires are hanging at the end of a spring-steel strut, and the tire's
vertical axis orientation depends on how much load is on the gear.
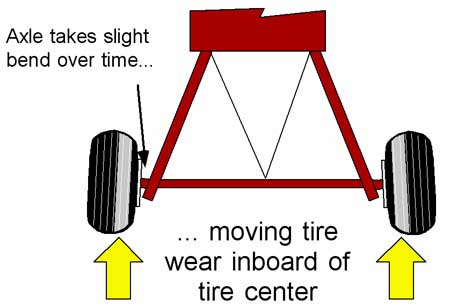 Fly Babies, while
they have stiff landing gear, see the same sort of wear. Due to both
landing loads and the pull from the flying wires, the ends of the axles
tend to bend upwards slightly. This makes the inside of the tires
wear faster than the outside.
Fly Babies, while
they have stiff landing gear, see the same sort of wear. Due to both
landing loads and the pull from the flying wires, the ends of the axles
tend to bend upwards slightly. This makes the inside of the tires
wear faster than the outside.
This is pretty common in Fly Babies...and doesn't seem to cause any
problems. The axle bends a bit, and tends to keep the new angle.
If you just swap the entire wheel assembly from left to right, you
don't gain much. The same side of the tire is still on the inside,
hence a similar wear pattern continues.
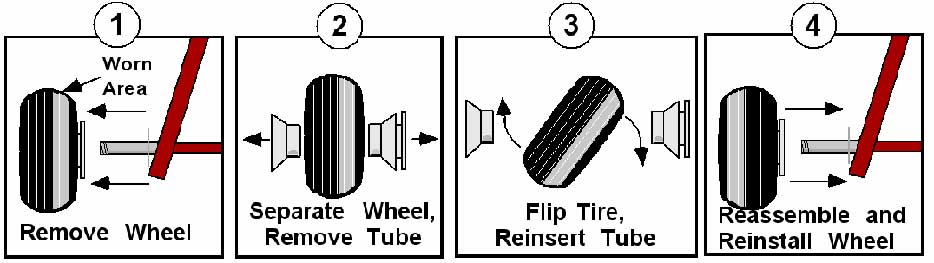
To maximize your tire life, you need to remove the wheel from the airplane,
disassemble the wheel, remove the tube, then flip the tire over and reassemble
with the more-worn section to the OUTSIDE of the wheel.
If the tube gets pinched anywhere when you put the wheel back
together, it'll develop a leak. Reassembly is best accomplished
with clouds of talcum powder (e.g., "baby powder") as a lubricant.
Shoot the inside of the tire with the powder, then stick the tube
back in. Make sure the inner radius of the tube is nice and
powdery, then reassemble the wheel. Shift things around as the
wheel's mating surfaces rejoin to make sure you aren't pinching the
tube.
Attach the two wheel halves together (with the bolts, snap rings,
etc.) then *partially* inflate the tube. Then deflate it, install
the valve core, and run the pressure up to normal. With the talcum
powder inside the tire, this'll let the tube shift slightly if it's
a bit off-center.
While you have the wheel off the airplane, you might as well grease
the bearings. Real mechanics have a fancy bearing greaser.
The rest of the skinned-knuckle brigade gets by with a tub of bearing
grease from the local NAPA store.
Clean off the exterior of the bearing and set it on a clean paper towel
with the wider-diameter side up. Grab a dollop of grease and put
it in the palm of your left hand (or right hand, if you're left handed).
Then pick up the bearing with your clean (clean? Ha!) hand andshove
the tapered part of the bearing (where all the little rollers are) into
the grease in your palm. You're trying to shove grease into the gaps
on the sides of the rollers. Rotate the bearing slightly, and shove
a new section into the grease. Work your way around (you might have
to renew...or at least, re-pile...the grease in your palm), then re-install
the bearing.
Tire Rotation - Step by Step
Here's a step-by-step procedure for tire rotation, specifically for the
Fly Baby:
-
Drop bolts through the extra holes in the master turnbuckle straps.
The straps come through the holders on either side of the instrument panel,
and if the plane is built stock, there are extra holes in the straps just
inside the holders. Dropping bolts through these holes ensure that,
if the Master Turnbuckle is loosened TOO far and separates, the wings don't
crash all the way to the ground.
-
Loosen the Master Turnbuckle until the flying wires (the wires UNDER the
wing) are somewhat loose.
-
Remove the clevis pins in the axle shackles. If too tight to move,
loosen the Master Turnbuckle a bit more.
-
Move the flying wire assembly outboard get it clear of the working area.
-
Chock both wheels
-
Slide a floor jack under the axle closest to the wheel to be removed.
-
Protect the axle from the shoe of the jack (I use a scrap piece of wood)
and jack the wheel up until just clear of floor.
-
Remove wheel
-
Disassemble wheel
-
Remove tube
-
Re-insert tube so that the step is on the OPPOSITE side of the tire
-
Reassemble wheel
-
Install wheel
-
Lower aircraft
-
Move jack to opposite side
-
Repeat procedure on other wheel
-
Lower aircraft
-
Remove jack
-
Move flying wires back into position. Ensure they are running straight
and are not kinked.
-
Re-install the clevis pins on both flying wire shackles. I use a
heavy Phillips screwdriver to get things aligned to insert the clevis pins.
-
Install the safety pin/cotter pin on the flying wire shackle clevis pins.
-
Re-ensure the flying wires are not in a position where they'll kink.
-
Tighten the Master Turnbuckle as far as you can. Best tool I've found
is a spare allen wrench...they don't bend, like nails will. As you
tighten it, take a gander under the wing to ensure the flying wires are
OK.
-
Remove the safety bolts installed in step 1
-
Stick the Master-Turnbuckle-tightener into your pocket.
-
Go fly
-
At safe altitude away from traffic, tighten the Master Turnbuckle some
more. You'll probably get at least a quarter-turn additional.
-
Land, and re-install whatever safety device was there to stop the Master
Turnbuckle from rotating on its own.
Comments? Contact Ron Wanttaja
.
 Return
to The Stories Page
Return
to The Stories Page