With my plane laid up awaiting exhaust
system repairs, I figured I'd work on modifying the cockpit to give me
a bit more legroom.
My old seatback was comfortable, but I didn't like what it was doing to the face of the STA 5 bulkhead. It came up from the cockpit floor to just below the turtledeck door, and getting in and out of the airplane was scratching the top arc of the bulkhead despite some protection I'd installed.
John Wells had a great suggestion that killed two birds with one stone: Install a brace across the BACK of the STA 5 bulkhead, and shorten the seatback so if fits WITHIN the opening, resting on the new brace. This not only let the seatback go back another inch, but put the seatback on a piece of expendable wood that could be occasionally replaced if it got scratched up too much.
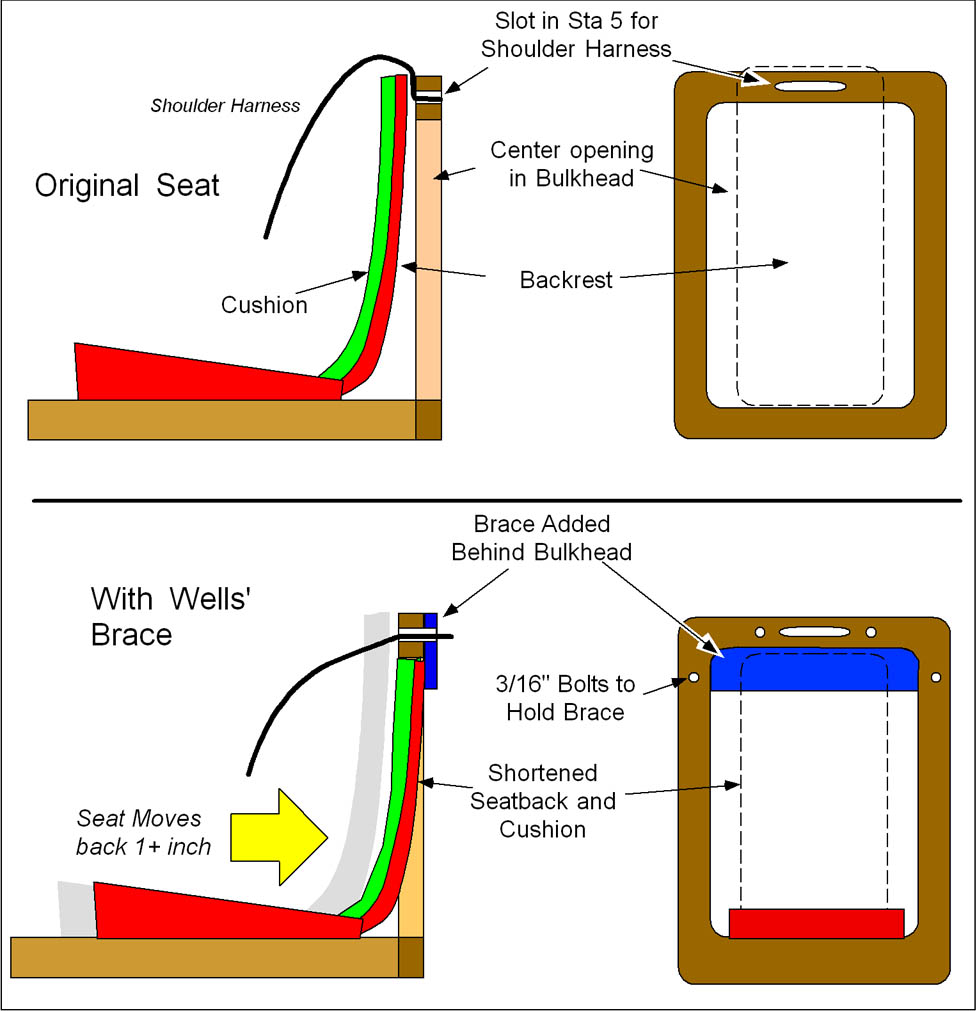
While the top of the STA 5 bulkhead is always the hard-limit as to how far the pilot can move back, with an inch or so of foam on the recessed seat back, that brings the pilot's back flush with the top of the bulkhead.
I made the brace out of a piece of three-quarter-inch 3 1/2"x 24" oak I bought at Lowes Aerospace for about five bucks. I wanted the board to fit flush against the top of the STA 5 bulkhead. This took a bit of weird cutting, since that area is the joining location for the top longerons as well as the top and side diagonals. It took a bit of trial-and-error, but I finally figured out the right dimensions:
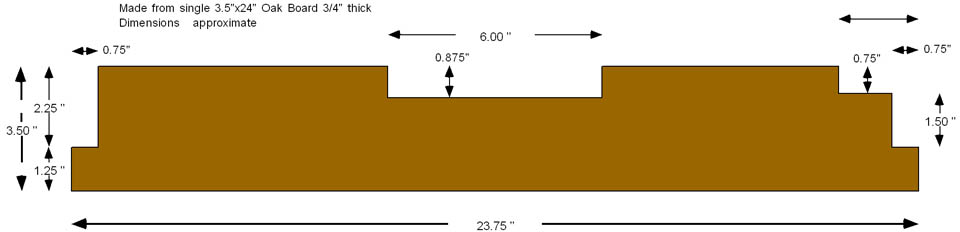
The big center notch is to clear the area where the seat harnesses pass through the slot in the bulkhead.
If I were going to be gluing this in place, I would have cut the edges slanted to try to fit exactly into the area. However, the plan was to just bolt the brace to the back of the STA 5 bulkhead, so I didn't think it was necessary. I clamped it in place, drilled 3/16" holes on either side of the harness slot, and on the vertical portions of the bulkhead. I used 10-32 flush-headed screws, with big washers on the back side. A countersink was used to flare out the screw holes. Varnish everything, let dry, then bolt it in place.
My old seat is a fiberglass chair with half the back removed, and a sheet of 0.040 aluminum the rest of the way up. It was straightforward to cut off the top of the aluminum to match the new recessed location. The old slipcover upholstery still fit, even, though I relocated some of the Velcro holding it in place.
A test fit...and by gosh, there WAS a inch or more of room to move the entire seat back!
Pull out the seat, remove the screws holding the fiberglass base to the mounting frame, and slide it back and inch. Reassemble and test-fit:
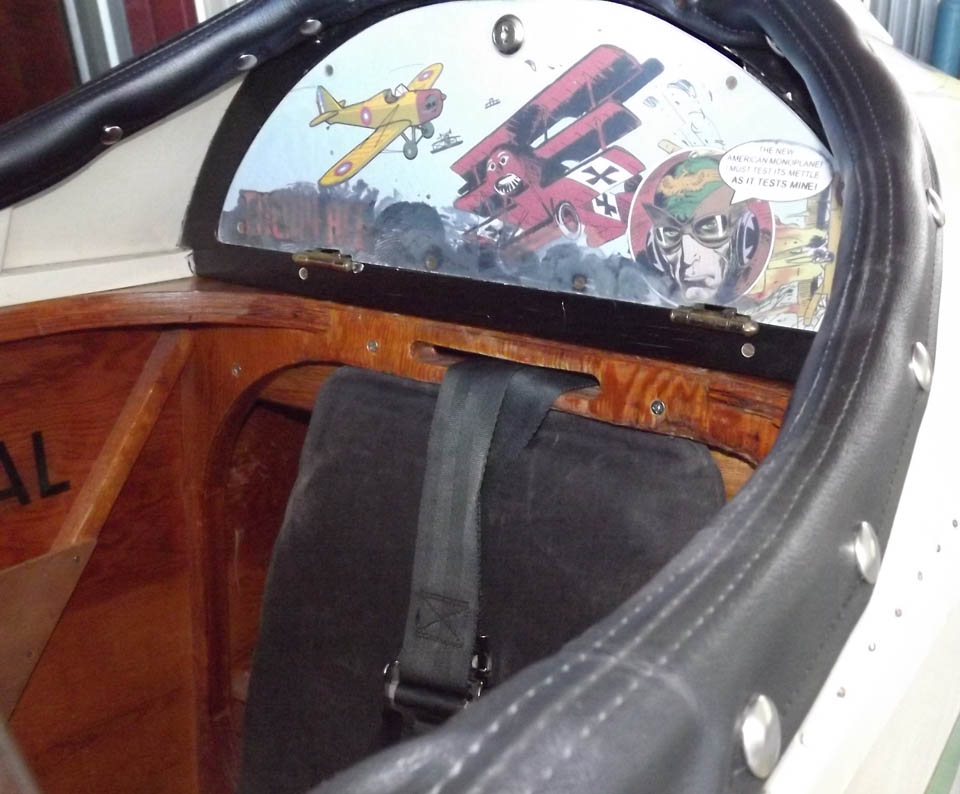
A test sit? Perfect. The backrest didn't feel any different, and my knees definitely sat lower. I've got another inch of legroom!
Looks like a pretty good mod. Great idea, John!
Ron Wanttaja
My old seatback was comfortable, but I didn't like what it was doing to the face of the STA 5 bulkhead. It came up from the cockpit floor to just below the turtledeck door, and getting in and out of the airplane was scratching the top arc of the bulkhead despite some protection I'd installed.
John Wells had a great suggestion that killed two birds with one stone: Install a brace across the BACK of the STA 5 bulkhead, and shorten the seatback so if fits WITHIN the opening, resting on the new brace. This not only let the seatback go back another inch, but put the seatback on a piece of expendable wood that could be occasionally replaced if it got scratched up too much.
While the top of the STA 5 bulkhead is always the hard-limit as to how far the pilot can move back, with an inch or so of foam on the recessed seat back, that brings the pilot's back flush with the top of the bulkhead.
I made the brace out of a piece of three-quarter-inch 3 1/2"x 24" oak I bought at Lowes Aerospace for about five bucks. I wanted the board to fit flush against the top of the STA 5 bulkhead. This took a bit of weird cutting, since that area is the joining location for the top longerons as well as the top and side diagonals. It took a bit of trial-and-error, but I finally figured out the right dimensions:
The big center notch is to clear the area where the seat harnesses pass through the slot in the bulkhead.
If I were going to be gluing this in place, I would have cut the edges slanted to try to fit exactly into the area. However, the plan was to just bolt the brace to the back of the STA 5 bulkhead, so I didn't think it was necessary. I clamped it in place, drilled 3/16" holes on either side of the harness slot, and on the vertical portions of the bulkhead. I used 10-32 flush-headed screws, with big washers on the back side. A countersink was used to flare out the screw holes. Varnish everything, let dry, then bolt it in place.
My old seat is a fiberglass chair with half the back removed, and a sheet of 0.040 aluminum the rest of the way up. It was straightforward to cut off the top of the aluminum to match the new recessed location. The old slipcover upholstery still fit, even, though I relocated some of the Velcro holding it in place.
A test fit...and by gosh, there WAS a inch or more of room to move the entire seat back!
Pull out the seat, remove the screws holding the fiberglass base to the mounting frame, and slide it back and inch. Reassemble and test-fit:
A test sit? Perfect. The backrest didn't feel any different, and my knees definitely sat lower. I've got another inch of legroom!
Looks like a pretty good mod. Great idea, John!
Ron Wanttaja
 Return to the Tech
Page
Return to the Tech
Page