Remember, it's not enough to just build an airplane. You're going to fly it...and, flying it means you're going to have to maintain it.
Which means, as you build the airplane, keep in mind that you may eventually have to remove any little item you install. Since the entire airplane is covered with fabric, this means you have to add a set of inspection panels to get at stuff. Imagine building an airplane with a permanent, fixed engine cowling. Not too smart, eh? Yet there are other parts on your airplane that'll need access, too. In the early days, they used to just have a slit in the fabric and lace it up, like a shoe. But it's tough to keep the fabric taut, and it's certainly a danger at higher speeds. So today, we have more-formal inspection panels.
There are basically two kinds of inspection panels, on a fabric-covered airplane. There's the conventional round type...little pop-off concave disks that fit on round holes in the fabric. When covering the plane, you glue down rings of plastic where you are going to want an inspection hole. Then, once the plane is painted, you can cut out the fabric inside the ring and pop the little disk into place. The rings and disks are available off-the-shelf.
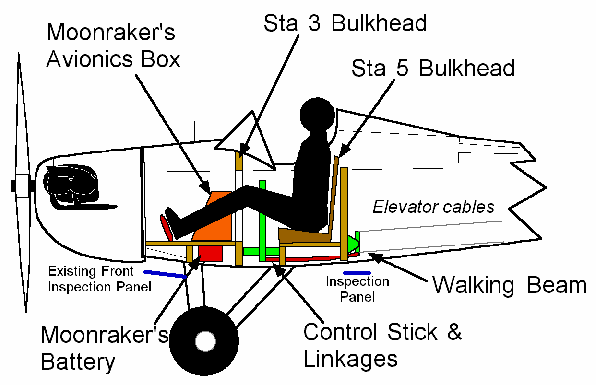
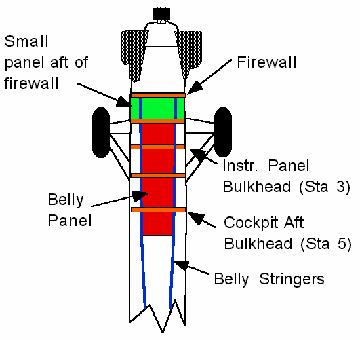
Then there are the custom inspection panels...those which are fitted to the specific airplane. These mount to the basic structure of the aircraft, instead of only the fabric. On the Fly Baby, there is a short metal panel on the belly just behind the firewall, and a small metal panel in the extreme aft end of the fuselage on the left side, to give access to the elevator bellcranks. There are a couple of other small ones, like those at the wing roots to let the wings fold.
Besides, with the battery mounted under the avionics box, I couldn't disconnect the electrical power on the airplane unless I removed the avionics box first...which meant I was dealing with live power every time I touched the electrical system.
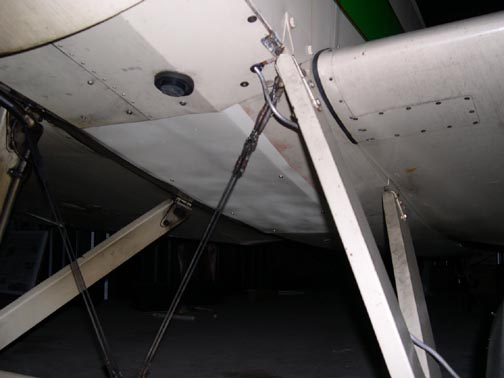
 Fortunately,
there was an absolutely beautiful solution: An inspection panel on
the belly of the airplane, running between the two belly stringers
from the existing front panel to behind the walking beam located behind
the Station 5 bulkhead.
Fortunately,
there was an absolutely beautiful solution: An inspection panel on
the belly of the airplane, running between the two belly stringers
from the existing front panel to behind the walking beam located behind
the Station 5 bulkhead.
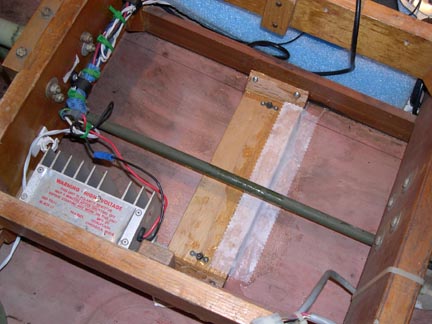
N500F, the Fly Baby prototype, had one of these panels. I did a lot of the maintenance on that airplane, and I remembered how that panel make life easier. If you had to inspect or lubricate the controls, just drop under the fuselage, spin a power screwdriver a couple of times, and drop the panel out of the way.
It's not just the superior access to the control linkages in the bottom of the plane... there's just enough room to slip your feet past the control stick torque tube and run your legs down, outside the airplane. On my airplane, the ability to drop my legs out the bottom put the avionics box in an almost ideal location for working on it....and to heck with the shouts of "Yabba-Dabba-Do!" from my buddies walking past the hangar. :-)

At the time, I was doing fabric work on the tail
of my plane anyway, so it really was a convenient time to add the panel.
There were three basic problems I had to solve: First, how to cut away the fabric without making it prone to additional tearing. Second, what to make the panel of. And third, how to attach the panel to the aircraft.
This is less of a problem with an aircraft under construction, as you have better access and can install suitable reinforcement when the fabric is first installed. In my case, I needed to install the reinforcement first.
As it ended up, I compromised with my panel length. The ideal panel would end aft of the walking beam, but I couldn't get at that area to install reinforcement between the stringers. So I decided to end my belly panel just forward of Station 5, the bulkhead at the back of the pilot's seat. I took a ~4" wide piece of thin plywood, covered its bottom with Poly-Tak (the glue used on Stits fabric) and epoxied it between the stringers under the pilot's seat. Triangular pieces of wood joined the horizontal plywood with the vertical stringers. These triangles were epoxied to the plywood before installation, with both epoxy and screws holding them to the stringers.
Once the epoxy had set, I added a fabric reinforcement tape to the back side of the plywood panel, sucked in my breath, and started cutting out the belly fabric. I first made a sort of Y-incision, from the corners of the plywood panel to the center of the belly-fabric area, then slit forward and did a similar Y at the Station 2 bulkhead where the fabric ended.
This left me with generous flaps of fabric on all sides. I folded one flap back onto the plywood panel and glued it down, overlapping it with fabric reinforcing tape. I did the same on the sides; both bonding down the cut edges as well as using the tape to overlap and reinforce.
 With the hole
done, it was time to make the panel itself. Aluminum, obviously,
but what thickness?
With the hole
done, it was time to make the panel itself. Aluminum, obviously,
but what thickness?
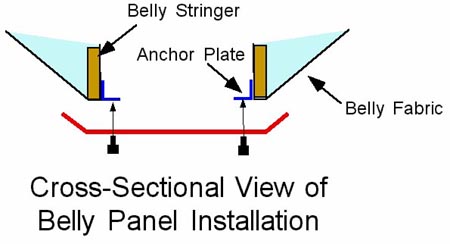
Since the panel would be overlapped by another up front, and attached along the sides, I decided to make it from 0.016 aluminum. That's pretty thin...but to make the panel sit somewhat flush on the belly, I would have to bend up the edges slightly to conform to the slight dish-shape given to the belly of the airplanes due to the stringers being a bit lower than the side longerons. The thinner aluminum would be easier to work. Plus, the bent-up edges would probably provide the needed stiffness.
I took a roll of brown paper and made a template. If I remember correctly, the blank for the panel ended up about 14 inches wide and 36 inches long. If I'd taken the panel all the way aft behind the walking beam, it would have been closer to 50 inches or so.
Anyway, I had a homemade bending brake cobbled up from a couple of hemlock planks, so I used that to flare up the edges of the sheet slightly.
N500F had used right-angle anchor nuts...a perfect solution, except those anchor nuts are now about $5 each! I could have used wood screws and put them directly into the stringers. But I figured I'd be removing the panel a lot, and I didn't like the prospect of the tiny screw holes wearing and the screws getting loose.
So, I made my own right-angle anchor nuts. I used flat 10-32 anchor nuts (~20 cents each) and pop-riveted them to short pieces of angle aluminum. I screwed these to the sides of the stringers. Then, I put my paper template back in place, punched through all the mounting holes, transferred the template back to the metal panel, and drilled out the mounting holes. A lick of paint on the new panel, and it went smoothly into place.
Even with the thin aluminum, I don't see any "oil canning" of the panel when in flight. Since the panel does curve slightly, the bent-up edges do crimp at bit at one point.. but it's under the airplane, and not too apparent.
I heartily recommend this type of panel to all Fly Baby builders and owners....
Ron Wanttaja
Comments? Contact Ron Wanttaja
.