 I'd been anticipating
having to remove the rudder to do this repair, and had been dreading trying
to cobble up a gap seal that would look halfway good. Fortunately,
I met Mike Proshold and his "Hee Bee Gee Bee" Fly Baby this summer.
I'd been anticipating
having to remove the rudder to do this repair, and had been dreading trying
to cobble up a gap seal that would look halfway good. Fortunately,
I met Mike Proshold and his "Hee Bee Gee Bee" Fly Baby this summer.
One of the problems Fly Babies seem prone to is ovalling holes in the tailwheel spring attach bracket. .As I mentioned in an earlier posting, I'd already had to replace the lower bolt and the lower bolt-hole in the tailpost itself had worn and the new bolt was fitting sloppy. I decided to pull the bracket off and replace it with a new, longer one.
I'd had a 3/8" bushing through the tail-post hole that matched the lower hole for the old bracket, and inspection confirmed that that hole had enlarged a bit. My plan was to drill out the hole to 1/2" and epoxy in a solid wood plug. I ordered the new bracket without the bolt holes, so I could drill everything while it was in place on the airplane.
Unfortunately, my airplane had been built with the nice, stock X-shaped gap seals, glued in place. Nothing for it other than to cut them away so I could remove the rudder.
The biggest problem with the X-type gap seal is replacing it. I could make one, but my airplane is painted with Stits Aerothane. This is a high-gloss Imron-like paint; not only is it expensive ($40 a quart) and toxic (you have to have outside air when painting with it), you can't patch it and have it look good like ordinary dope. Any overspray dulls the surrounding paint, and if the repair area is masked off, the repaired area has a different sheen and tone than the faded paint surrounding the hole. Conventional dope (like the regular Stits paint) is matte-finished, and repairs blend in pretty well.
I'd been anticipating
having to remove the rudder to do this repair, and had been dreading trying
to cobble up a gap seal that would look halfway good. Fortunately,
I met Mike Proshold and his "Hee Bee Gee Bee" Fly Baby this summer.
Mike had an ingenious solution to the gap-seal problem. He used clear plastic angles sold at the hardware store for protecting the corners of walls inside the home.
When I saw Mike's seals, I knew I had my solution. So while waiting for my bracket to arrive, I got the tail feathers ready for re-installation.
I made gluing strips from plywood and wrapped them with waxed paper. I applied Poly-Tac (the fabric glue used with the Stits process) to the inside of each flap, folded them back against the spars, and nailed down the gluing strips.
The nice thing about this approach is that it kept the paint scheme going...the beige, green, and the red trim strip bent nicely on the back side of the stabilizer spar and nearly matched up. It looked darn good.
However, it did leave the ends of the cut strips exposed. I figured that might be a problem on the rudder spar...the open edges were facing forward, exposed to the slipstream. I was a bit worried that the tug of the air would try to rip the glued seams open and tear the fabric right off the rudder.
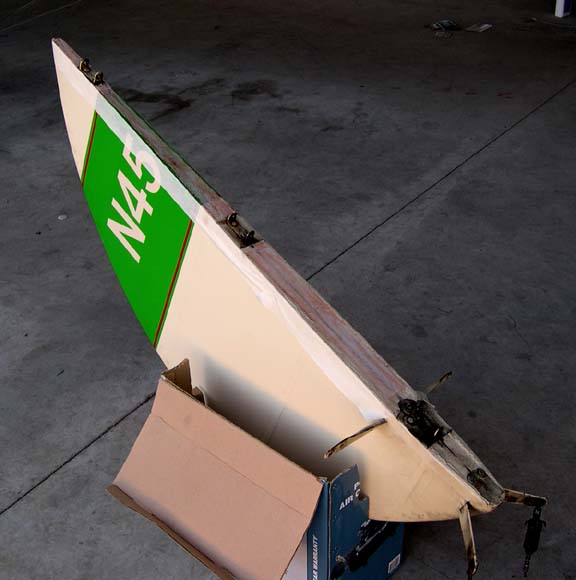
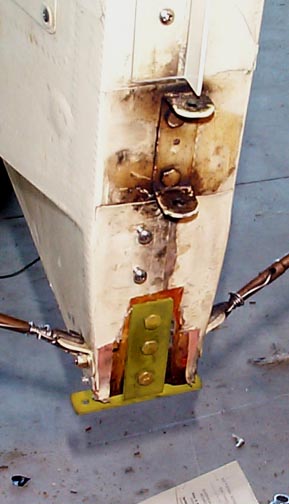
So I applied a strip of reinforcing tape right down the seam on the centerline of the rudder. I took the full Stits process right to the silver dope, then masked off and painted with my beige Rust-o-leum and some green enamel that was the closest I could find to the green Aerothane trim I have. The photo above shows the rudder being held in the work position, atop an old cardboard box I'd carved to hold it. The reinforcement tape is in place, and the edge of the repaired area has a strip of masking tape that formed the basis for the paper masking that left just the spar-area open for the touch-up paint.
I figured the vertical stabilizer spar would be fine without the reinforcing tape. Even it an edge came loose, the slipstream would be pushing it back in place. And in any case, the plastic angle for the gap seal would install atop it, helping hold it down.
Making the Proshold seals themselves was a snap. Cut off the right length of angle then trim one leg to the width of the hinges. Instead of leaving the plastic angles clear like Mike did, I painted mine to match the rest of the airplane... using the same rattle-can paint. Mike used glue to attach his. I like replacability, so I used #6 stainless steel sheet metal screws for putting mine on.
 So, back to the
airport to drill the holes so the tail would be ready when the bracket
arrived. I drilled the old lower hole in the tailpost out to 7/16",
and carefully enlarged it to where it would barely accept the 1/2" plug.
I still had about 3/4" of wood below the edge of the hole.
So, back to the
airport to drill the holes so the tail would be ready when the bracket
arrived. I drilled the old lower hole in the tailpost out to 7/16",
and carefully enlarged it to where it would barely accept the 1/2" plug.
I still had about 3/4" of wood below the edge of the hole.
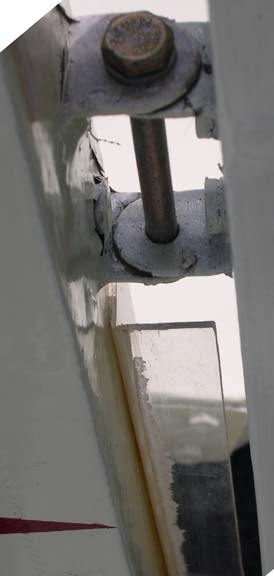
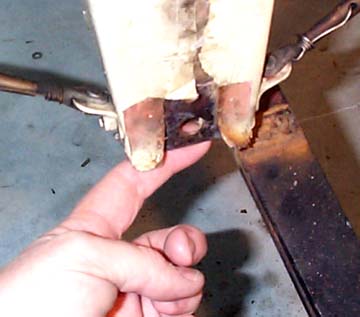
But as I was playing with the hole, it looked to me like the wood at the bottom seemed to be shifting...slightly. I grabbed a drill bit (the handiest pointy thing I had at the time) and started poking at the bottom of the tail post. Sure enough, the 3/8" solid section started fragmenting and dropping away. The photo shows the tip of my finger stuck betwen the face sheets, visible throught the hole I'd drilled.
Dry rot. Damn.
I dug at it for a bit, and the bad wood seemed to stretch a bit wider than the hole I'd drilled, and ran upwards until it just reached the through-bolt for the horizontal stabilizer cable tangs. I poked at the face sheets; they still seemed solid.
Basically, the lower filler block on my tail post had suffered dry rot. The tail post layout can be seen on Figure 1-10 of the plans, which is reproduced below. Basically, it's a pair of 1/8" face sheets separated at intervals by filler blocks, solid sections of 3/8" wood. The lower filler block on my airplane had suffered from rot.

So, how to fix it? Looking at the layout of the tail post, it looks like the wood at the bottom is primarily to give a solid section for the tailwheel spring bolts to tighten on. The tailwheel assembly should apply next to no bending load to the tailpost, since the tailwheel spring itself should be rotating around its forward attachment and hence trying to push the post upwards, not back.
So it seemed to me that what I need to do is pull the cross-bolt for the horizontal stabilizers out, use a slim chisel to ensure maximum cleanout inside the spar, cut a new piece of 3/8" wood to fit the gap, slather it with epoxy, slide it into the gap, then pump in some more epoxy from above via the cross-bolt hole. Let the epoxy cure, ream out the cross-bolt hole to accept the tang bolt again, then bolt the new spring attach bracket in place.
One thing working on my favor was the longer arms on my new tailwheel spring attach bracket. The bracket consists of a large "U"-shaped strap, with a flat strap welded across the outside of the bottom of the "U" like an underline. The "U" part bolts to the tailpost, and the strap of the bottom is the top half of a clamp bolted onto the tailwheel spring. The strap went higher on the tail post than the old one, which would should still give me two bolt holes in original, rot-free wood.
"Can I help you?" asked a salesman.
"Ummmm.... do you have any 3/8-inch ash?"
Incredibly, they had it. I bought a 4' long, 7" wide piece for $10.
I took everything out to the airport for a test fit. The new bracket fit perfectly...just a little loose, so it slid on nicely. Unfortunately, the ash material for the plug was a little TOO loose. Darn. I'd have to come up with something else.
Since I was there, I decided to work a bit more on the inside of the tailpost. Poking upwards with my chisel, it also seemed like the wood below the point where the stabilizer flying-wire cross-bolt went through was a bit soft as well. So I pulled the bolt and started chipping away. Pretty soon, the wood got hard again. I worked on it just far enough up to hit the very bottom of the upper bolt hole for the bracket.
I figured I'd install the replacement block, then pump epoxy into the upper bracket hole to fill in any voids. My wife was going on a weekend trip with friends, so I could spend both Saturday and Sunday at the airport.
Saturday morning, I dug though the scrap on the floor of my home shop and found a nice piece of oak. I cut it a bit wider than 3/8" and dropped it into my car.
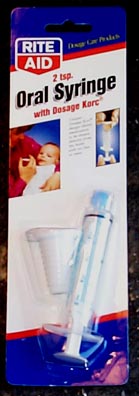 One problem was
how to pump the epoxy into the upper bolt hole. I went to the drug
store and started looking for cheap syringe-like device. I found
the perfect one in the baby department; it's designed to let you squirt
medicine into an unwilling toddler's mouth. About 3/8" diameter,
three inches long, with a spout sticking out about 1/2" at the end.
$3.
One problem was
how to pump the epoxy into the upper bolt hole. I went to the drug
store and started looking for cheap syringe-like device. I found
the perfect one in the baby department; it's designed to let you squirt
medicine into an unwilling toddler's mouth. About 3/8" diameter,
three inches long, with a spout sticking out about 1/2" at the end.
$3.
To the airport. I used file-folder paper to cut out a pattern, shaping it to fit the inside of the gap. I transferred the shape to my oak piece, then cut it out on the bandsaw. I shoved the blank carefully up the opening, pulling it out and sanding down the high points on my benchtop belt sander. I left an extra half-inch at the end to aid in handling.
The upper bolt hole was a bit ovaled as well, so I drilled it out to 3/8" to accept a piece of oak dowel as a filler. A nice side effect is that the access down into the void was much improved. My horizontal/vertical bandsaw cut a short piece of dowel for the hole.
So, I was finally ready: The filler block was set to install, and two packages of J-B Weld were ready to go. I decided the syringes would be a bit hard to load with the 3" length, so I cut one down to about an inch long.
I mixed up a batch of J-B Weld and used a thin strip of plastic to liberally paint the inside of the void. I then slathered the epoxy atop the plug, then all around both sides.
I started shoving the plug into the void. As it got near the end, I tapped it a couple of times, gently, to seat it as well as I could.
I could see the top of the plug through the enlarged upper bolt hole. I filled the syringe, and started pumping more epoxy in. Once the hole was overflowing, I slathered epoxy onto the oak plug and jammed it into place.
With a careful wipedown of the extruded epoxy, the gluing was done. The instructions for the J-B Weld called for at least 14 hours cure time. The next day, I carved off the remainder of the plug sticking out the tailpost. It was now ready for the new bracket.
Problem. The wood plug inside the void had caused the tailpost to swell a bit...and the bracket was now a little too narrow. Since I'd specified 0.090" steel, it was a bit too thick to bend outward.
The external surfaces of the tailpost were a bit rough, so I sanded them down a bit, and also took a file to the inside of the bracket to help fit it to the tailpost. Eventually, I was able to get it slid to within 1/8 or so of the no-plug position. Unfortunately, due to the curvature at the bottom of the U, this meant that the inside of the bracket did not make contact with the bottom of the tailpost.
At this point, I cussed myself for cutting off the plug flush to the bottom of the tailpost. Had I let it stick out a quarter-inch or so, it would have been perfect.
I decided to leave the gap. I may fill it with an oak plug at some point, but I did notice the old bracket had been a bit rusty where it had been in contact with the bottom of the tailpost. It's possible that my rot problem had its start with the bracket/tailpost interface catching and holding water. At least THAT won't happen anymore. Though I might make a epoxy/oak plug to fill the gap.
I marked bolt hole positions on the back face of the bracket. I used my benchtop drill press to drill starter holes on the back face. Back when the bracket into position. I oriented my hand drill as orthogonal as possible to the bottom hole, then drilled a 1/8" hole through the wood and into the inside leg. A pin to hold that one in place, then drill the other two holes. Then drill them all out to 3/16".
 Off with
the bracket. The holes all look good....I managed to stay pretty
much on centerline of both bracket straps and (mostly) level. One
last bit of epoxy work, though. The new bracket is longer, and its length
takes the top bolt hole past the point where the filler block ends.
Drew had warned me about this, though, so I had a 1/2" oak plug ready for
it. Since I was on the verge of getting done, I used 5-minute epoxy
on this one.
Off with
the bracket. The holes all look good....I managed to stay pretty
much on centerline of both bracket straps and (mostly) level. One
last bit of epoxy work, though. The new bracket is longer, and its length
takes the top bolt hole past the point where the filler block ends.
Drew had warned me about this, though, so I had a 1/2" oak plug ready for
it. Since I was on the verge of getting done, I used 5-minute epoxy
on this one.
Since the epoxy needed an hour to cure fully, I took the time to apply fast-drying polyurethane to the new wood (mostly just the bottom of the plug) and hit the new bracket with zinc chromate. I also drilled the crossways hole for the horizontal stabilizer flying wire anchors. About a half-inch of wood on either side was still original, so this helped me keep the drill running true. Halfway in from one side, halfway in from the other, then ram it all the way through. Fortunately, it came out straight. I cleaned a bit of the roughness off the old through-bolt, spritzed it with zinc chromate, washed it with varnish, installed the cable anchors, then re-connected the turnbuckles, tightened, and safetied them.
Finally, ready to install the new bracket. I ran it into place, tapping it gently with the rubber hammer. An awl to help twist it into the right place, shove the bottom bolt through, then the middle bolt. Up with the drill, to drill through the top hole into the new dowel just epoxied in place.
I varied from standard practice and installed all the bolts with the heads aft. They're visible enough, if the nut comes loose and they start backing out. It let me use the rubber hammer to tap them into place.
The nuts on the top two bolts were a bit hard to install inside the inverted "well" forward of the stabilizer spar, but I wrapped a bit of electrical tape around a paired washer and nut, leaving a bit of tape loose for handling. This let me get them up far enough to start, after which the tape easily tore away before the final tightening.
Good gosh. The bracket is finally installed.
The rest was pretty straightforward. Clamp the tailwheel spring to the bracket, re-install the rudder (cursing as the hinge pins slap around and refuse to go into place), add the Proshold gap seals, reinstall the rudder cables and tailwheel springs.
Test flight went normally...everything seemed tight. After 30 days of downtime during and unseasonably dry and warm Seattle September, my airplane was airworthy again.
And the next day, of course, it was cloudy and cold.
I really like the longer bracket. However, if I were to do this again, I'd go with the 0.063" material rather than the 0.090" I used.
If you're still in the building process, make the bottom plug on your stabilizer spar another inch or inch and a half long. You'll need it, if you use the longer bracket.
And I really like Mike Proshold's gap seals for the tail surfaces. The airplane definitely handles better with gap seals, and Mike's plastic beauties look good, are cheap, and can be easily installed and removed.
I am a bit worried about that gap between the bottom of the tailpost and the bracket. However, I've got a total of about 3/16" of solid steel (two 0.090 legs) back there... that ain't gonna bend easily. At least it's easy to inspect, if cracks start appearing. I may yet install some sort of plug, though....
Comments? Contact Ron Wanttaja
.