By Drew Fidoe
By Drew Fidoe
[RJW note: Drew has been posting his progress on the Fly Baby mailing list, and has agreed to allow me to repost his material here. A hangar fell on his airplane a number of years back, and he has been in the process of rebuilding it for several years.]
Disclaimer: Note that this is purely a personal experiment and is not necessarily a recommendation for anyone else. It is a report of a work in progress, hence there is as yet no indication of how durable the paint will be, or whether the latex will be able to keep sticking to vibrating fabric. This page will be updated as time passes.
Drew passed on some links to other pages discussing latex paint.
 I let the fuselage sit for a week and a half and
then applied my first layer of latex. I am using a
quality indoor latex primer, which has titanium dioxide which
gives excellent cover-over and hopefully UV resistance as
well. As this latex primer is being used for both build-up
and UV barrier, I also added a half-pound of aluminum powder to
the 1 gallon can of primer for extra UV protection. After
mixing the paint I drew off enough paint to cover the fuselage,
about one and a quarter cups of paint, and added Floetrol and then
thinned the paint with automotive windshield washer fluid. I
rolled on the latex with a 4" foam roller, really working the
paint into the fabric, and using a foam brush to get the areas
missed. I worked at getting as thin and smooth of a coat as
possible, I had a few lumps from the aluminum powder that I
used in the paint (it was old and a bit lumpy to start
with). I used 400 grit wet-N-dry to sand the lumps and
imperfections out. The latex primer sands very easily and
when dried the coat was quite even. The windshield wiper
fluid cuts down the thickness of the paint nicely and the Floetrol
helps in the spreadability, and the final product flows out
showing little of brush marks making sanding easier.
The sanding takes very little time, I just smoothed out the high
spots and feathered out the occasional lump and run. 220
grit is good for overly thick areas but 400 grit gives better
control so that the fabric isn't cut into.
I let the fuselage sit for a week and a half and
then applied my first layer of latex. I am using a
quality indoor latex primer, which has titanium dioxide which
gives excellent cover-over and hopefully UV resistance as
well. As this latex primer is being used for both build-up
and UV barrier, I also added a half-pound of aluminum powder to
the 1 gallon can of primer for extra UV protection. After
mixing the paint I drew off enough paint to cover the fuselage,
about one and a quarter cups of paint, and added Floetrol and then
thinned the paint with automotive windshield washer fluid. I
rolled on the latex with a 4" foam roller, really working the
paint into the fabric, and using a foam brush to get the areas
missed. I worked at getting as thin and smooth of a coat as
possible, I had a few lumps from the aluminum powder that I
used in the paint (it was old and a bit lumpy to start
with). I used 400 grit wet-N-dry to sand the lumps and
imperfections out. The latex primer sands very easily and
when dried the coat was quite even. The windshield wiper
fluid cuts down the thickness of the paint nicely and the Floetrol
helps in the spreadability, and the final product flows out
showing little of brush marks making sanding easier.
The sanding takes very little time, I just smoothed out the high
spots and feathered out the occasional lump and run. 220
grit is good for overly thick areas but 400 grit gives better
control so that the fabric isn't cut into.
I waited a week and then applied my second coat of latex primer. I tried this coat without the Floetrol. It seems to make a difference in the spreadability of the paint as well as the final self-levelling when drying. This time after rolling I used the foam brush to further smooth the paint applied by the roller, about ever three square feet I would go back and work the rolled on paint with the foam brush. This ensured that my "used" aluminum powder lumps where smoothed out in the paint. This gives a better finish than just rolling the latex (it wouldn't be as much of an issue without the aluminum powder added), but there are very minor brush marks. This isn't too noticeable, and sand out easily. Also, smoothing out the paint with the foam brush in the direction of the weave helps to ensure good contact application and hides the brush marks to an extent. The weave of the fabric has been filled nicely, it is still visible but this isn't an issue for me. The sides of the fuselage where there is no flex in the fabric will get a third coat to help smooth out my sins during fabric application. You couldn't notice my stopping points when applying the fabric after the fist coat of latex, but the glue lumps and occasional air bubble are still evident (I worked for hours with the iron and thought I got them all...dang).
The Fly Baby fuselage is now ready for top-coat. I'll be using a quality satin or semi-gloss, full-acrylic latex for this, but may use enamel for the undersides of the fuselage and perhaps the first couple of bays of the wings to avoid oil staining.
I like working with the latex, no nasty fumes, and the brushes, paint trays, cups and roller clean up with water (I clean them then place them in a zip-lock bag into the freezer). For my control surfaces, I'm going to use straight latex for sealing and UV barrier. The latex sticks tenaciously and has excellent coverage. It fills the fabric weave easily and there are no pinholes. So far I've done it all by hand, but will try using a spray gun for the top-coats. The fuselage takes on a greyish tint with the aluminum powder in the latex primer. It's lookin' good! I do realize that I'm out in the realm of the "experimenter" with the latex coverings. I've done a lot of research on the issue and figured that I had to give it a whirl. We'll see how things turn out and how it holds up in the field. In the meantime I don't recommend anyone trying this as I would hate for some else to end up with a woof-woof job on their aeroplane! That being said, I'm confident of good results.
Cheers,
Drew
Why would guys spend money on Polyfibre fabric and then use latex as a finish? Wouldn't it be better to just finish up with Polytone?
I got some good deals on the fabric and materials, and I am trying to get away from the noxious chemicals. So far the paint and build up has been very fast and easy, I can get the paint locally with no hazmat fees. I don't recommend it for anyone else, but am posting my progress for educational purposes only. I have done a fair bit of research into this subject, and I'm sure that people said the same thing to Mr. Stits when he was "experimenting" with his fabric system (not to take anything away from the excellent products that he developed). So far it looks pretty light compared to the original Ceconite-style covering previously applied to the airframe. My airframe is already 40 years old...I'm not looking for "lifetime" covering. I'll keep you all posted with my progress/results, good or bad as always!
Regards,
Drew
Are you able to get a smooth finish with latex? Does it have to be thinned way down or does it work straight? How about (God forbid!) repairs later on down the road? Can the latex be removed to make sure the patch will stick and then refinished?
No worries! The finish in latex can be as smooth as the applicator. I do get some brush marks with the foam brush but the latex primer sands very easily. With 400 grit wetNdry the stuff smoothes out beautifully. If I spayed it would be even better, will try that for the top-coats. I do thin the paint as the high quality stuff is quite thick. I use windshield washer fluid as a thinner and Floetrol for speadability/levelling. I haven't looked at the actual removal of the paint for repair work, however I usually restitch my repair panels anyhow, so the tapes probably wouldn't be too critical. I may play around to find a suitable stripping agent later on...gotta get flyin' again as a priority!
Drew
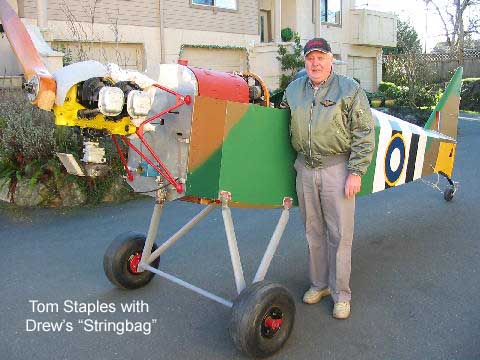
(Note: In the time period between the first and second
report, Drew decided to name his plane, "Stringbag." "This
was the affectionate nick-name for the Fairy Swordfish," he
says, "Supposedly named for the complicated biplane rigging in
an age of streamlined monoplanes. I view Fly Baby as the
"stringbag" of the modern homebuilt world of aluminum and
fast-glass...so from now on, my Fly Baby's name will be
"Stringbag" :)"
 Over my winter holiday I've been busy beavering away
on Stringbag. All fabric is in place, stitched, and
taped. The fuselage is in prime and sanded, ready for
final paint. The bare engine is still waiting installation
of cowlings and accessories. Brake pulleys have been
installed and runs checked but no cables installed yet.
Over my winter holiday I've been busy beavering away
on Stringbag. All fabric is in place, stitched, and
taped. The fuselage is in prime and sanded, ready for
final paint. The bare engine is still waiting installation
of cowlings and accessories. Brake pulleys have been
installed and runs checked but no cables installed yet.
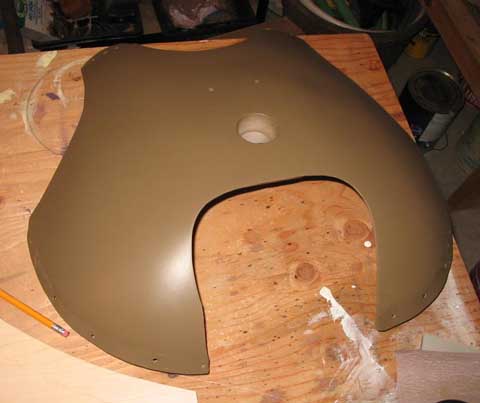
This weekend I finished up a few tapes and the seaplane drain grommets on the tail feathers. I've commenced application of the latex UV block/primer to the surfaces. I'm using CIL interior primer/sealer. This paint has excellent adhesion, and I use interior paint for this stage as the paint is supposed to dry more slowly than exterior formulations (but otherwise is the same).
For a UV barrier, I'm relying on both the tungsten super-oxide UV barrier in the paint (makes it white as well as reflects light) and aluminum powder which I added to the paint in the same quantity as that added to old dope (I think I could have double the recipe with little problem). The latex goes a long way, I only mix about four cups at a time. I ladle the paint out of the can into a household, two-speed milkshake mixer (the stainless steel cup is marked for consistent measurement). I add a capful of Floetrol to the paint and then windshield washer fluid to thin the paint. The entire concoction is mixed on low for five minutes (high speed introduces air to the paint). The paint now has a bluish-grey hue to it.
I paint the first coat with a 2" foam brush, cross-wise to the airflow over the surface. I apply the paint with a fair pressure on the brush to work the latex into the fabric weave, but not so much as to cause dripping on the inside of the fabric. The idea is to thin the paint enough to allow it to be worked easily into the weave but no more. Each coat of latex-primer-mix must be applied as thin as possible. The fabric areas previous coated in the Polybrush take the paint well but must be fully cured prior to the latex application.
Once the latex has dried, I carefully inspect the surface for overlooked fabric defects, such as lifting tape edges or bubbles/high spots in the fabric. As I am using Polyfibre materials and methods for attaching my fabric to the airframe I stitch all of my ribs!!) I can use an iron to fix these. The iron will smudge the latex so I touch-up the area with a bit of latex-mix. I then carefully sand down any high-spots in the paint (using a dust mask as a lot of dust is created...it goes everywhere!). I then add a second coat of latex-primer-mix with a foam brush, this time applying the latex in the direction of the airflow, or cross-wise from the previous coat.
After this coat has dried over night, I carefully inspect the surface and sand again, this time taking time to remove the foam brush's paint lines/marks, but don't go overboard as the subsequent coats brushed on will fill the low spots. 220 grit with minimal pressure seems to work best, if I use 400 grit the sandpaper clogs up too quickly but the paint can be sanded to a smooth, dull gloss. Best control and removal of the latex-primer-mix is by sanding in a small circular motion. The primer paint sands very easily, making quick work of high spots but care must be taken to avoid touching the fabric!
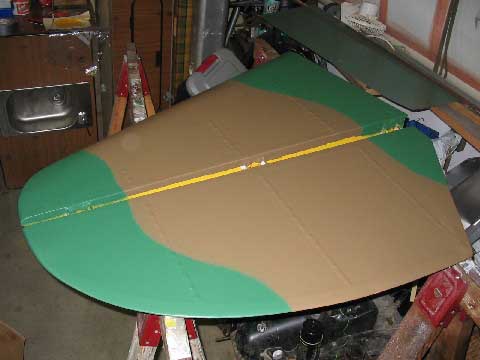
A 4" white foam roller may be used for further applications, but I prefer using the 2" foam brush as there is a bit less sanding required between coats. (you can roll and then brush-out the lines, plus the Floetrol really helps the latex to level out). I only build up the latex-primer until the fabric weave is filled but still visible. I could use this method of build-up to get a glass smooth finish but the trick of latex is to keep the paint coating a thin as possible to hopefully avoid premature ringworm or cracking.
I found that a total of three to four coats of primer worked well, more in scrungy plywood backed areas where I had a bad time applying the fabric to the fuselage sides. Another coat or two doesn't add much to the thickness if required as I seem to sand off most of the paint after the third and subsequent coats are applied, and over plywood there will be no movement of the fabric so less risk of cracking/ringworm as the thicker coating ages. The latex goes a long way, for the primer coatings, I expect to use only a gallon of paint (my spruced-up wings are in dope but will also be latex primed prior to latex top-coat...the latex seems to stick tenaciously to everything). The fuselage has taken on a dull greyish blue colour now.
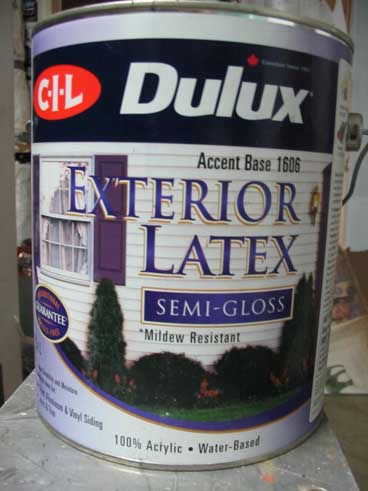
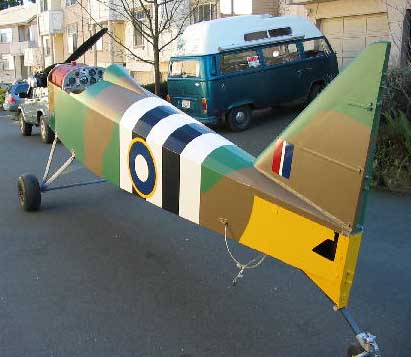
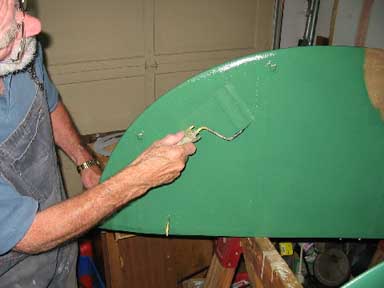
For the top-coats, I selected CIL Dulux exterior grade acrylic latex semigloss. I brought my paint colours to the Home Depot Aerospace paint counter and they matched them for me. The first try wasn't successful , the girl didn't understand camouflage and when I applied the paint to test patches on the fuselage the brown was a bit light, and the green was disgustingly feminine :)
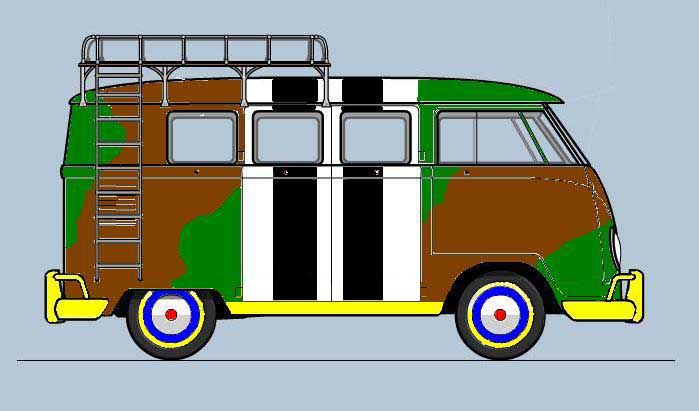
I took the paint back for a free retint and this time talked to a guy. I handed him a rocker cover painted forest green and had him tint the paint to a reasonable match, he also darkened the brown. Next time I'll bring in proper paint swatches for the store to match, as the computer cannot match printed colours...so it wasn't the girl's fault, she was just using a lady's eye to match what I had brought in printed on paper...the picture of my bus posted on Ron's altered states page :)
In hind-sight, model stores have great paint shades to use for the computer colour-matching, but I selected most of my colours to match off the shelf enamel paints for my metal and fibre-glass components. My brief colour application trials look promising. I rolled on the semi-gloss colour paint unthinned and without Floetrol, it covered reasonably well but I'll definitely require two, possibly three coats by this method. I used a rough sponge to add the cammo mottling between the colours to great effect.
Without the Floetrol the semi-gloss left a bit of orange peel, but this was just a quick trial. I deliberately let the test-patches to dry, after 24 hour it does sand, but not as easily as the latex-primer-mix. So I'll avoid sanding the semi-gloss if possible! I will experiment with spraying the colour coats as well...this is a work in progress! At least with latex based paints, If I am not satisfied with the application of the paint...I can just was it off before it dries! I have a small automotive sprayer, as well as access to the use of an HVLP sprayer. I'll keep you all posted on my progress!
Cheers!
Drew
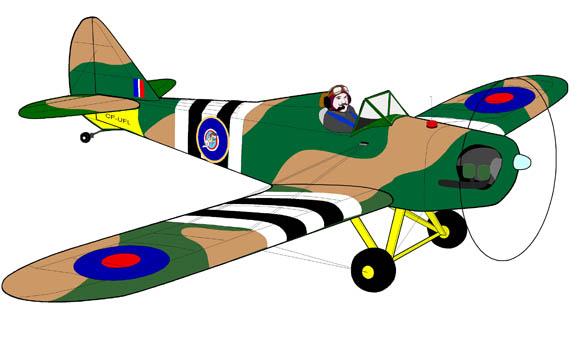
Fly Baby C-FUFL
# 64-16
Continental A-65/75
 I'm
progressing well on my paint-job. The latex is going on very
well. I am getting away with only two colour coats, with the
occasional touch-up required. I tried messing about with an
air sprayer for the camouflage blending/application, but prefer the
ease of simply rolling the pain on...with the Floetrol and
windshield wiper fluid the finish is already spray quality and at
least 5X faster in application time when compared to spraying as I
don't have to fiddle with too much thinning or worrying about runs,
plus I require fewer coats.
I'm
progressing well on my paint-job. The latex is going on very
well. I am getting away with only two colour coats, with the
occasional touch-up required. I tried messing about with an
air sprayer for the camouflage blending/application, but prefer the
ease of simply rolling the pain on...with the Floetrol and
windshield wiper fluid the finish is already spray quality and at
least 5X faster in application time when compared to spraying as I
don't have to fiddle with too much thinning or worrying about runs,
plus I require fewer coats.
For the cammo blending, I use a piece of rough sponge strategically daboinked on the periphery. Clean-up is simple, wash with water, which makes boo-boos and runs easy to clean up as well. I'm using waaay less paint than expected, for my primary colours I could probably have got away with a pint rather than a gallon of each.
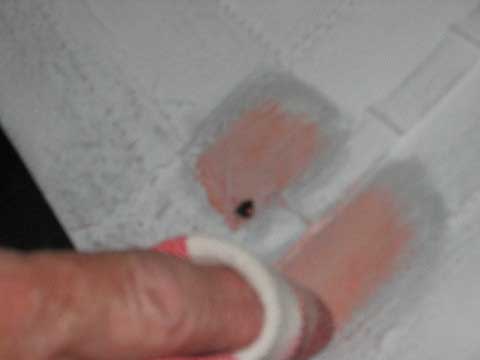
Ol' Tom Staples dropped by today to inspect my progress and borrow some covering supplies. Space was tight and a horizontal stabilizer got knocked off the saw horses. A quick touch-up of primer on the top surfaces still being painted and it will be ready to go again, and the finish-coated lower surfaces were none the worse for wear. Repair time...5 minutes :)
...making progress!
Drew
Fly Baby C-FUFL "Stringbag"
# 64-16
 Continental A-65/75
The fuselage and most of my control surfaces have been in final
latex for a few months now. After one month cure time I
rubbed down the latex surfaces with ArmorAll Protectant, and have
been doing so every couple of months or so. The latex/fabric
has held up very well to scuffs and knocks in my workshop.
When I cut away some fabric to install an antenna, the fabric
removed was inspected and the paint was very flexible.
Touch-ups are easy and indistinguishable from the surrounding
paint, but I suppose that this may not be the case after there is
some weathering and fading. Touch-ups later will just add
character J The semi-gloss latex covered surfaces tend to
stick to surfaces if left in contact with other latex items or
unvarnished wood for long periods of time, and sometimes a small
chip of paint is left behind. This may be due to the
ArmorAll, or perhaps due to my previous overzealous sanding of the
latex primer to a dull sheen.but this issue seems to be minor
issue so far.
For some builders who have voiced concerns about repairs to latex surfaces I have continued experimentation to address this issue. I have found two ways to remove latex coatings, first is by using heat from an iron, which was discovered the hard way, which means that one cannot use the iron for touch-ups after the fabric is painted in latex without blemishing the finish. The second way is by chemicals. Polyfibre chemicals will melt latex paint to a sticky mess...one cannot apply these products over latex coatings. I did try MEK as a latex remover and wasn't happy with the results. I came across a commercially available latex remover and was impressed with the product. It was rather expensive, so I did some more research, and the major component of that product turned out to be the solvent Xylene. Xylene is an inexpensive and easily obtainable solvent readily available from home improvement stores such as Home Depot.
 To remove the latex with Xylene, I just moisten a
clean cotton rag with the solvent and then gently rub the latex
surface. The paint rubs away into the rag quite easily and
under control so that a nice, feathered surface results. I
could even rub away one colour to expose another colour layer (I
used different colours for my test pieces to show delaminations or
other potential problems). I practiced using this product on
my outdoor samples, as well as a hidden area of my airframe.
When using Xylene, the area rubbed down remains a bit gummy for a
couple of hours, so it would be advisable to let it sit for a day
or so before applying the touch-up paint. From my
experiments so far, it may be possible to use this product to rub
away any ring-worm or cracking prior to reapplying touch-up
paint. The Xylene could very well affect fabric/adhesive
adhesive chemicals, as Xylene is used as a thinner for such
products as contact cement. I stitch all of my fabric
repairs as per CAM 18 and do not rely on fabric cement for
securing or repairing my fabric. To the best of my
knowledge, Xylene is NOT a recommended chemical for use on or near
any aviation fabric cement.
To remove the latex with Xylene, I just moisten a
clean cotton rag with the solvent and then gently rub the latex
surface. The paint rubs away into the rag quite easily and
under control so that a nice, feathered surface results. I
could even rub away one colour to expose another colour layer (I
used different colours for my test pieces to show delaminations or
other potential problems). I practiced using this product on
my outdoor samples, as well as a hidden area of my airframe.
When using Xylene, the area rubbed down remains a bit gummy for a
couple of hours, so it would be advisable to let it sit for a day
or so before applying the touch-up paint. From my
experiments so far, it may be possible to use this product to rub
away any ring-worm or cracking prior to reapplying touch-up
paint. The Xylene could very well affect fabric/adhesive
adhesive chemicals, as Xylene is used as a thinner for such
products as contact cement. I stitch all of my fabric
repairs as per CAM 18 and do not rely on fabric cement for
securing or repairing my fabric. To the best of my
knowledge, Xylene is NOT a recommended chemical for use on or near
any aviation fabric cement.
For repairs, the Xylene proved its stuff. On one aileron, which a home-builder friend covered for experience, a reinforcement tape and the seaplane drain grommets were over looked prior to the latex primer coat being applied. Xylene was used to remove the latex and the tape and grommets were applied using Polybrush without difficulty. I use the Xylene sparingly, and it is flammable and requires good ventilation (or respirator) to be really safe
With regards to my latex samples, they have held up well to their years sitting outdoors. Some of these samples have the aluminum powder primer, other don't. So far all fabric still have structural strength, I cannot force a thumb through them. The paint does look a bit weathered, but has remained flexible in spite of no ArmorAll applications. One latex coating was covered in a water-based system-3 clear-coat. This finish checked after 2 years in the weather, and is impervious to the Xylene. For another weather-aged sample, I lightly sanded the surface and repainted it with semi-gloss latex. The adhesion was excellent and finish as good as new. I am glad I did not attempt to clear-coat my airframe...latex only for me. I have recoated one older sample to view the results. The new latex looks fine. After two months with the new top coat, I tried pressure washing away the paint with the 1700 psi pressure washer held about an inch away from the surface. A few flecks to the two month old top latex were blown off, however I couldn't remove the mature undercoat of latex attached to the fabric.
With my experience so far, the latex primer and flat formulas stick tenaciously to anything, including previously doped surfaces. The semi-gloss formulas do not sand easily, unlike the latex primer and to a lesser degree flat latex. If I have to remove or smooth out semi-gloss latex, I use a cotton rag moistened with Xylene and rub down the imperfection. Gloss and semi-gloss latex appear to require more cure time for good adhesion, but with a decent undercoating of primer, the semi-gloss latex sticks fine. Over sanding the primer to a gloss (to smooth out brush marks or imperfections) *may* affect adhesion, more testing is required to confirm this...and time will tell when I get my bird back in the air again ;) A thin layer of pure primer, sprayed or rolled in place and not sanded would be the ideal undercoating for the gloss latex formulas.
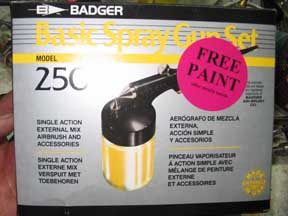 While I didn't
initially have success with applying latex by spray painting,
practice and experimentation led to success. I prefer the
application by brush to fabric surfaces, however I found better
results on smooth metal surfaces using a $20 Badger
model 250 single action hobby spray-gun.
While I didn't
initially have success with applying latex by spray painting,
practice and experimentation led to success. I prefer the
application by brush to fabric surfaces, however I found better
results on smooth metal surfaces using a $20 Badger
model 250 single action hobby spray-gun.
 For painting my metal components, I purchased Alkyd
Enamel house paint in quart-sized cans (about $15 each).
This was tinted to my samples and the matches in the end were
satisfactory. The alkyd enamel would not brush on a smoothly
nor would it level as well as the enamel rust paint used on other
metal components. While this paint is extremely flexible is
too soft.it scuffs too easily. As I wanted colour-matched
green and brown on my metal and fiberglass components, I applied
automotive primer over clean fiberglass and aluminum cowling
components. I then sprayed on the alkyd enamel, thinned
approximately 3-parts paint/1-part paint thinner, using the hobby
sprayer about 3 coats were required (it may be brushed and then
sanded). I used my shop air compressor, dialed down to about
25 psi. I have a basket-ball needle quick-connected to the
compressor air hose, and the spray-gun's skimpy rubber hose slides
right in place with no clamping required. Once allowed to
dry over a few days, the alkyd enamel was then sanded with 400
grit sand paper. I then used the hobby sprayer,
approximately 2-parts latex paint/1-part windshield washer fluid
(the cheap stuff.no Teflon additives)/one part Floetrol, and
sprayed semi-gloss latex over the alkyd enamel coats. The
results are excellent, although the semi-gloss latex applied by
the spray-gun is a bit on the flat side compared to the same paint
applied by foam roller to the fabric components.
For painting my metal components, I purchased Alkyd
Enamel house paint in quart-sized cans (about $15 each).
This was tinted to my samples and the matches in the end were
satisfactory. The alkyd enamel would not brush on a smoothly
nor would it level as well as the enamel rust paint used on other
metal components. While this paint is extremely flexible is
too soft.it scuffs too easily. As I wanted colour-matched
green and brown on my metal and fiberglass components, I applied
automotive primer over clean fiberglass and aluminum cowling
components. I then sprayed on the alkyd enamel, thinned
approximately 3-parts paint/1-part paint thinner, using the hobby
sprayer about 3 coats were required (it may be brushed and then
sanded). I used my shop air compressor, dialed down to about
25 psi. I have a basket-ball needle quick-connected to the
compressor air hose, and the spray-gun's skimpy rubber hose slides
right in place with no clamping required. Once allowed to
dry over a few days, the alkyd enamel was then sanded with 400
grit sand paper. I then used the hobby sprayer,
approximately 2-parts latex paint/1-part windshield washer fluid
(the cheap stuff.no Teflon additives)/one part Floetrol, and
sprayed semi-gloss latex over the alkyd enamel coats. The
results are excellent, although the semi-gloss latex applied by
the spray-gun is a bit on the flat side compared to the same paint
applied by foam roller to the fabric components.
When using the hobby sprayer with the latex paint, I did encounter some contamination which resulted in unsightly fish-eyes. To correct this, I learned keep a plant spray bottle, filled with windshield washer fluid handy. When I experienced trouble or made a boo boo, I simply misted on some washer fluid and wiped away the mistake or contamination. The surface was then immediately ready for more latex. I now spray down and wipe off the surfaces to be painted with the windshield washer fluid prior to applying latex. It is also handy for quick cleaning of the fabric as the ArmorAll treated paint tends to collect dust
When spraying latex, I premix the paint using my milkshake blender, and then store it in a baby-fude jar. The spraying is then a snap, just fill the little sprayer bottle and go to work. Straining the latex may be a good idea, as I would occasionally get a clog in the spray gun, and regardless I would clean it out every ½ hour of use as the air tends to dry the latex paint on the gun. If I experienced a clog, I would simply try and suck out or blow out the clog manually (read "lips") and carry on.
Clean up of the gun when using latex is a snap, wash in warm tap water and ensure that the siphon tube and nozzle are clean, add a few drop of washer fluid to the cleaned gun paint-jar and store for next time.
This will be my last posting on latex paint until I get some practical wear and tear use in the air. As I've mention before, I have not invented any process, but have merely built upon the material already out there on the internet (please see earlier links for credit where it's due). I have revised many of those ideas and techniques and added a few of my own.
In a nutshell, here is a synopsis of my latex "lessons learned":
 Apply the primer latex paint using a 4" foam
roller and/or 2" foam brush to work the paint into the
fabric. A minimum two coats are required. Do not
attempt to fill the weave of the fabric; thinner coats will
resist cracking later.
Apply the primer latex paint using a 4" foam
roller and/or 2" foam brush to work the paint into the
fabric. A minimum two coats are required. Do not
attempt to fill the weave of the fabric; thinner coats will
resist cracking later.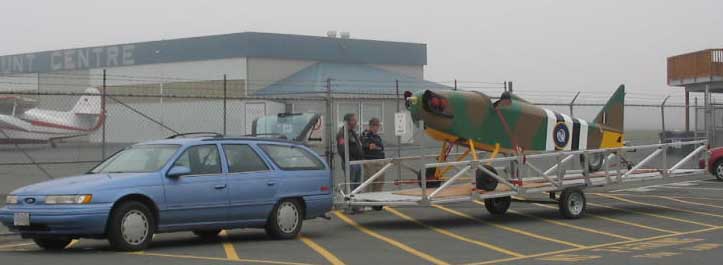
Drew
Fly Baby Mk 1a
C-FUFL
"Stringbag"
8:^)
NOTE:
SOME LATEX PAINT LINKS FOR THOSE WHO WANT TO KNOW MORE:
(Paste these into your browser)
http://www.houstonhobbies.com/tips/painting/spraying-latex-hvlp.htm
http://www.houstonhobbies.com/tips/painting/latex-paint-session.htm
http://www.o-geepaint.com/ArchiCoats/Flood.shtml
http://www.o-geepaint.com/ArchiCoats/Flood.shtml
http://www.questiongravity.com/airbike/latex1.htm
http://hammer.prohosting.com/%7Eragwings/jbpm.html
http://www.modelairplanenews.com/how_to/latex1.asp
http://www.ultralightnews.ca/articles/housepaint.htm
http://www.ultralightnews.com/features/latexpaint_uvbarrier.htm
http://www.warplane.co.uk/DuxDday/Duxford_D-Day_anniversary_show_2004_17.jpg
http://www.ultralightnews.com/features/54NewsletterMarch2003.pdf
http://www.pcimag.com/CDA/ArticleInformation/coverstory/BNPCoverStoryItem/0,1848,133180,00.html
http://www.bobvila.com/ArticleLibrary/Task/Painting/
 Return to the Fly Baby Tech Talk Page