Young pilots flying fast military aircraft need ejection seats to fling them away quickly if problems occur.
But us old guys flying slow homebuilts sometimes need ejection seats, too. Aging is a slow foe; things feel OK forever, but suddenly you realize it’s caught up and you’re hollering, “Mayday!”
Take my case. For twenty-five years, I’ve been lifting myself vertically out of the open cockpit of my Fly Baby with a combination of arm and leg leverage. But knee problems took one leg out of the mix, and made the first few inches of lift difficult. I had to brace myself on one of the rudder pedals with my good leg, and I didn’t like the extra wear-and-tear on a control system.
What I needed was an ejection seat. Not a youngsters’ rocket equipped Martin-Baker to fling me over the hangar roof, but a much slower one that would boost me those first critical inches.
What to use, then? I looked at scissor-lift tables, with an eye towards adapting the lift portion to the Fly Baby cockpit. All were too big and too heavy
Inspiration finally struck: What about those lift chairs for the older folks? Could I adapt the lift mechanism to the airplane?
Up She Rises
I stopped by a local medical supply store, hoping to examine some of the mechanisms used by the seats. Instead, the manager showed me the Uplift Technologies Power Seat. The Uplift is a single, self-contained package that is designed to be placed atop any type of chair, plugs into a wall outlet, and lifts and lowers the occupant about eight inches. It’s designed to be portable, so the weight is low enough to allow a senior citizen to carry it around.It was a perfect solution, with no need to disassemble and attempt to modify the mechanism. But I was concerned about the length. Would it fit in the available space without interfering with the control stick?
I confessed my potential use, and my concern about length, to the store manager. “Is your plane at the airport just down the road? Take it down and see if it’ll fit!”
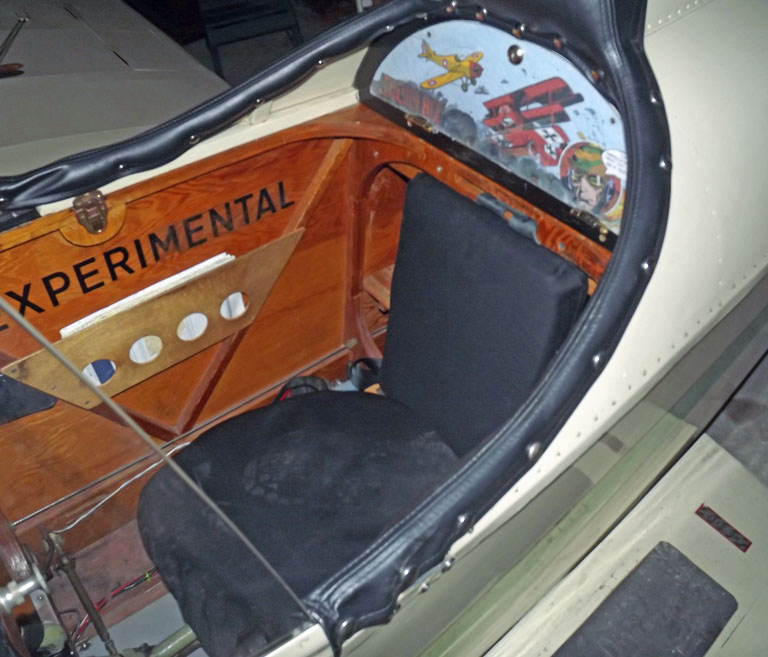
The Fly Baby has an extremely basic seat interface…just a flat framed area in the cockpit floor. The Uplift’s flat bottom lay atop it without a problem, and the length and width were perfect.
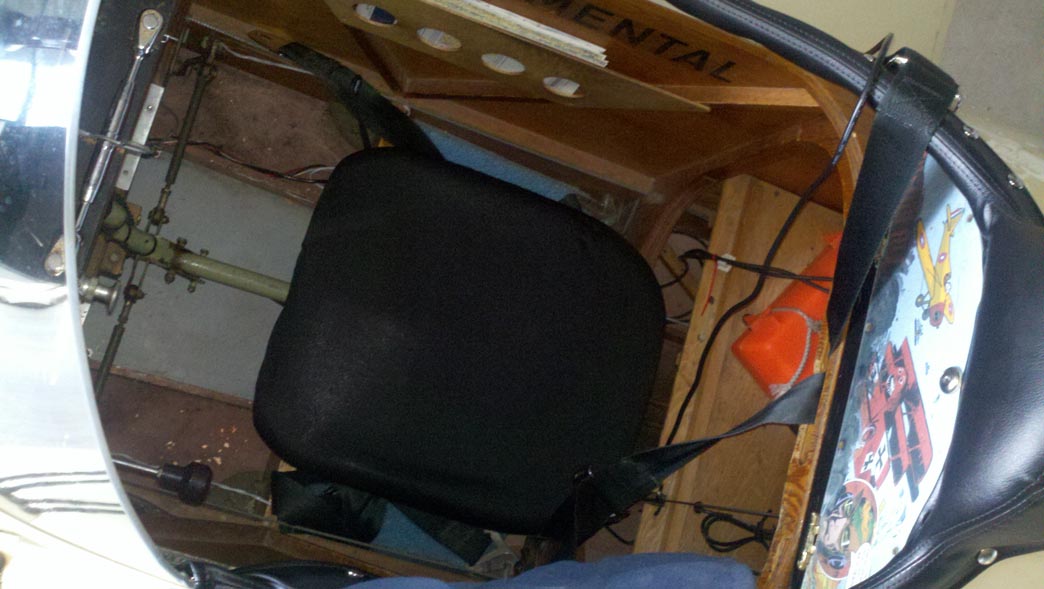
I couldn’t resist. I ran an extension cord to the cockpit, plugged in the seat, and hopped in. A flick of the lever, and the seat rose smoothly, letting me easily grab the cockpit sides to push the rest of the way out.
Back to the store, plastic on the counter, and $150 put me in possession of the seat.
Power Issues
The power cord was a problem, of course. My initial hope was that I could replace the motor with a 12 volt DC unit. Access the motor was easily achieved, but finding a 12 volt unit that would fit the same mounting holes and carried the same gear on its shaft would be problematic.My fallback was an automotive inverter. Many companies sell units that plug into a car’s cigarette lighter port and supply wall-plug power to electrical gizmos. Some of these can be purchased for $20 or less.
How big an inverter? The Uplift seat is rated at 120 volts and 0.6 amps, or about 72 watts. Considering inefficiencies of the inverter, a 200 watt inverter seemed the minimum size. Fortunately, it only runs a few seconds per flight.
Research unveiled an issue when using an inverter to operate an appliance with a motor. The cheap inverters produce a square wave, fine with most electronics (which convert it back to DC anyway) but motors can’t use it. Units producing a sine wave are a bit less common and more expensive.
I found a 200 Watt inverter with a “Modified Sine Wave” output for about $45. A quick test with a battery showed the power was acceptable to the seat.
Assembly
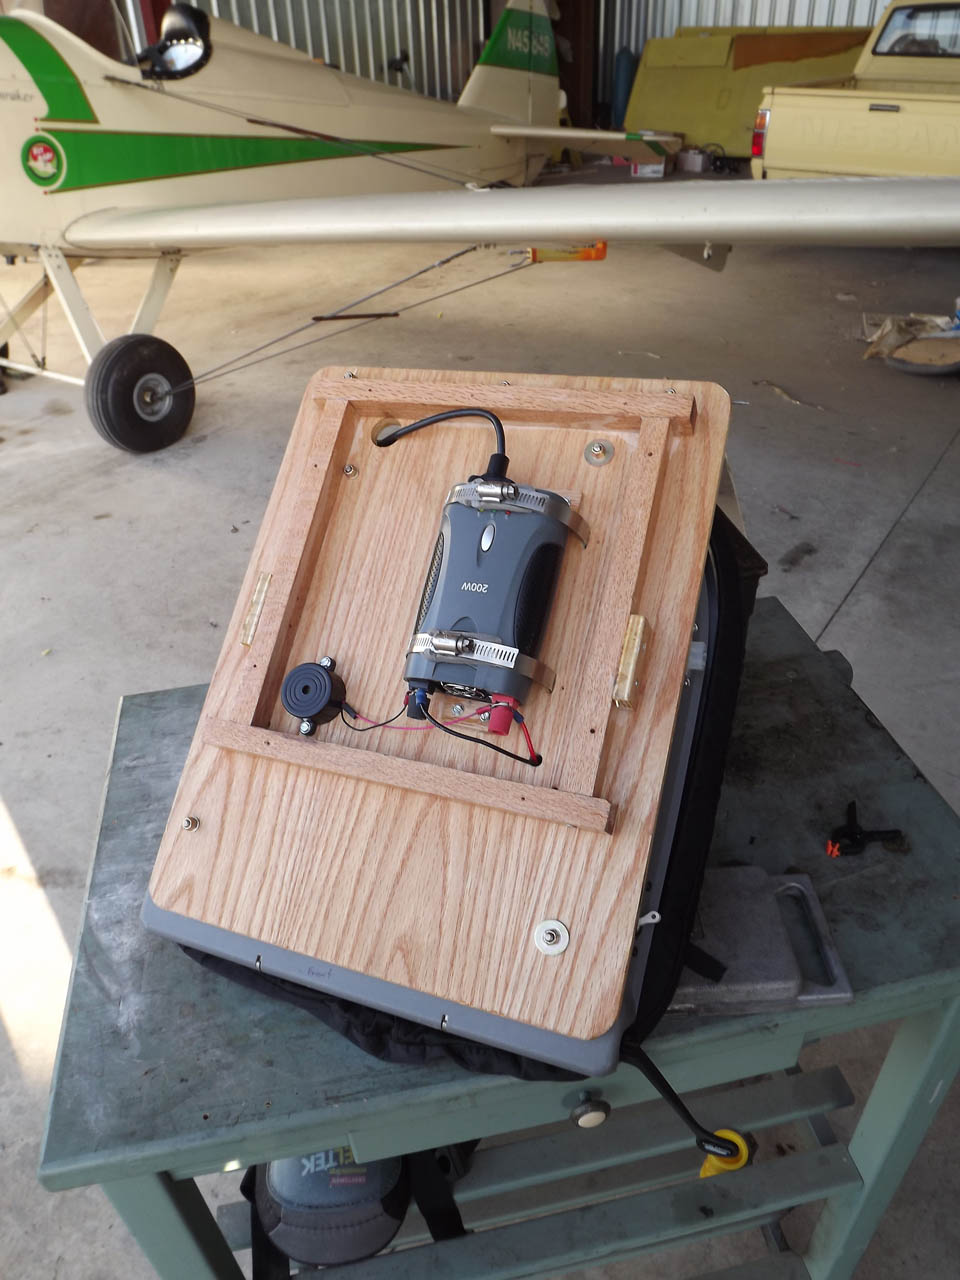
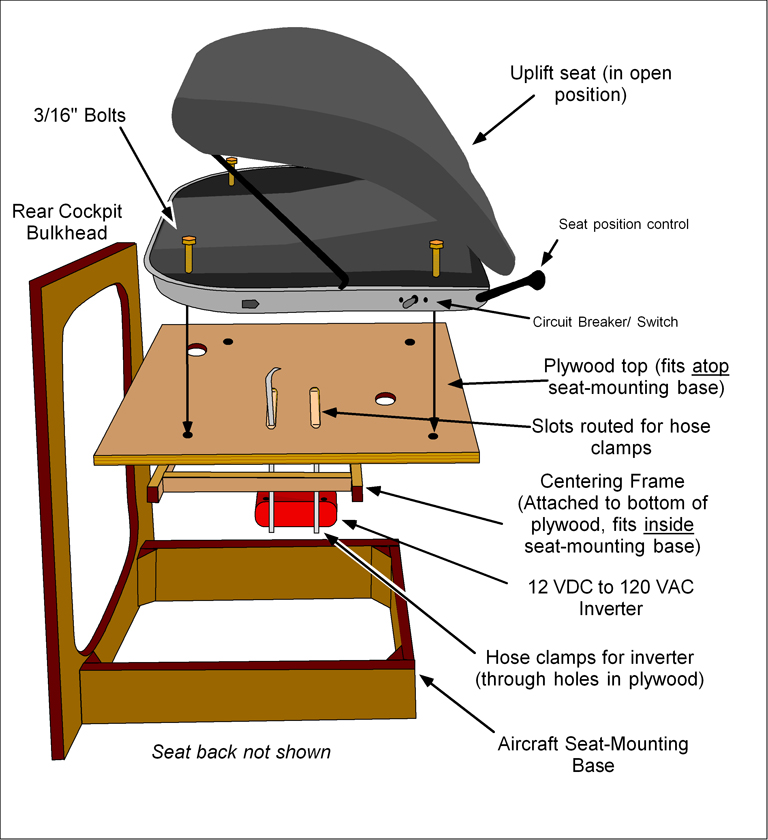
The initial plan was to place the Uplift directly atop the existing seat-mounting frame, adding just a few brackets to keep the seat in place. A bit of consideration, and I reluctantly abandoned that approach. The frame would have concentrated the weight into narrow portions of the seat base, and I was concerned the plastic would eventually crack.Instead, I used a piece of ½” plywood, like the stock seat. A wood frame on the underside of the plywood fit inside the seat-mounting frame to hold the unit in place.
The inverter had a flat
mounting surface with small feet. I installed it
upside down (e.g., an inverted inverter) below the plywood,
held in place by stainless-steel hose clamps (with padding)
through holes in the plywood panel. The top of the
plywood was shallowly routed out so that the clamps sit
flush with the surface. The surfaces were curved
and smoothed with chisels and sandpaper to avoid stress
points on the hose clamps.
With the seat in the full-rise position, access to the inside of the plastic exterior shell was easy. A Molex connector was installed on the outside of the shell for power, as was a combination switch/circuit breaker. A bit of bench testing showed a ~4 amp draw, so I used a 10 Amp breaker left over from a recent electrical-system rebuild.
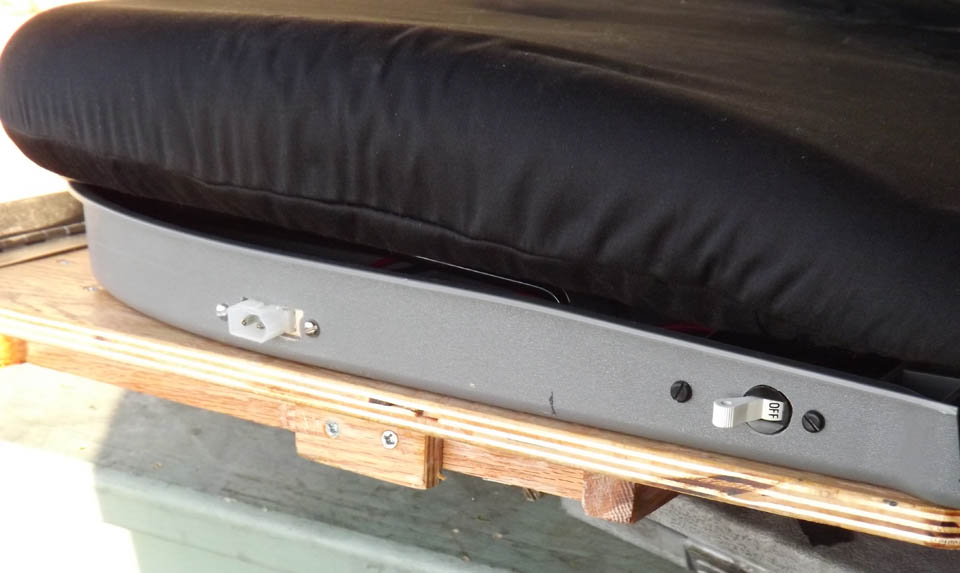
With the seat in the full-rise position, access to the inside of the plastic exterior shell was easy. A Molex connector was installed on the outside of the shell for power, as was a combination switch/circuit breaker. A bit of bench testing showed a ~4 amp draw, so I used a 10 Amp breaker left over from a recent electrical-system rebuild.
Electrical Cautions
Testing showed that the inverter drew about a half-amp even when not running the seat, so I didn’t want to leave it running all the time. Plus, I suspected it might induce a lot of garbage into the aircraft’s electrical system, and I did not want to have the avionics exposed to it. There’s probably little risk, but I didn’t feel like betting that my $45 inverter wouldn’t blow out a $2,000 transponder.For a reminder to turn off the power, I added a piezo buzzer from Radio Shack. Connected to the inverter’s output, it beeps loudly whenever the inverter is powered on.
My recent electrical system rebuild included an avionics master switch, so I make sure to have it “off” before turning on the inverter. Had I planned the seat during the rebuilt, I would have used a DPDT switch for the avionics master, to ensure the seat could not be powered-on unless the Avionics master was off. I could install a small relay to perform the same function, but I’m content with handling via checklist for now.
Testing
The seat works. Turn on the aircraft master switch, verify the avionics master is off, and flip on the seat-power switch and hear the beeper. Pull the seat lever up, and the eight inches of rise makes it easier to clamber out of the cockpit.The seat runs a bit slower on the inverter than it does on wall-plug power, something research had mentioned. It takes about 25 seconds for full rise. It’s a subtle motion, not really apparent other than my adjusting position in the cockpit as the sides drop away. One friend said, “You looked like you have a bad case of gas.”
Here's an animated GIF of the seat. Actual time for the rise is about 20-25 seconds
Back to the Back
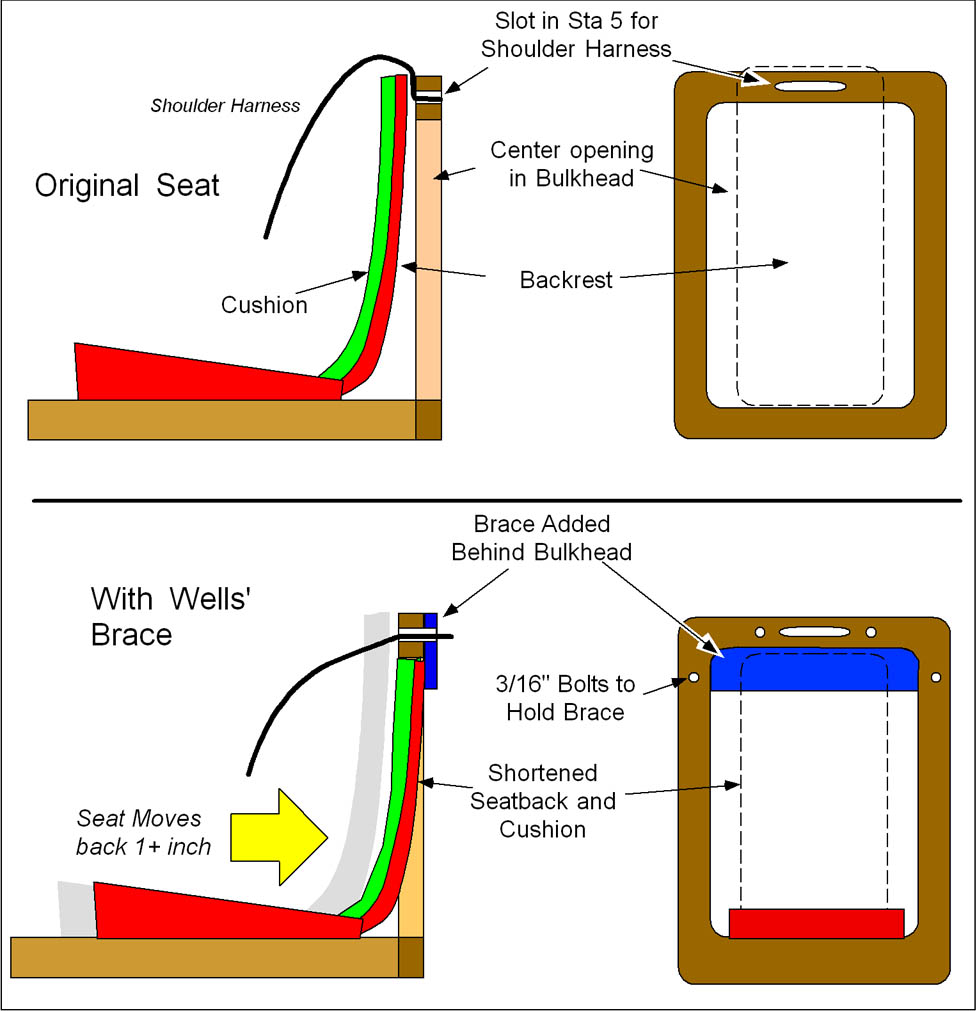
When I first flew with the power seat, I had a temporary back, consisting of just a flat sheet of 1/4" plywood. Most anyone who's flown with a stock seat knows how uncomfortable that straight seat-back is. I could have just added a half-mile of foam, but that robs legroom...which is at a premium in my bird.The final seatback was going to utilize the Wells Seat Brace I installed a couple of months back, so the problem with a flat sheet probably wouldn't be as bad. Probably. But I still thought I needed just a little curve in my seatback.
First thought was to find some really thin plywood and laminate a curved back. A bit of research kind of scotched that; certainly do-able, but really thin plywood wasn't commonly available around here, and pretty darn expensive when one goes to the online sources.
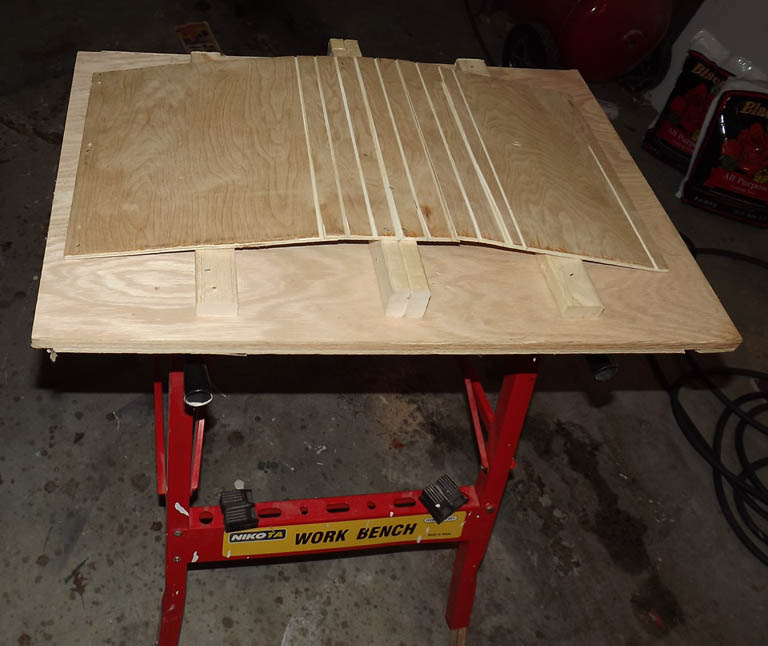
Second thought was to cut a whole bunch of parallel slots across the back of a piece of 1/4" ply, until it was flexible enough to take a curve. Then fiberglass the back to lock the curvature down.
I tried that one, first. Set the table saw to cut through all but one ply, then use the ruler on the saw to space slots 1" apart.
Relatively quick to do. However, when I tried to bend the wood, it still didn't want to go. When I bent it TOO far, there was always one slot that would fail (break) and then the thing wouldn't take a smooth curve for love nor money (the broken line would always be a sharp break). Tried three times, none of they would work.
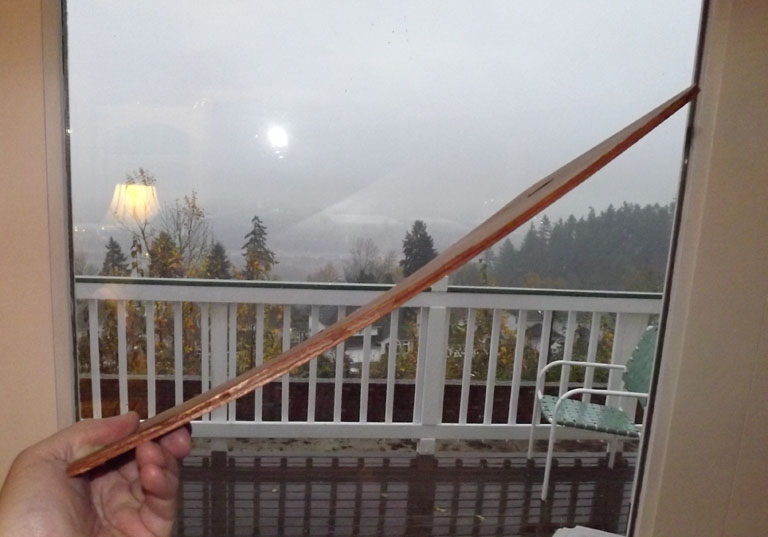
Hmmm. Back to the lamination idea. I checked with the local wood stores and found a nice big piece of 1/8" birch ply for a reasonable price.
I'd need a form to bend it on and clamp it down to. I considered cutting out a set of arcs in 3/4" ply, nailing them down in parallel, then covering the thing with some scrap aluminum.
Then I remembered my failed "slotted" plywood. I used a nail gun to tack a 2x2 across the middle of a piece of heavy plywood (actually two 1x2s) curved the slotted ply across it, and nailed the ends of the slotted ply down. Tuck a couple of 1x2s midway to the ends, and I had a form. It had a little discontinuity at the broken slot, but I figured the plywood would just curve past it.
Next, I covered the whole thing with wax paper. Then I clamped down one piece of 1/8" ply 1'x2', covered it with glue, then slipped another piece of ply atop it, removing/reattaching clamps as necessary to get the two pieces together

Now, where should the curve go? I had marked on my flat test plywood where the most pressure had been on my back. I adjusted the new curved back to put the apex of the bend at that spot, then cut it to fit.
A test fit in the airplane showed it fit within the inlaid area defined by the Wells brace. I threw a bit of 1" temperfoam atop it and sat down. No "hard spots" like the flat sheet had had, however, I could feel the ridge of the bulkhead very slightly. The 1" temperfoam wasn't quite enough.
...I was feeling the bulkhead/foam interface area on top). I figured a piece of normal 1" foam would take care of the problem.
To hold everything in place, I needed some upholstery for the seat back. It seems like every ten years or so, I need to make a new seat cover for some reason or the other, which means I have to re-remember how to use my sewing machine.
("My" sewing machine for a good reason: It was a birthday present for my wife, the first year we were married ~32 years ago. I got smarter after that. In any case, I'm the only one who has ever used it, always for Fly Baby seats.)
Off to the fabric store, always a fun time for an American male. I fight the overwhelming urge to only pick up camouflage cloth ("See! See! I'm a macho man!") and poked through the solid colors. I found a nice black heavy-duty cotton and bought a couple yards of it.
(All right: Gotta insert my favorite fabric-store story here. Years ago, the store I went to was right next door to car-parts place. As I arrived, I saw two young guys trying to get their car started. It was backfiring all over the place. I leaned over, offered some totally useless advice, then continued into the fabric store. Which was empty. What the heck? Then I saw a woman in the far back of the store, peeking around a doorway. Then the car outside went through a series of backfires again, and I realized what was up: "It's OK folks...it's just car backfiring next door. And about a dozen people came back out....)
So any, I got the cloth, dug the sewing machine out of the garage, re-read the instruction book again, and got to work. The basic design would just be a bag, slipped down over the foam and wood and secured at the bottom. Think of a "U" shape, with the bottom of the "U" being the fabric folded, and two lines of stitched applied on either side.
I cut my fabric in half, giving enough for two covers. I folded a piece in half and stitched down one side. Then I tucked ONE piece of foam and the wood back into the half-bag, laid it flat, tucked the fabric tight, and laid down a chalk line for the other side. I used only one piece of foam, hoping things would be nice and tight when both were installed.

(Rumors that I wore an apron to match the tablecloth are totally false)
But when I sewed the next seam, I actually put it about a half-inch inside the chalk line. I had enough to do a second cover, if needed, and I wanted to fabric to be tight.
Then...try to assemble. Surprisingly enough, my eyeball by-guess-and-by-golly method worked great. The foam fit tight, but it did fit.
Bolt the seat back to the piano hinge on the base, and take it out for a
try:
Plug in the power lead and sit down. Pretty comfortable. Hit the master, turn on the seat power, and hit the "eject" button. Rises up normally, and getting out is a bunch easier.
The Bottom Line
The bottom line was surprisingly reasonable.Cost? Less than $250, including the seat, inverter, buzzer, connectors, and associated wood and fabric.
Weight? The seat-lift mechanism itself weighs 12 pounds, and the inverter was less than a pound, plus a pound or two for the wood and other bits. But my old seat was surprisingly heavy, and the net weight gain was only nine pounds. The simple operation of the seat, including its dirt-simple flat-bottom interface, would probably suit it for any number of other homebuilts.
Eventually, a fancy new store-bought knee is probably in my future. Hopefully, my “Moron-Baker” ejection seat will let me keep flying until then.
Ron Wanttaja
 Return to the Tech Page