Updated November 2018
Note: This posting provides a lot of detail on the various paths I took trying to develop this headset. If you wish only the technical details (e.g., how to actually build the headset), click here.
Back in the dawn o' time when I learned to fly, nobody wore a headset but military pilots. Aircraft cabins had huge freakin' speakers and volume controls that went up to 11. If the sound of the engine was too loud, and manly men (and womanly women) would merely squint a bit and turn the knob up.
I quit flying, temporarily, in 1977 (oddly enough, to go into the Air Force) and when I got out, I owned a 150 for a couple of years, then switched to (good ol') Fly Baby N500F. Since the Fly Baby didn't HAVE a radio, the headset question was moot.
By the time I bought half-interest in a Stinson in 1994, everything had changed. Headsets were standard now, and after a flight or two, I realized how much more comfortable flying was with the noise blocked from my ears. When I bought Moonraker in 1996, I flew several years with my old, passive headset, then upgraded to a unit with active noise attenuation.
Over the years, I've seen a lot of complaints about headsets. They're heavy, and people hate the "clamping" effect on their heads. Ear seals are sensitive, and can be messed up by eyeglasses or sunglasses.
These issues didn't affect me, much. I don't fly all that long (usually less than an hour) and my head is invariably wrapped in a leather helmet anyway. My problem with a headset is merely cosmetic: They're ugly, and don't match the suddenly-it's-1920 ambiance I prefer.
So I built my own...one that will fit under a standard, unmodified flying helmet, with only a microphone boom poking out to show there's electrons sharing space with the one or two brain cells I take with when I fly. Audio is delivered to my ears via standard ear buds or foam earplugs with speakers built into them.
It didn't strike me until afterwards that the design might work for those who dislike the drawbacks of conventional headsets, as well. It eliminates the clamping, and the weight is less than a quarter of that of a conventional headset...about three ounces.
Depending on the decisions you make, total parts cost about $100... a third to a fifth that of commercial in-the-ear headsets. And the vendor of the $300 equivalent said they wouldn't work under a leather helmet, so that took them out of the running for me, at least (they're highly thought of by closed-cockpit flyers).
The headset is basically two parts: The microphone boom, and the electronics/hardware needed to use consumer-grade earplugs in an airplane. Let's address the parts sources first, then discuss those two aspects of the design.
It should be noted that my first attempt tried to combine the earplugs and mike boom into a single package. For reasons I'll discuss in the Earphone section, I decided to make them separate.
By the way, Carl Peters has an excellent write-up on his own headset design on the Vans' Air Force site. I referenced his discussion several times while working out my mike boom.
PARTS
Other than some of the wiring stuff you'll pick up almost
anywhere, there are three basic items you need to procure.
Microphone: Aircraft Spruce sells several
microphones designed to replace the elements in standard
headsets. I initially bought part # 11-04838, an A1060
microphone element, for $29. Through no fault if its
own, I later bought a Flightcom A-9 through ACS as well,
P/N 11-08765. I bought it while troubleshooting a "dead
mike" issue that turned out to be a broken wire at my
end, there was nothing wrong with the original mike
element. I haven't tested the $29 element in the air,
but it does work on ground testing.
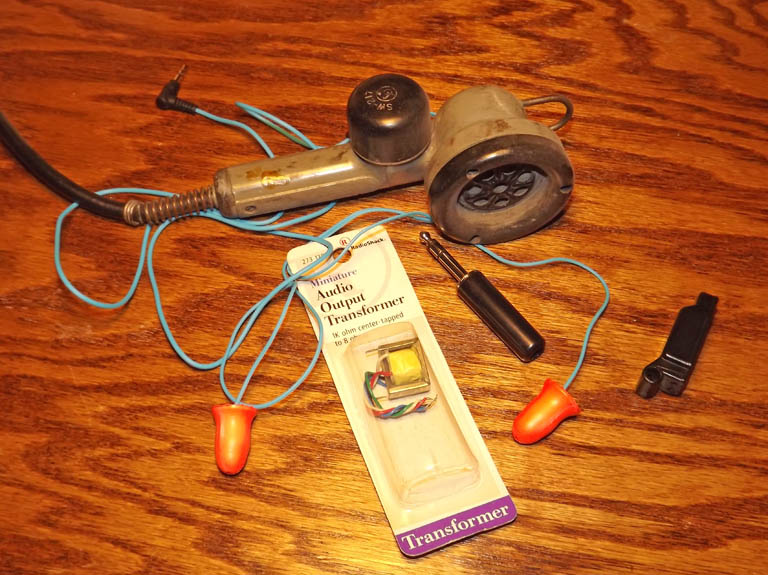
Plug: Aircraft headphones use a standard 1/4"
audio plug, available at Radio Shack. However, the
microphone plug is different...it's slightly smaller, about
0.20". It was a common plug in the '20s, when it was
used in telephone exchanges (e.g., the operator plugging a
customer into the line they wanted) but the only use for them
nowadays is aviation. Hence, it had to be bought from an
aircraft supplier. ACS P/N 11-05995, cost $6.
Matching Transformer: Aircraft headphones are
300 ohm impedance, but consumer-grade electronics is 8
ohm. They won't work unless you match impedances.
Fortunately, this matching requires only a common Radio Shack
audio output transformer, part number 273-1380. I
stopped by a couple of Radio Shacks and they didn't have
them! Getting nervous, I ordered some online...and they
were backordered! I finally stopped by my closest Radio
Shack, and they have *five*. I bought a couple...and
then my online order came through a month or so later.
They're only about three bucks.
You'll also need a set of ear buds or similar in-the-ear
speakers, the wire to connect them all up, and any other
additional connectors you wish to incorporate. I used
leftover shielded audio cable for my wiring. A few 1/8"
plugs and inline jacks, ~$3 or so each.
THE MICROPHONE BOOM
First decision was to decide how the mike was going to "attach" to my head. I didn't want a frame that went over the top of my head, to keep from interfering with the helmet (or baseball caps, for the closed-cabin crowd).A couple of online sites mention using piano wire or coat hanger wire. I fiddled with a coat hangar, but I had a behind-the-head set of earplugs that I'd tried out several years back:
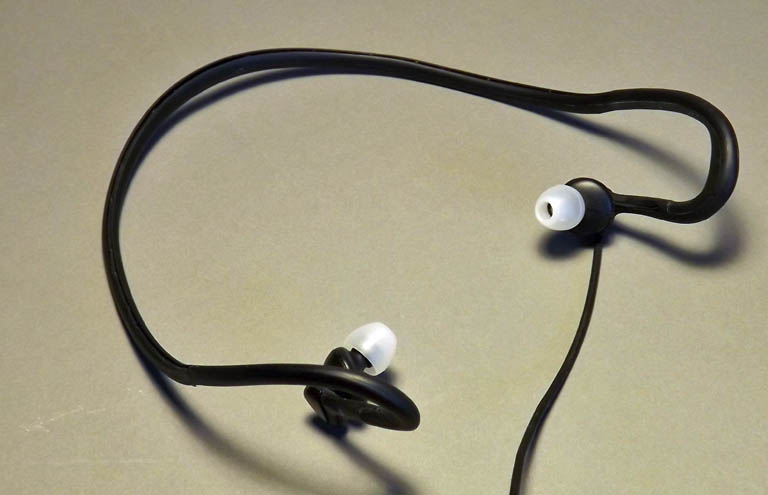
I liked the style...they basically rested atop your ears, but went back around the bottom of one's head, just above the neck. Decided to try using these. The plugs themselves were uncomfortable in my ears, and I wanted to use the Plugfones, so I cut off the earplug section to just leave the frame itself.
Desired Features
 One
thing I wanted was to have the system behave very close to a
commercial headset. Which meant I needed a flexible
microphone boom.
One
thing I wanted was to have the system behave very close to a
commercial headset. Which meant I needed a flexible
microphone boom.Why? Normal operation of an aviation microphone puts it just touching your lips, and it's nice to be able to just slide it away from your face occasionally. A hard boom wouldn't allow that.
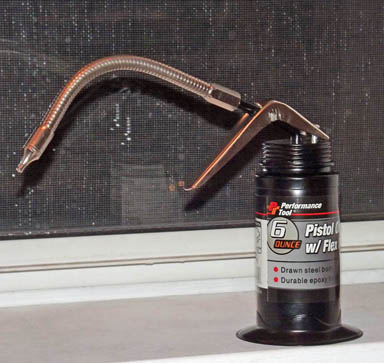
What to use? Geeze, I needed a length of flexible tubing (metal or plastic) that would allow wires to run inside, support the weight of the mike element at the far end without sagging away, and allow the mike to move around by an inch or so.
Found the (initial) answer staring at me in the garage:
Yup. Ordinary oil can.
Kinda liked the chrome color...kind of an "art deco" touch that would go with the old-style look I was trying for.
A few nights of experimentation, and doggone it, just wouldn't work. It was a bit short, and making a fitting that allowed it to screw on at the frame end but with a hole in the middle for the wires just didn't wash.
Then I noticed something my wife had bought me, several years ago. It was an LED light designed to plug into a USB port for light around a laptop computer. Notice the beautiful metal flex tube:

I cut it apart, and it looked like it'd do quite well. But I had trouble with the wires; they seemed to be stuck inside. Eventually mucked it up so bad, I went out to buy another.
And it happened again: No one had them. Some had ones with plastic tubing (extremely flimsy, wouldn't hold position). The only metal one was a white "Hello Kitty" light. Didn't think things were THAT desperate, yet.
Found them again, on Amazon (search for "USB Flexible Light"), $6 each. Bought three. Took one apart when they arrived, and the wires were free inside the tube.
Holding the Mike
Four years ago, when I built my first mike boom, I came up with
a quick-and-dirty solution for holding the microphone. It
worked well, but it did take a bit of fabrication time.
Since then, I've discovered there's a nice little $5 component
that makes this MUCH easier... and you don't have to find some
12-gauge wire for connecting to the mike leads or have a mike
element that has a slot for a big vertical screw.
I've made two more mike booms since, both using the new
method. I really like it. I've included the old way,
too, just in case you wanted to do it that way.
The NEW Method
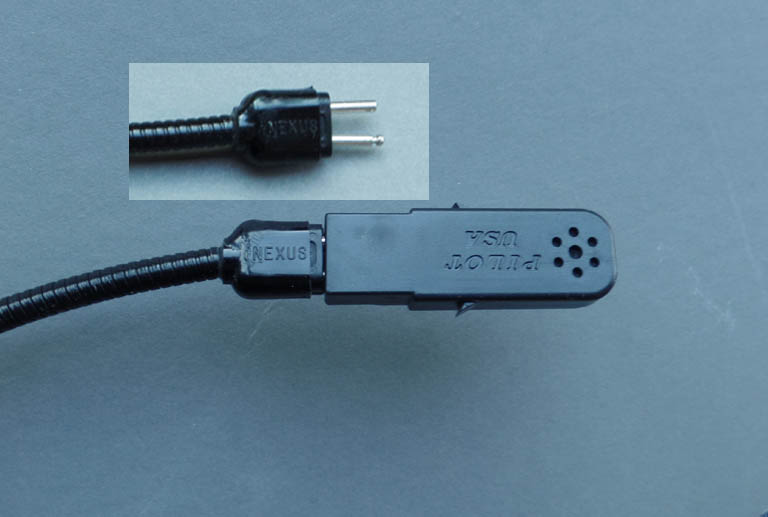
 The key to the new mike attachment system is the
U173/U microphone attachment plug. This plug has two pins
designed to slip right inside the mike contact holes and get
held by the two little screws on the mike element. It
sells for $3.50 on Aircraft Spruce. Buy two or three, just
for spares.
The key to the new mike attachment system is the
U173/U microphone attachment plug. This plug has two pins
designed to slip right inside the mike contact holes and get
held by the two little screws on the mike element. It
sells for $3.50 on Aircraft Spruce. Buy two or three, just
for spares.
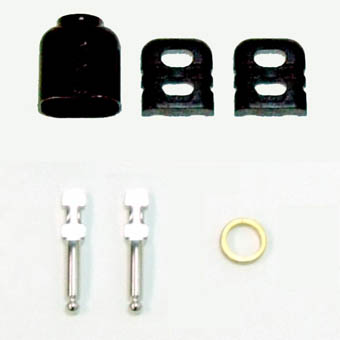
the U173/U consists of a plastic top and bottom for the center
insert, a one-piece outer shell, and two pins. The end
opposite the mike element has a largish hole. It probably
isn't going to be the right size for your flex tubing, but it
can be easily reamed out with a drill bit or exacto knife.
Remember, you want a tight fit, here.
Solder your mike wires to the ends of the pins, and slide them
into the mike element. Make the wires plenty long, to run
all the way through the flex tubing with lots to spare.
Assemble the two haves of the inner insert of the plug over the
pins. The pins themselves have to be rotated to a specific
angle; this puts the wires towards the inside of the plug.
Slide the outer shell over the flex tube to check its
fit. Make sure the insert portion with the pins will slide
inside. Then remove the insert and epoxy the flex tube to
the outer shell. Depending on how daring you're feeling,
you can even just epoxy the whole thing together. It's
cheap enough, if you botch it...new plugs are only $3.50.
Now you know why I suggest you buy extra. Pack epoxy into
the interface between the tube and the outer shell. A
little excess is fine. I apparently scrimped on one mike,
and the interface came loose. Surprisingly, it didn't
really affect the ability to position the mike in the right
place.
The picture below shows what the assembly looks like, all
together, with an inset just showing the plug itself.
The OLD Method
This is the original method I used to build mike holders.
Nothing wrong with it, it works fine, but it does require that
the mike element have a big vertical slot for a mounting bolt.
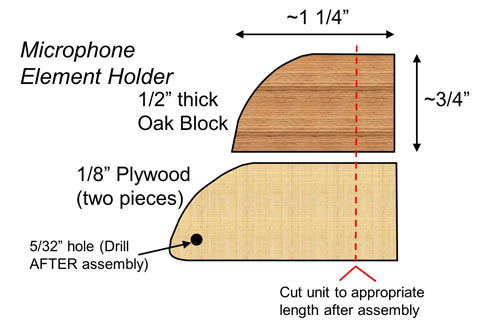
The diagram on the right shows the basic design. The outright shape isn't critical...the only critical dimension is the position of the hole where the bolt goes through to hold the mike. This has to be far enough away from the block sandwiched between the plywood so that the element can be bolted in place and be able to rotate. See the wood-and-metal test model below.
The oak block gets a hole bored through (left to right as the diagram on the right has it positioned) to accept the flex tube. This is easier before the cheek pieces are glued on...in fact, it's much easier before the left side is beveled back.
The width is about 3/4ths of an inch...but, again, isn't really critical. In my case, I rough-cut the pieces, epoxied them together, let them cure, then sanded them down so they matched. As the diagram shows, the length is really too long...cut it down as shown (or even a bit shorter) after letting the epoxy cure. Use your benchtop sander to round the edges of the finished unit.
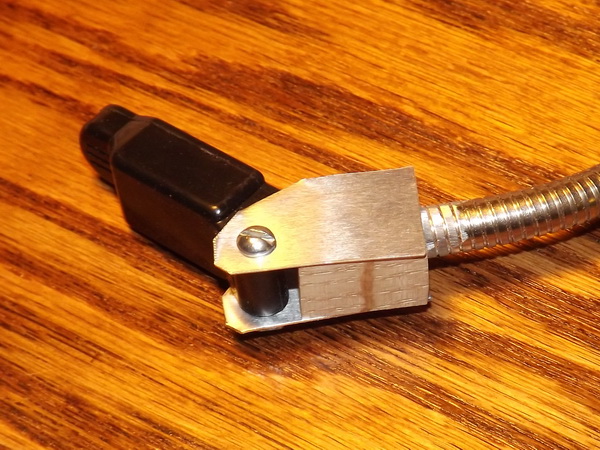
For reference, here's a picture of a rough wood-and-metal test model I built.
Serendipity
All the pieces were available, so it was time for a test fit. I used some tie-wraps to attach the boom to the plastic headphone frame I was going to use, and put it on. Fit comfortably...but there was no stability. Any head movement put the mike to bobbing on the end of the boom. The plastic frame wasn't stiff enough.Damn. NOW what to use for the frame. I fiddled with a bit of coat hanger wire. Hmmmm...probably would work, but would be hard to make smooth bends and not look crude. Carl Peters used piano wire from some hinge, but I was loath to use my limited stock of hinge wire.
This is where serendipity comes in. At the same time, I was working out how to connect the skinny wires in the flex tube to the mike element. The element's electrical connections were two sockets and a pair of set screws. Pretty straightforward, until I discovered the set screws were REALLY short. It was designed to accept a connector with stout pins.
I tried my stock of ordinary wire. Too skinny. I grabbed a roll of Romex (house wire), and tried it. ALMOST worked. My Romex was 14 gauge...maybe 12 gauge would work?
As I contemplated going out to buy some 12 gauge Romex for, basically, a half-inch of the wire, I fiddled a bit with the Romex. Hmmm. Solid, but moldable. Holds its shape. I doubled over a length of it, molded it into a shape that'd fit over my ears and down below the back of the head. Pretty solid, and comfortable. I curved it to go to my lips, and taped the mike element and holder in place. Perfectly solid, no motion when I moved my head.
Looks like 12-gauge Romex would solve *two* problems!
I bought a small spool ($15 for 25 feet). It was, indeed, the right size for the microphone element. I molded a set to fit over my ears, and it worked really well.
A bit of safety wire to attach the boom, some black shrink-wrap to clean it up a bit, and here's how it looked:
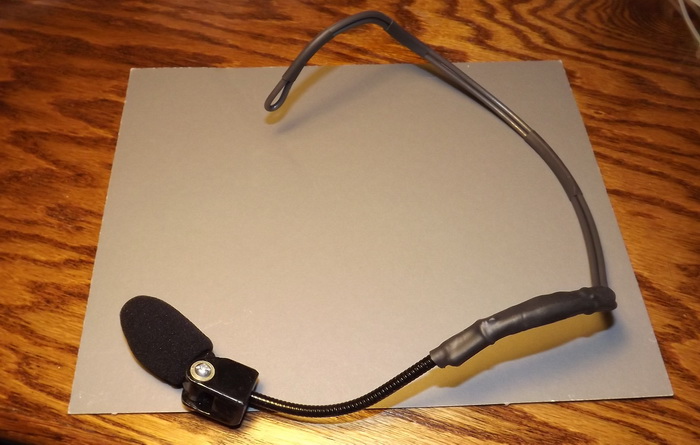
Note how the doubled-over piece of Romex has the "loop" on the right side of the boom...opposite of the mike. This gives is a smooth surface that doesn't need any padding. Also, it leads the wiring down off the headset.
After I built the headset, I found the "official" connector that fits the mike element: It's a type U-173/U connector, available at a lot of places, cost is less than $5.
A simpler (and probably better, electrically) way to attach the wiring to the microphone. However, it would be tough to adapt to the flex tube....
Wiring
The basic process was to connect the microphone element to the wires running through the boom, and the wires in the flex boom to the shielded cable that would run off the headset.Ideally, I would have run the shielded cable through the flex boom and eliminated one splice. The problem is, there isn't much room inside the boom! The wires that come with it are 26 gauge (or smaller!), and one can't really push anything else through.
The mike element needed 12-gauge pins to make contact, so the first step was to solder those 26 gauge wires to short pieces of 12-gauge solid. A bit of heat-shrink afterwards, and they looked pretty solid.
(Hint: Even if you don't use the system utilizing the U173/U plug above, the pins are perfect for this application. $3.50 for a plug is probably cheaper than if you had to buy a whole pack of 12-gauge house wire.)
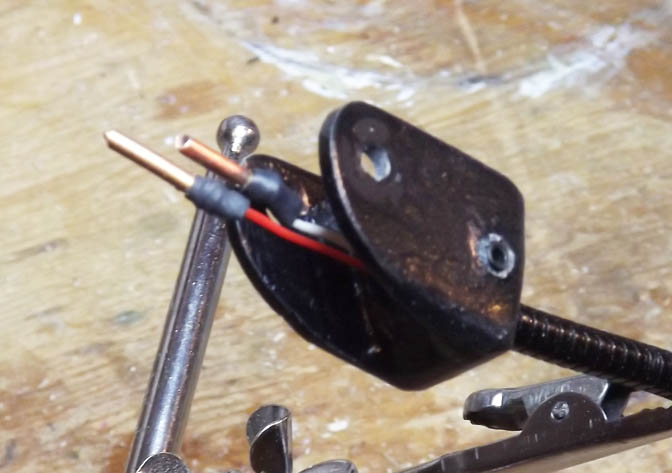
(Note that you can see the set screw that holds the mike-holder to the flex tube, as mentioned earlier.)
Last stage was the cable that comes off the headset to connect to the airplane mike jack. One of the things I wanted was SHORT headset cables. Since I had to cram plugs in my ears as part of the headset donning process, I wanted to insert them before getting into the airplane. I didn't want them dangling low, getting under me when I tried to sit down.
My ideal was that used by military flight helmets. They have short connectors, and the pilot hooks it up once he's seated and strapped in. So I ran the mike cable out of the headset by a foot or so, and installed a Molex connector there. Then, I built an extension cable, with a Molex connector on one end and that 0.20" mike plug at the other. You can run it continuous, if you intend to don the headset inside the airplane.
The Molex plug would keep me from accidentally connecting the microphone to the earphone cable. Unfortunately, somehow, one of the wires to the Molex plug was damaged, and the mike didn't work on the first test. I eventually tracked it down to the connector...after buying a more-expensive mike element, on the assumption that the original one wasn't right for my radio. I replaced the Molex ssytem with another 1/8" jack and plug combo, with the OPPOSITE gender from the headset. In other words, the earphones have a male plug, but the mike has a female jack. That way, it's impossible to connect them the wrong way.
It looks good, and fits under the helmet nicely. Never mind the ugly Fly Baby driver underneath....
One thing was added. The interface between the flex tube and the headset came out a bit thick, and it was actually a bit uncomfortable atop my ear. I made a small strap out of black 1/2" Velcro strip. This goes from the ear position on one side over the top of my head to the other side, lifting the band slightly and keeping the weight off the ear. Works pretty well...I don't even notice it, when I have it on.

Another Option
So what about that thickness above the ear? Well, I
could have changed the design a bit so that the flex tube
attaches to the Romex before it goes over the ear.
But consider: Why do commercial headsets have adjustable
microphones? So they can fit different-sized users, of
course. But if you're building the system for yourself,
you don't really need the flexible boom.
So why not run the Romex all the way to the microphone holder,
instead of using the flexible tube? Drill a couple of
holes just large enough for the individual Romex cables, and
epoxy the mike holder to the end. Bend the Romex so the
mike's in the position you want.
You might be tempted to attach the two Romex cables directly to
the mike element. However, you do, still, want the mike at
the end to swivel a bit, and a direct connection would prevent
that.
Haven't tried it, but it would probably work. Be more
comfortable, too.
EARPHONES
 OK, we've got the mike handled. Let's get the
sound to your ears.
OK, we've got the mike handled. Let's get the
sound to your ears.I had installed standard ear buds on the Russian Helmet conversion I'd done several years ago. However, I really didn't like the "buds"...too hard, too uncomfortable.
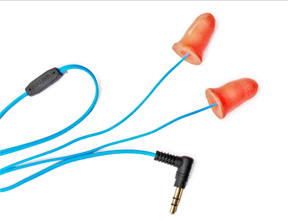
Shane Costello-Reiche suggested "Plugfones": Basically foam earplugs with little speakers mounted inside. I really liked the idea, and I soon had four pairs to experiment with.
As mentioned earlier, the consumer-grade ear plugs won't work directly with an aircraft radio...you need an impedance matching system. This is cheap little Radio Shack transformer. Electrically, the connection is very simple...see this diagram.

I didn't like the idea of putting the transformer on the headband, because I was hoping to keep the headset very slimline (the transformer is a 1"x1"x 3/4" block) and was concerned that the Plugfone wires would be tough to connect to, as well. But I gave it a try.
And failed. The wires were like the ear buds, no way to reliably connect to them.
Well, that's why I bought four pair of the Plugfones. Decided to install the jack on the headset (which meant I had ~3' of headset wire to coil and try to store on the band, as well) and install the adaptor on the headset wire just before the plug. That's the option at the top left of the above diagram.
I built it that way...but didn't like it. That was a lot of crap heat-shrinked to the mike frame. It got awful bulky, in back. The Plugfones dangled loose, and looked like they were going to be impossible to protect from dirt, etc. during storage (after all, I stick them in my ears!). The final decision came when one of the ear buds went bad... probably due to all the messing around, wrapping up, and tying down. I decided to make the mike frame and the ear plugs separate, and cut the ear plugs from the mike boom. This lets me keep the ear buds in a separate container, and simplifies carrying spares if one set fails.
Enclosing the Transformer: Try #1
So I've got a transformer to enclose and build into the system. The trouble is, I hate "boxes". I'd prefer a molded approach so that nothing can shift around, break, etc. When I was a kid, a company called Burnstein Appleby sold electronics modules that were molded epoxy, with just a few wires sticking out. Connect up a battery to two of them, a mike to another, and an antenna, and you had an AM transmitter.I wanted to try the same approach. I would wire up the transformer and put it inside a small mold, with the wires coming out holes poked in the opposite ends. Then I'd cast the thing in epoxy.
What *kind* of epoxy? The conventional hardware-store types were too expensive for the amount I'd need...had to find it in bulk. They were also clear, which is not what I wanted. They also were a little too runny; I figured I needed something pretty darn stout.
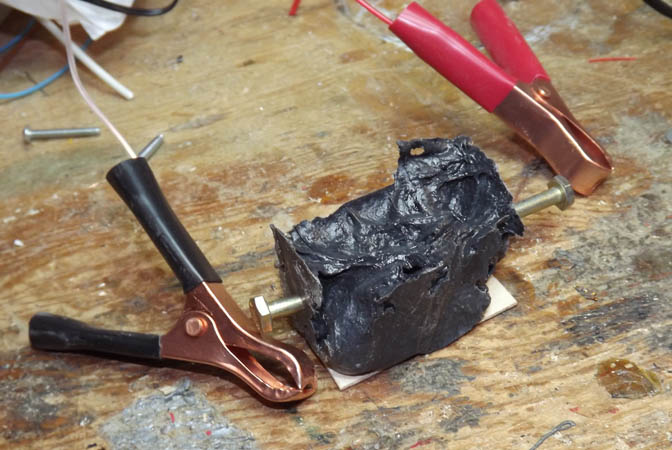
Anyway, to make a long story short (too late!), I found some structural epoxy that I thought would be perfect. Got it...and found out it was a little TOO viscous. It didn't flow into the mold...at least without a two-ton press. I gave it a test, though, and the result was laughable: it looked like a Frankenstein booger. A couple of bolts, a couple of alligator clips, and the analogy was clear...
Enclosing the Transformer: Try #2
Okay...getting the whole headset close to being done, so I needed a solution quick.Radio Shack sells "project enclosures," but they're much bigger than that little transformer needs. My wife told me about tiny jewel display boxes, designed to display a loose jewel. Bought one for several hundred dollars at the local jewelers (it did come with a nice Christmas present for my wife) and installation of the transformer was pretty straightforward:
Enclosing the Transformer: Try #3
Try #3? You've already got a working example.Yes, but: I really wanted to make a molded one work. I decided to try casting resin, the kind you buy at the hobby stores. For a mold, I picked something most middle-aged American men have stacked around... a pill bottle.
I started by wiring up the plug and transformer....
...then covered the whole shebang with a piece of heat shrink, with tie-wraps to hold the wires tight. This got the diameter down to less than the pill bottle.
 I cut off the bottom of the pill bottle, and drilled
a hole in the removable top so that the plug would fit
through. I also slit the pill bottle down the side and held
it shut with tape. Splash some mold-release inside.
Insert the plug into the hole in the pill-bottle top, click the
body of the pill bottle in place, punch another hole in a piece of
cardboard for the plug, then position it over a cup to catch any
casting-resin overflow.
I cut off the bottom of the pill bottle, and drilled
a hole in the removable top so that the plug would fit
through. I also slit the pill bottle down the side and held
it shut with tape. Splash some mold-release inside.
Insert the plug into the hole in the pill-bottle top, click the
body of the pill bottle in place, punch another hole in a piece of
cardboard for the plug, then position it over a cup to catch any
casting-resin overflow.The store had tints available for the casting resin. After a careful inspection of the fusias and pinks, I selected a good all-American black.
Mix the resin, pour it in. Let it sit overnight. Hmmmm... a bit of shrinkage, wasn't full like the night before. Mix some more resin and tint, try to match the blank, and fill the pill bottle back up. The red and white wires at the end still stuck out a bit...probably not an issue. After all, I figured the pill bottle was going to be permanently stuck to the resin and I wasn't going to be able to use it, anyway.
Let it cure for several days. Overnight was supposed to be sufficient, but what the heck.
Ok, time for the grand opening. Pull the pill bottle up, twist the cap. Nothing moving.
Grab a vise grip. Grunt. Still nothing.
Laughing, I decided to whip out the "big guns". I clamped the bottle in the benchtop vise, and grabbed a pipe wrench with a long handle. Unghhhhh....
...and the top turned.
Wonderingly, I took it off the rest of the way and looked at the plug end. The resin was perfect cast of the inside of the bottle cap.
Surely the body will be completely stuck. I slit the tape holding it together at the cut. and stuck the knife blade between the resin and the end. The plastic lifted away. Off it came...and boy, it looked pretty good!
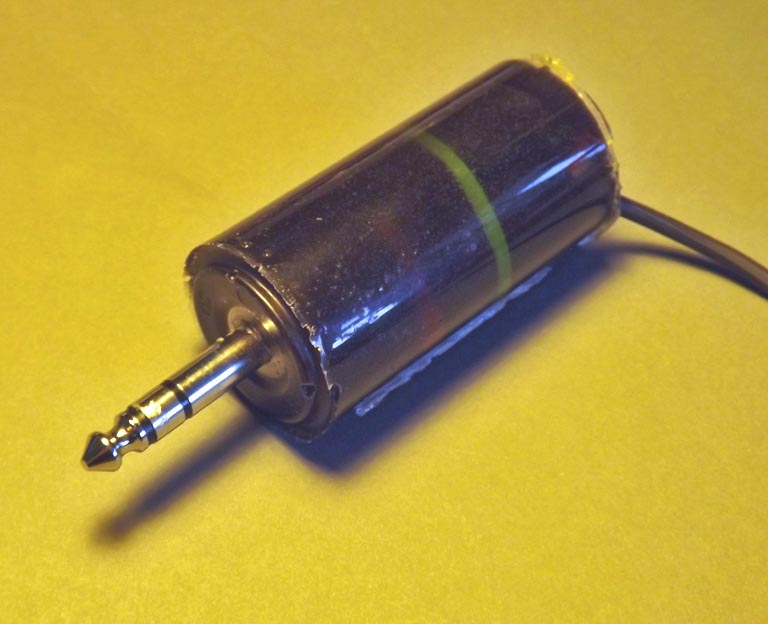
You can see a bit of "flash" from the slit in the pill bottle...and the ghostly form of one the tie-wraps, underneath the resin.
The ironic thing? I never expected this to work, so I didn't ELECTRICALLY TEST THE ADAPTOR before casting it!
Looking at the pictures, though, everything seems to be hooked up right. We'll see.
TESTING
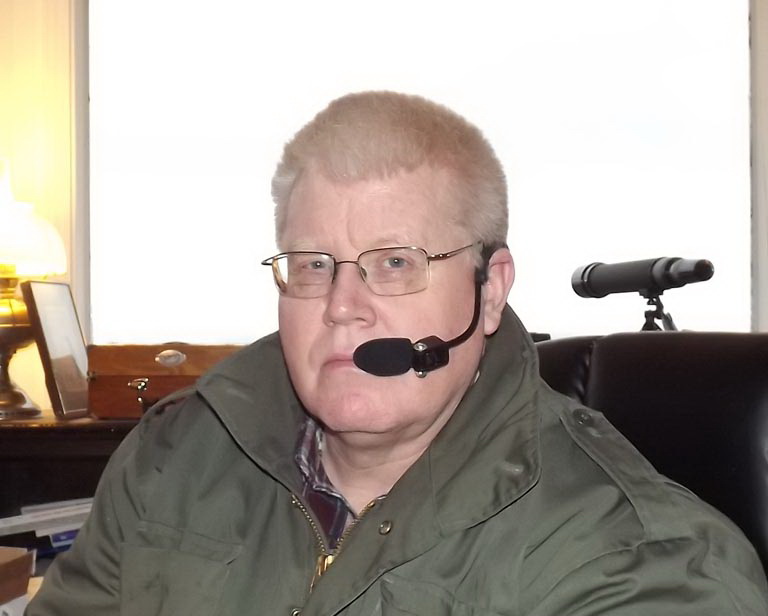
Both halves of the headset together, time to give it a try.With a complete under-helmet-capable headset, I wore a complete revamp of my flying headgear. My current helmet has the big holes for a conventional headset, and of course, I didn't need that, now.
Several years ago, I received a replica WWI German flying helmet for Christmas. It, of course, doesn't include provisions for a headset. The headset fit nicely beneath.
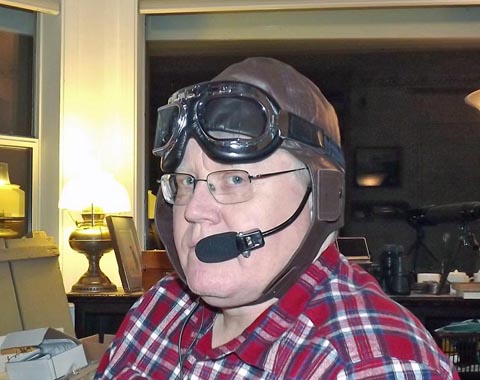
The goggles were purchased from a local Motorcycle shop. They are not set up to accommodate glasses. The company makes a pair
that is, but they are kind of ugly and large (I've got a set...they look like a SCUBA mask).
I modified the smaller pair of goggles to work with my glasses. It basically took a bit of work with an Exacto knife...cut away a bit of the padding between the lenses to accept the bridge of my glasses, and also carve it back slightly at the temples. This actually worked quite well; the goggles sealed nicely, but didn't put any pressure on the glasses.
I turned out that, the way I installed my radio, it had an 8-ohm output impedance and didn't NEED the impedance matcher. I tried a set of Sennheizer CXC 700 ear buds (cost ~$100). They worked pretty good, but the ANL had the usual faint popping noises you get when it tries to operate in an open-cockpit environment. Plus, they're hard... my ears were hurting after having them crammed in for 45 minutes.
I tried a set of the Plugfones "Ranger" ear buds...they've got flanged plugs, like folks use on the gun ranges, and claim an impressive 25 dB of attenuation. No popping or other artifacts like the ANL, and they were extremely loud and clear.
I had two opportunities to get feedback on how well the transmit side worked, both positive. One comment: "I heard you say, 'Fly Baby', and I said, 'Isn't that an
open-cockpit plane? It doesn't SOUND like an open-cockpit plane!" He says most open-cockpit transmissions have a lot of "warble" from wind noise, and that didn't exist with my setup. Very good audio quality, he said.
The Plugfones came with the wires wrapped around and held together with a twist-tie. I slipped enough wire out of the twist-tie, and retightened it. I like how it came out, so that's going to be my standard setup from now on.
So: The pluses:
- Met its primary design goal: Fitting under the helmet.
- Was comfortable to wear. That thin strap across the top of my head took all the pressure off my ears.
- Outstanding transmit audio quality.
- Good receive quality
Ron Wanttaja
 Return to the Tech Page
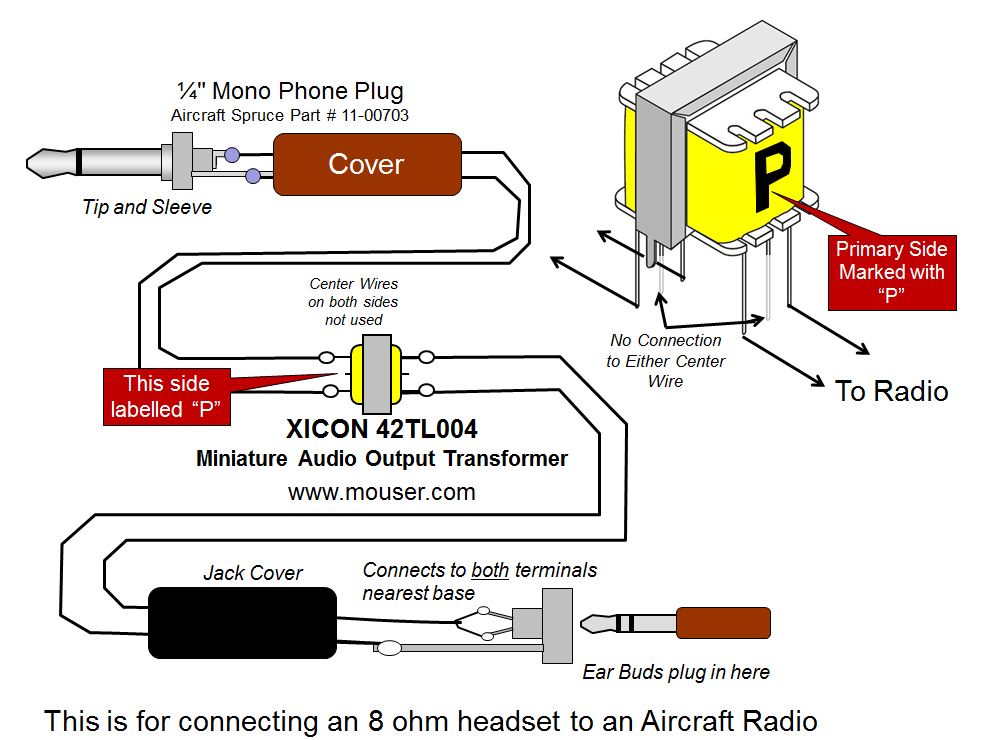