A few years back, I posted a page about my long process for developing a slim-line headset to fit under a leather helmet.
This provided the building information in a rather round-about way. All well and good....but for someone JUST looking to build a headset, it was perhaps a bit too confusing.
Plus some of the information is out-of-date...as in giving Radio Shack part numbers for components. Radio Shack closed down a few years ago, so the part numbers aren't as much of a help.
This web page strips away the extraneous information. It provides just what you need, if you're wanting to build your own headset.
This web page assumes that you need a headset that plugs into an aircraft in the normal way. This may mean the standard pair of jacks on the panel of a Cessna, it may mean an Icom with a headset adaptor.
Building the headset will take some minor electronics work, mostly soldering wires to plugs and jacks.
Parts List:
- Aircraft microphone element: This is, basically, a
self-contained unit that has everything necessary for the
radio (except the connection to it). Aircraft Spruce
sells several microphones designed to replace the elements
in standard headsets. I initially bought part #
11-04838, an A1060 microphone element, for $29.
Through no fault if its own, I later bought a Flightcom A-9
through ACS as well, P/N 11-08765.
- U-173/U microphone attachment plug. These are small plugs that connect directly to the microphone element, Aircraft Spruce P/N 11-00701. These are only $2 each, pick up three or four at a time.
- 26 or 28 gauge stranded wire
- Microphone Plug: The plugs used on aircraft microphones is unique; it is not used on any other device. It's a 3-conductor plug, 0.206" in diameter. Search Amazon for "0.206 Plug", it should come up. Or look on Aircraft Spruce, P/N 11-03918. Amazon has it for about $10, it's about $25 on Aircraft Spruce
- Headphone Plug: This is a standard 1/4" two-conductor or three-conductor (stereo) plug. Aircraft Spruce P/N 11-08308 will do, but these are available from a lot of sources for quite a bit cheaper.
- Ear buds/ear plugs
- A 1/8" inline stereo jack (more details later).
- If you're building a headset to plug into a handheld radio:
- A 1/4" to 1/8" stereo adaptor. This allows plugging your ear buds (which have a 1/8" plug) into a 1/4" jack.
- If you're building a headset to plug into a STANDARD
aircraft radio:
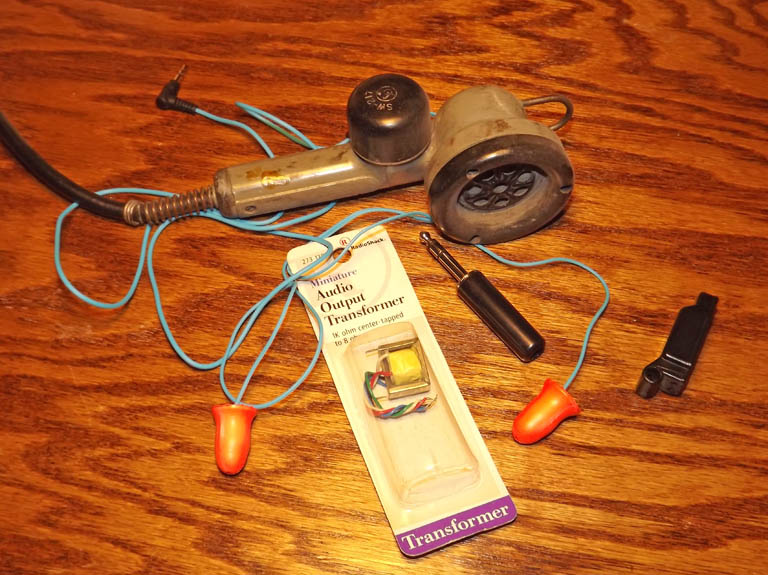
- An XICON 42TL004 Miniature Audio Output Transformer, available on www.mouser.com. Again, these are only about $4, so pick up a couple spare.
- You'll also need cables to connect the components
together. I cut up standard audio cables (which are
shielded).
Microphone
Building your own headset microphone means solving some
electrical and some mechanical issues. Electrical, in
the sense of connecting the microphone element to the
microphone jack of the airplane, and mechanical, which
addresses the issues of how to support the microphone on your
head.
Microphone Electrical
 It's pretty straight-forward, really:
There are two contacts on the microphone element, and they
have to be wired to the ring and sleeve terminals on the
microphone plug.
It's pretty straight-forward, really:
There are two contacts on the microphone element, and they
have to be wired to the ring and sleeve terminals on the
microphone plug.
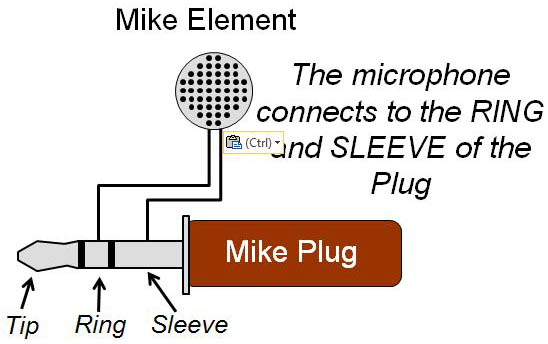
That is literally all there is to it. The schematic on
the right shows the connectivity. The mike plug end has
three electrically-separated sections, and the microphone
element is connected to the sleeve portion (the longest
section closest to the middle) and the ring connection (midway
between the tip and the sleeve.
Pretty darn simple...and it's too darn easy to wire to the
TIP, instead of the ring. Watch that.
Why is the Tip left blank? Because it's used for the
push-to-talk switch. Connect the tip to the sleeve, and
the radio PTT is activated. That's usually on the
aircraft side of the interface, and you shouldn't have to
worry about it for your homebuilt headset. The existing
PTT switch will work fine.
I like to use shielded cables to connect the microphone, as
stray signals can feed back. I use ordinary audio cable,
the kind of stuff you use to connect speakers to
stereos. Connect the shield part of the cable to the
sleeve on the plug.
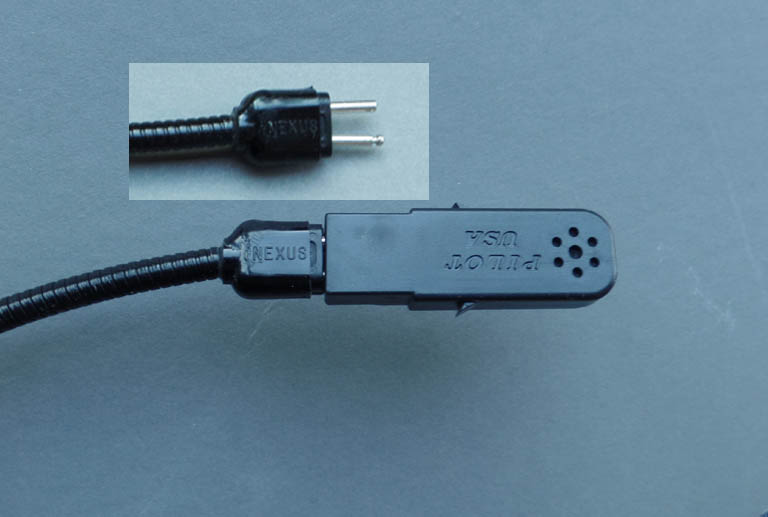
The microphone element has two sockets with set screws for
accepting wires from the plug. As I mention in the main
article, 12-gauge Romex wire is perfectly sized. But
it's really a lot easier to use a U-173/U microphone
attachment plug. This is a little assembly that costs
just $2 and includes everything needed. Buy several.
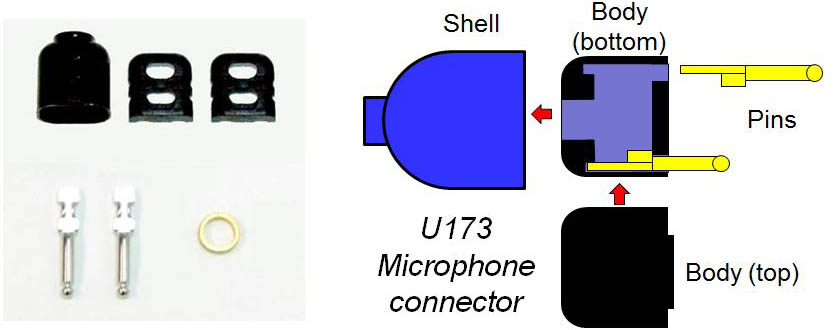
You'll need to solder wires to the pins, assemble the body, and slide it inside the shell, with the wires existing the hole on one end of the shell. The wires will need to be very fine gauge to fit through the flexible neck of the microphone boom. We'll be cannibalizing an LED flex light for the boom, just use the wires from inside of it.
Assemble the connector WITHOUT soldering wires, attaching to the microphone element (tighten down the connection screws) then remove the shell and two body halves. This holds the pins in the right position for soldering.
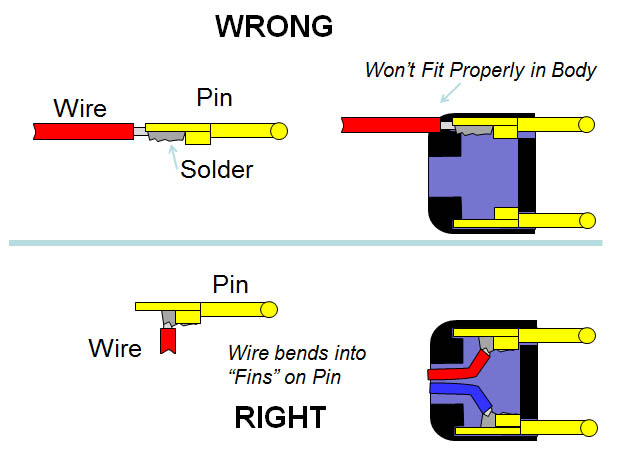
This diagram shows how the wires need to be soldered to the pins. NOT to the end of the pins but to the "wings" in the middle.
Microphone Mechanical
 It's good we know how to wire up the
microphone element, but it doesn't do too much good if the
microphone element isn't supported by your lips. We
need some sort of structure to hold the mike. On a
standard headset, the microphone boom just connects to the
ear cups. But we're using ear buds for our homebuilt
headset, so that's not an option.
It's good we know how to wire up the
microphone element, but it doesn't do too much good if the
microphone element isn't supported by your lips. We
need some sort of structure to hold the mike. On a
standard headset, the microphone boom just connects to the
ear cups. But we're using ear buds for our homebuilt
headset, so that's not an option.
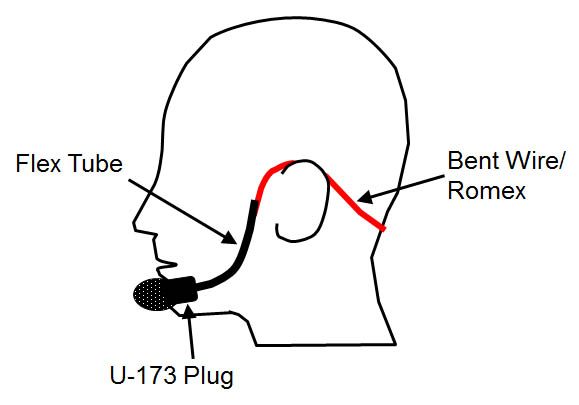
You can see the U173 plug that connects to the microphone element (hidden under a foam cover in this illustration).
Between the two, you see something labeled "Flex Tube". This is metal tubing that bends...the microphone wires run on the inside of the tubing, and the tubing itself is attached to the main frame (I use safety wire wrapped around the two). The cable to the microphone plug connects to the microphone wires outside the flex tube, then follow the route of the bent frame. The whole frame is covered with shrink tube when it is all together and working...including the area where the flex tube is wired to the frame.
You don't HAVE to use the flex tube. You can run the Romex frame right down to the U-173 plug, bending it as appropriate to put the mike element on the corner of your lips. But for the most part, the flex tube is nice...you can pivot the mike away from your lips if you want, and it's more adjustable than the hard bending of the Romex.
So, where do you get this flex tube? I bought a flexible LED light from Amazon (designed to plug into a USB port, and used the flex tubing from it. Search Amazon for "LED Flex Light"; they sell for about $10 and provide enough flex tubing for two headsets.

From this point, it's just assembly. Wrap the flex tube and end of the frame together with safety wire, cut the flex tube to the right length, epoxy the U-173 shell to the end of the flex tube (you might have to ream out the shell slightly), then run the wires from the U-173 connector through the flex tube, solder them to the audio coax you're using to connect up the microphone, and route the coax along the frame. Use a bunch of black shrink tube to cover the whole frame and the interface with the flex tube (don't use the shrink tube on the flex tube itself), run the cable for ~3 feet, and install the plug.
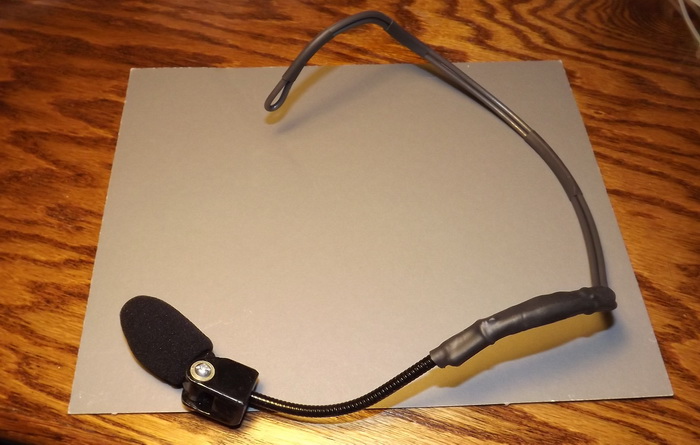
 One final fillip: While the
microphone boom is light, it's still putting some weight
atop one's ears. I actually found it a bit
uncomfortable.
One final fillip: While the
microphone boom is light, it's still putting some weight
atop one's ears. I actually found it a bit
uncomfortable.So I added a support strap, as you see in the picture to the right. This is just a strip of velcro, with the ends curved around the parts of the frame that go over the ears. I size this so the frame sits slightly above my ears and takes all the weight off them. It's very comfortable.
Headphones
Compared to the microphone, there's little work
required for the headphones.
Just about any commercial ear plug/ear bud will
work. I have a set of ear buds that actually an
automatic noise limiter (ANL), like the
top-of-the-line aircraft headsets. These were
expensive for ear buds ($100) but it's still hundreds
less than a standard ANL headset.
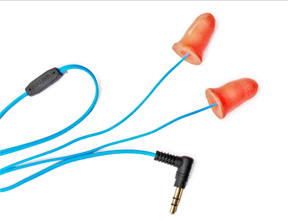
I found a better options: Plugfones.
These are foam ear plugs with speakers built into
them. They have passive noise attenuation equal
to those of a standard headset, and provide very good
volume to the ear. What's more, they're cheap
(about $25) and you can buy spare ear tips cheaply as
well.
 I *really* like
these. I hate standard ear buds because they're
hard; these are soft and very comfortable.
I *really* like
these. I hate standard ear buds because they're
hard; these are soft and very comfortable.
They actually have two types of ear tips. One
is the standard, foam like the typical ear
plugs. The others are flanged silicone rubber,
similar to ear plugs used for percussive sports like
shooting.
One huge advantage of these is their low cost:
You can put a spare set or two in the airplane, and
have some backup headsets.
The big DISadvantage of these is that they have an
8-ohm impedance. Standard aircraft radios expect
speakers with 300-ohm impedance, and these won't work
without a matching transformer.
Connecting to a Handheld
But if you're connecting your homebuilt headset to a
handheld radio, you don't NEED a matching
transformer. The handhelds want an 8-ohm
speaker, and that's what ear buds supply.
So all you need is a way to plug the 1/8" plug for
the ear buds into the 1/4" jack on your radio's
headset adaptor. That's real easy, nominally...
they sell simple adaptors that allow plugging-in a
1/8" plug into a 1/4" jack. Often, these
adaptors even come with your ear buds.
 However, there's a
problem: The ear buds (and adaptors) are set up
for stereo (two audio channels), but the radio only
outputs one. That means only one of your ear
buds will work.
However, there's a
problem: The ear buds (and adaptors) are set up
for stereo (two audio channels), but the radio only
outputs one. That means only one of your ear
buds will work.
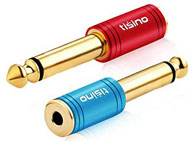
The good news for those willing to spend $10 is that you can BUY adaptors to do the job. Check on Amazon for a "1/4 Mono to 3.5mm Stereo Adapter". This one is $10 for two, and they work just fine.
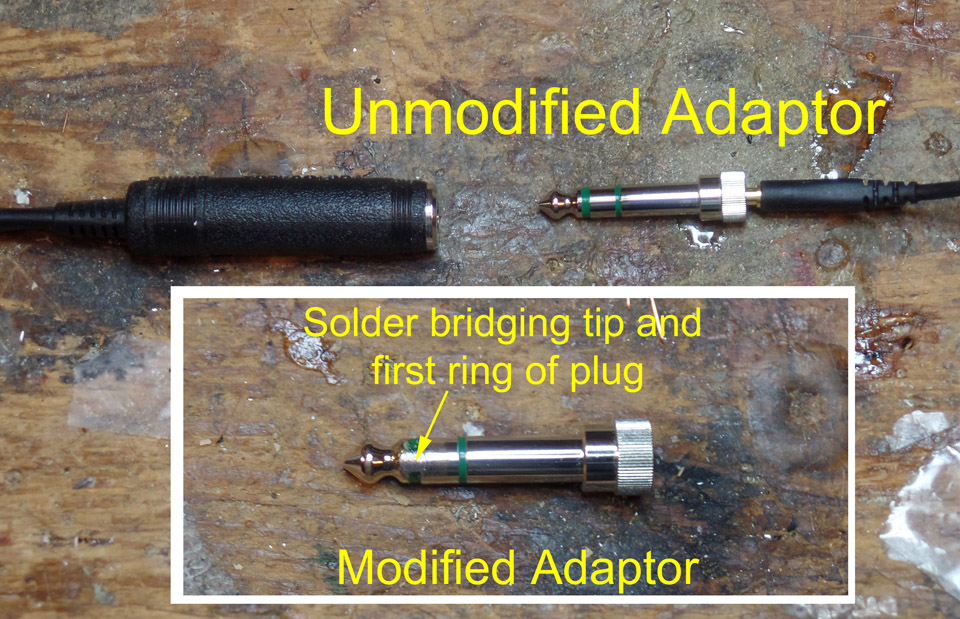
If you've got a stereo adaptor just sitting around,
you can modify it as shown below. Cut a slit
between the tip and ring of the adaptor, then fill the
slit with solder to connect the tip and ring. I
used a Dremel tool with a cutting wheel to cut the
slit, but you can probably do the same thing with a
triangular file. Just smooth the solder down
afterwards so it goes into the jack without effort.
Connecting to an Aircraft Radio
For the ear buds to work on an aircraft radio, a small impedance matching transformer has to be used. I use an XICON 42TL004 transformer, purchased from www.mouser.com. They're just $4 or so, I'd pick up several to have spares.The "Primary" side of the transformer is marked with a large black "P". The two outer connections of the Primary side are connected to the plug going to the aircraft radio, while two outer connections of the secondary side go to your ear buds.
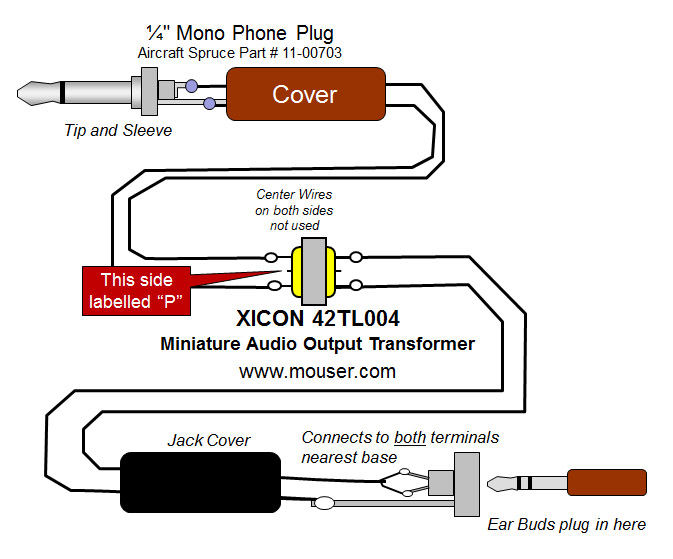
One way to do this is by installing the transformer inside a small plastic box, with a standard 1/8" stereo jack. Search for "1/8 stereo jack" and you'll get a lot of options.
Feedback Squeal
When I first used this adaptor with a standard aviation
headset, I got a squeal in the headphones when I
transmitted.It appears there was some sort of acoustic coupling between the headset microphone and the headphones. Not sure why this happened on the handheld radio with the adaptor vs. a standard aircraft radio without an adaptor.
But the solution was pretty simple: I reduced the "sidetone" volume. "Sidetone" is when you hear your own voice when you transmit. Most, if not all, handhelds should have an adjustment for this. Here's the instructions for my Icom ICA5 (and I'm betting most radios work this way).
1. Select an unused frequency
2. Turn the volume down a bit so the squeal won't hurt.
3. Press the Push-to-Talk switch to transmit
4. WHILE transmitting, adjust the volume down.
At some point, the squeal will stop, and you will still be able to hear yourself talk (albeit at a lower volume level).
 Return to the Tech Page