The terms "Rig" and "Trim" are different, but are really related. Most folks refer to "Trim" as the feel of the aircraft, but it's also used for the devices that may adjust that feel. But really, it's the Rig of the aircraft that affects how it flies and whether you need to adjust the trim.
This article will address the issues separately: Rudder Trim, Elevator Trim, and Aileron Rig (wing heaviness).
Rudder Trim
Light airplanes in the Fly Baby's class don't usually have
cockpit-adjustable rudder trim. Many have exterior tabs,
like you can see in the photo below. 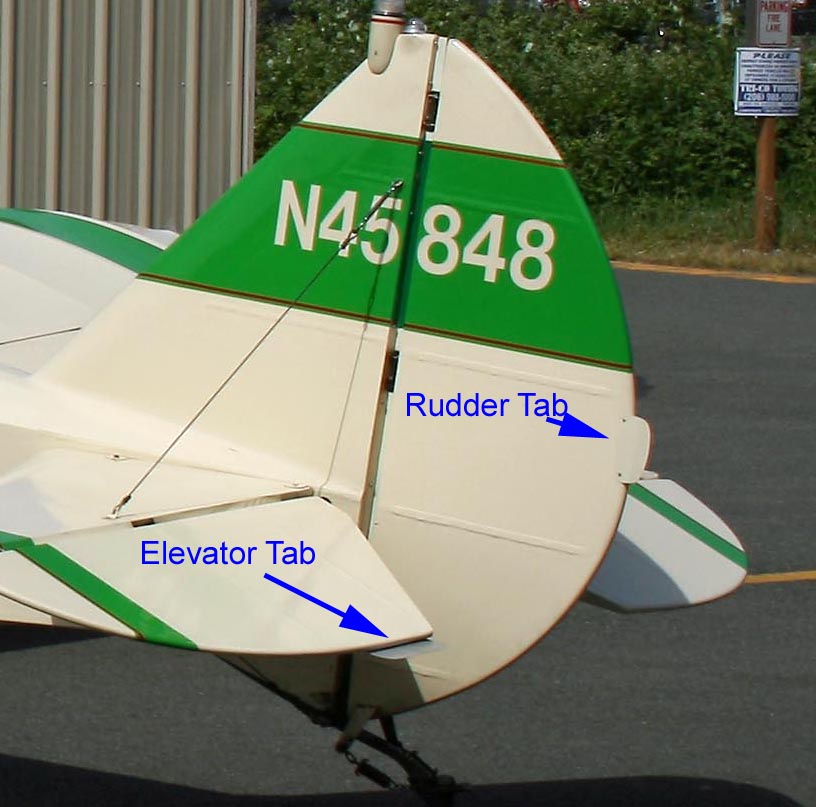
But the Fly Baby has a good excuse. Many planes build in a slight offset to the vertical stablizer to compensate for engine torque (oh, OK, "P-Factor"). But Pete wanted the Fly Baby to be adaptable to a wide variety of engines, some of which turn in the "wrong" direction. Having the vertical stab offset in the wrong direction wouldn't do anyone any good, so Pete's building instructions construct the stabilizer with no offset. So, unless you install a jet, you WILL probably have to install a fixed rudder tab.
 It's pretty darn simple...just look at the
picture above. It's a piece of thin aluminum (~0.040"),
six or eight inches long and ~2 1/2" wide, screwed onto the
rudder's trailing-edge bow with a couple of #6 or #8
screws. This is my own airplane, and the size seems to
work just fine.
It's pretty darn simple...just look at the
picture above. It's a piece of thin aluminum (~0.040"),
six or eight inches long and ~2 1/2" wide, screwed onto the
rudder's trailing-edge bow with a couple of #6 or #8
screws. This is my own airplane, and the size seems to
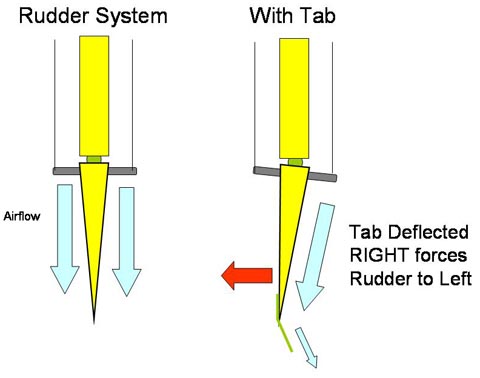
work just fine.Which way to bend it? Remember, the trim tab acts as an "anti-servo", so if you want to force the rudder to the left, you have to deflect the tab to the right.
Which side? Well, the mighty Continental tries to force the nose to the right, so the tab will need to be bent to the left. If you install the tab on the right side of the rudder, that gives it a bit of "left bend" right from the start.
"But....but... Ron, yours is installed on the left!"
Well, yes. I have a good reason for that: Somebody had already put holes on the left side of the rudder bow. Rather than drill a couple of new holes and leave the old unslightly ones in view, I installed the tab on the left side.
Plus... well my diagram on the right notwithstanding, the trailing edge of the rudder and elevator on a Fly Baby is pretty blunt. I'm thinking that the stagnation area behind the tailing edge might make a tab installed on the "correct" side less efficient.
It doesn't make a lot of difference. The tab is really pretty small, and it's not going to make you snap-roll on takeoff if you don't get the position, size, or bend right. Just install it without bending it, then go fly. Get a feel for whether you have to hold rudder at cruise. Then land, bend the tab a bit, and fly again. Pretty simple.
Elevator Trim
It comes as a surprise to some folks that the Fly Baby does not have cockpit adjustable
trim. Folks get so used to the high control
pressures required for your typical Cessna or Piper, that the
whole concept of NOT having to adjust the trim with every
airspeed change is alien to them.The fact is, the Fly Baby trim doesn't change much, in flight. We've got only one seat (so the load doesn't change much), the speed range is only 50 MPH or so, and the elevator pressures are light enough so that out-of-trim conditions aren't too noticable. We can get by with fixed tabs, adjusted to a good compromise setting.
Install a fixed tab as shown for the rudder. I adjusted mine so that the plane is slightly nose-heavy when the fuel tank (which is slightly forward of the CG) is full. When the tank gets towards empty, the plane becomes slightly tail-heavy.
I don't find the amount of pressure is a problem. However, if someone builds their plane for long-distance cruising or is more sensitive than I am, they can install a trim system if they wish. Chuck Baynard decided he wanted cockpit-adjustable trim on his Fly Baby, and installed one. He supplied a nice writeup on how he did it. His is a spring-type system similar to a number of production-type aircraft.
I suggest you build your plane without a trim system, and add one like Chuck's later if you really feel the lack.
Aileron (Wing Heaviness)
Do you have to hold the stick to one side or the other during cruise flight? If so, you might need to perform a gen-u-wine adjustment to the Fly Baby's rigging. I did, several years back.Wing heaviness can be caused by a variety of things. The wing rigging could just be wrong, one wing may actually be heavier than another, a yaw tendency is being translated into a wing heaviness, or the two wings could even be built different. I once saw a Mini-Mustang where the profiles of the leading edges did not match...one was obviously sharper! Probably made it stall strange, too.
You could put a fixed tab on an aileron, but there's a lot cleaner, easier way. The wing wires on a Fly Baby are used to set the wash-in/wash-out for each wing, and you can easily fiddle with the bracing to get the plane to fly the way you want it to. You actually twist the wing to slightly increase or slightly decrease its lift. This is the way all aircraft had their trim adjusted, until cantilever wings started showing up.
To make this adjustment, you'll need an awl or a stout nail, a spool of safety wire, and a pair of side cutters.
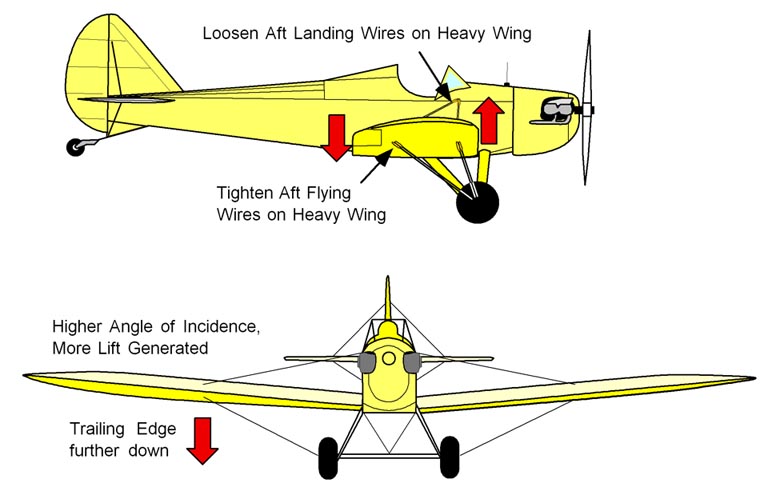
There are two ways to proceed: You can reduce the angle of incidence of the "Light" wing, or increase the angle of the "Heavy" wing. Let's assume you're going to adjust the heavy wing to produce more lift.
Go to the Heavy wing with your tools and crawl underneath the trailing edge of the wing near the inboard end of the aileron. You'll be looking up at the pair of turnbuckles that attach to the BACK flying wire point.
Pretty easy, here: Remove the safety wire from both turnbuckles. Then, stick your awl or nail into the center hole of the turnbuckle, and tighten it one or two turns. It's sometimes hard to tell which way to turn it. After it starts turning, though, if it's getting tighter (the right way), it get stiffer to turn. Also the wire attached to the parallel flying wire will seem to get a bit slack.
After you've tightened one turnbuckle one or two turns, safety-wire it, and then tighten the OTHER turnbuckle the same amount. Safety-wire it, and you're ready for a test flight!
If it gets so that the turnbuckle won't tighten, you need to slack off a bit on the corresponding landing wire on top of the wing. Those turnbuckles are right outside the cockpit. Remove the safety wire, slack them off a turn or two, then re-safety them.
Remember to use fresh safety wire each time (e.g., don't reuse it).
IIRC, I did ~2 turns on my first shot, and it helped my slight wing-heaviness but didn't fully take it out. Took another one or two turns. One or two turns is pretty gradual, you shouldn't wildly affect the handling.
If your aft flying wire turnbuckles are already tightened all the way...well, then, adjust the OTHER wing the opposite way: Tighten the leading flying wires to reduce its lift slightly.
This is really a pretty subtle set of changes. Other than the wing-heaviness disappearing, you probably won't notice any difference to the aircraft.
Ron Wanttaja
 Return to the Tech Page