Templates for Fly Baby Parts
February 2009
Fly
Baby
rib template by Marco Pinto (Color added)
The photocopier is one of the more ubiquitous items in the modern
world, but most folks don't know their dirty little secret:
They distort the images they copy.
For the most part, this distortion consists of a proportionate
enlargement or reduction of the item they're copying. In plain
English, the image is slightly bigger or smaller than the original.
This doesn't make much of a difference if you're copying page 293
of a physics textbook. It does make a difference if
you're making a copy of a template of a Fly Baby part!
Pete included a lot of templates in the plans, but he always
included the actual dimensions of the part the template
represents. If you slap a ruler on the template, you may well
find that the template dimensions aren't quite right.
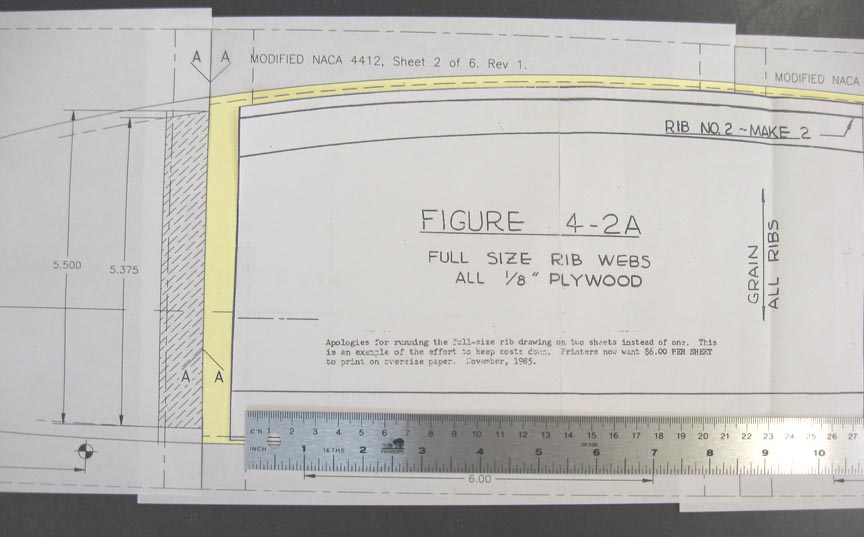
This gets worse the larger the part. The largest part
templates in the plans are the ribs...and they can get quite far
off. Here's a picture Tim Roska took of one of the plans' rib
templates laid against Marco Pinto's CAD rib template. I've
"colorized" the CAD template equivalent of the plans template.
Note how the plans template is definitely smaller than it is
supposed to be.
You should always check the
template dimensions prior to cutting out the part.
Several Fly Baby builders have drawn Computer-Aided Design (CAD)
templates of key Fly Baby parts, and have passed them to me for use
by others. If you
follow the special instructions below, you'll find that
these will be a lot more accurate than what is contained in the
plans set. Plus, you won't have to cut up your plans to make
parts, since you can print these on your own printer and just run
another set if you botch the part.
First off, let me establish a disclaimer, and give you the special instructions
needed to use these.
Disclaimer
These templates were not drawn by
professionals, nor have they been checked and verified to the
degree an aviation manufacturer would require. It is the
responsibility of the builder to check the dimensions of the
templates prior to making parts from them. No claim of
suitability nor accuracy is made.
Special Instructions
There is a key factor that has to be considered when you print these
templates: Your computer printer may not necessarily print
them at the proper size.
 Printers usually
automatically adjust the size of the printed image to match some
internal standard. If you allow your computer to do this, the
template will not be the proper dimensions.
Printers usually
automatically adjust the size of the printed image to match some
internal standard. If you allow your computer to do this, the
template will not be the proper dimensions.
Prior to printing, you need to either bypass this automatic
adjustment. You'll usually find it in the "Page Setup"
menu. You may have to then click the "Printer" button (and
probably the "Properities" button) to get to the page that lets you
adjust the print size.
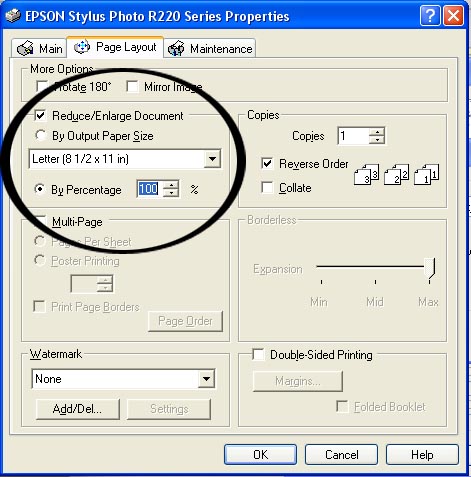
The appearance of that page differs between printer brands.
You can see the adjustment page for my Epson printer on the
right. I have clicked the "Reduce/Enlarge Document" button,
and set the percentage to 100%.
If I hadn't done that...the printer prints at 97%, EVEN if the
"Reduce/Enlarge" control isn't checked.
Once the template prints out, check the dimensions. If it's
too small, you'll have to increase the percentage, and vice-versa.
The setting holds throughout your print session, so if you're
printing rib template sections, you shouldn't have to re-set this
for each page. UNLESS you exit, and re-start the program, of
course.
Many of these templates require that you print multiple pages and
tape the results together. Index marks are provided to help
you align the pages.
Templates
The templates are all in Adobe Acrobat (e.g., .PDF) format.
Unless your computer really dates from the stone age, you should
have Acrobat Reader already.
Best approach is to RIGHT-click the links, then save the files
somewhere on your hard disk. If you do a normal left-click,
it'll probably open inside your web browser. Don't print it
from the web browser! But you'll probably be given the option
to save it to your disk at that point.
Wing Ribs
The wing ribs are the largest templates in the plans set, and the
one most vulnerable to dimension errors. Plus, in the
most-recent printing of the plans, the templates are actually
reduced to fit on a single 8x10 page rather than the 11x17 fold-out.
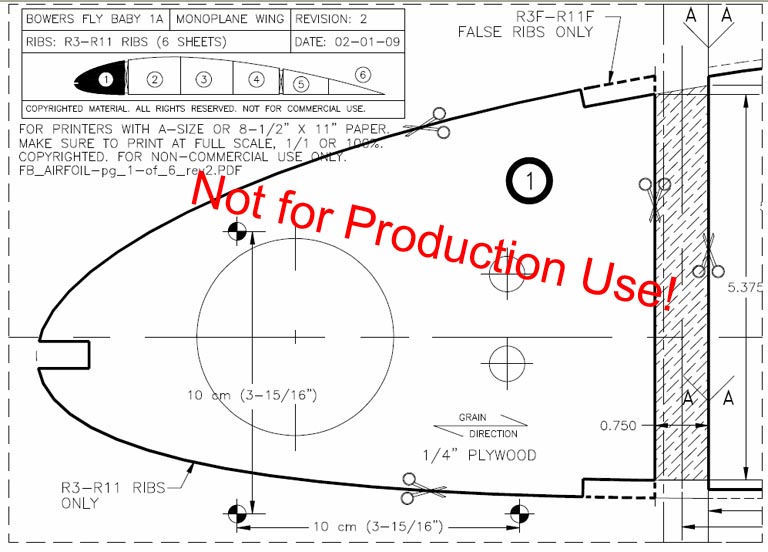
Marco Pinto's rib CAD files are great. They're for the main
ribs in the wing (ribs 3-11) and include the alterations for the
false ribs that only exist in front of the spars. On each
page, he includes a little map that shows where, on each rib, the
template goes. Here's a sample:
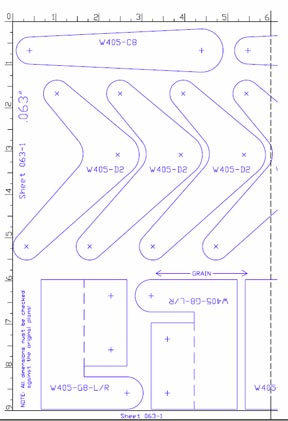
One thing you'll notice is that Marco providee a set of horizontal
and vertical indexes on each page, 10 centimeters apart. Check
these measurements to ensure that the drawings printed out the
proper size, then tape them together.
Now, I know
the plans are in English measurements. I'm as addicted to the
inch-foot -miles system as any American. But using 10
centimeters as the index makes things a lot easier, because you
won't have to do any decimal conversions of fractions of inches to
adjust your printer. Say your ruler measures the 10cm index
marks as 10.1 cm apart. Your printer's printing large, so you
need to set your size percent to 10/10.1 or 99%. If the index
marks were four inches apart (for example), and you'd measured 4
3/32", you'd have to convert that fraction first.
Marco generated two types of rib drawings. The first
outputs the ribs on standard 8.5x11 paper, and consists of six
files. I've packed them into a single ZIP file:
Standard Paper Rib Template
He generate the second on my request. Many printers can print
on what is called "Banner feed" paper...and endless string of
standard paper attached end-to-end with perforations between
sheets. He built this file based on using two banner sheets
(e.g., 8.5 x 22 inches). With this method, you only have one
taping to do (two separate banner sheets for the middle ribs).
You can buy banner paper at any office-supply store.
Banner-Paper Rib Template
Note that each of the two files above individually has all the
templates to build the entire rib. You don't need to download
both (though they're only about 200 kb in size).
Marco also drew up a layout showing where to drill the ribs to clear the
internal bracing wires.
Airfoil Shape in Excel
I've taken the airfoil ordinates that Pete included in the Sport
Aviation articles and plotted them in an Excel
spreadsheet, along with the stock 4412 airfoil.
Steel Parts
Ted Cannaday took the time to draw up layout diagrams for the
steel parts. These show how you could arrange all the
4130 steel parts of a Fly Baby on 4130 sheet to maximize efficiency
when you cut them out. The file is 36 pages long, including
several pages of instructions at the start.
Within the PDF file are full-size layout drawings for all the .063”,
.093” and 3/16” fittings for the Fly Baby as shown in Pete Bowers’
plans book, along with one of the 1/4" parts. They are arranged to
fit the standard available sheets in sizes 9” x 18” and 9” x 9”, and
1¼” strips in the case of the 1/4" material. Since these sizes
cannot be printed on commonly available printers, each layout sheet
is divided up into two or three printed pages which should be
‘assembled’ before use. To this end, registration marks and dashed
assembly lines are provided at the 6” and 12” points, along with
rulers along two edges of each sheet and strip.
Also, Jim Katz has generated a set of Autocad files for both the steel parts and many wood
parts. You should be able to take these to a laser
cutting/water jet/plasma cutting shop and have them cut out parts
automatically. However, it's important to CHECK the dimensions
youself... there's no guarantee there aren't any errors in there,
nor that the various computer systems haven't distorted some of the
dimensions. You might also want to change the hole size to
small pilot-size holes, too.
List of Materials
Materials List. An Excel
spreadsheet with a stab at the total materials list for building a
Fly Baby
Questions? Email Ron Wanttaja .
 Return to the Fly Baby
Home Page
Return to the Fly Baby
Home Page