Battery Issues
July 2004
 Back in the
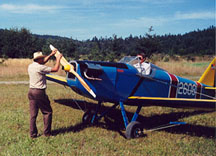
beginning, Fly Babies didn't need batteries. Forty years ago, aircraft
radios were heavy and expensive, controlled fields were few, transponders
hadn't made it into General Aviation yet, and most homebuilders were quite
happy with having to hand-prop their aircraft.
Back in the
beginning, Fly Babies didn't need batteries. Forty years ago, aircraft
radios were heavy and expensive, controlled fields were few, transponders
hadn't made it into General Aviation yet, and most homebuilders were quite
happy with having to hand-prop their aircraft.
Things are quite different, nowadays. Radios are relatively cheap,
and amazingly light. Transponders are not only common (and somewhat
affordable), but many of us live within the "30-mile veil" of Class B airspace
where transponders, except in limited cases, are required. Few folks
are really willing to hand-prop their airplanes.
The upshot? Many Fly Baby builders end up including a battery
in their aircraft.
Even so, strictly speaking, they are still not mandatory. Leave
off the battery and electrical system, and you can legally fly within the
Class B "Veil" without a transponder. Many Fly Baby aviators use
low-cost handheld radios, with their built-in NiCd packs. And with
a bit of training and a tailhook to hold the
aircraft, hand-propping is still a viable way to go.
But...doggone it, they *do* make aviation life a lot easier.
For information on batteries and electrical system, see Tony Bingelis'
book, The Sportplane Builder. He's got a great article on
aircraft electrical systems. Firewall Forward and Tony
Bingelis on Engines also have good information on battery selection
and picking a mounting location.
The following material is more Fly Baby specific....
Battery Selection
The absolute largest battery you'll have to consider is the aviation "25"
size...G-25, RG-25, CB-25, etc. These usually weigh about 20-25 pounds.
That doesn't sound like much...unless you're trying to hold one up at full
arm's reach.
But even a 25-series battery can be overkill for a Fly Baby. Some
builders have used motorcycle batteries with good results.
Depending upon how you're going to end up mounting it, pay attention
to the required positioning of the battery. Some batteries can only
be mounted upright, which means your cables have to run in a particular
orientation.
Last fall, I replaced my gel-cell battery with a drycell battery from
Odyssey. I'm very happy with it... it cost about the same as a conventional
aircraft battery, can be mounted in any position, and has performed perfectly
in my aircraft with no changes to the electrical system.
Low Cost Options
 After reading
this, Drew Fidoe had the following suggestion for finding low-cost batteries:
After reading
this, Drew Fidoe had the following suggestion for finding low-cost batteries:
For those hand-prop people out there, you can purchase smaller
gel cell batteries for radio only operation. I used something like
a 7.5 amp hour battery for my old 100 channel radio and it worked very
well. I would simply pull the battery about once a month for a recharge.
It was light weight, about 5 lbs, and was easily portable. I purchased
one at a local electronics specialty store, and the other at a battery
direct warehouse. I've since upgraded to a 12 amp-hour battery (9
lbs) as I now require a transponder at my local airport.
For larger engines using a starter, larger size gel cells
are also offered at automotive retailers and places such as Wal-Mart for
garden tractors and the like. One local RV builder has had very good
luck purchasing his gel-cell batteries used for bargain scrap-value prices
from an electric wheel-chair/scooter repair shop. Apparently the
one that he frequents changes them out on a kind of "planned maintenance"
schedule. He claimed that the most he got out of one was four years,
the minimum was a year and a half cranking an 0-320. Just some options,
anyhow.
One last thing WRT gel-cells. If you completely discharge
them the battery will be ruined. For example, don't leave the radio
on for two weeks like I did!
Mounting Location
Where to put the battery on a Fly Baby? There are a number of factors.
First, the battery will have to be replaced on occasion. I've
been getting about three to four-year life with mine. So install
it at a place you can get at. If you're using a maintenance-free
battery, it's all right to put the battery in a less-convenient location.
You still want to be able to look at it, come annual time, though.
Second, if you've got a starter, you'd prefer a location closer to the
firewall to minimize the run of the battery cables. Long runs are awkward
to do, weigh more, and the extra length increases power losses. Keep
in mind, too, that the Fly Baby has a wooden structure. On a metal
airplane, or a car, you can just attach the ground terminal of the battery
to nearby structure and just run a positive cable to the starter, etc.
Won't work on a Fly Baby.
Third, if you're using a cell with liquid electrolyte, you need a location
where a vent tube can be run out the bottom of the plane to shed any released
gasses or boiled-over electrolyte
Here's a diagram with potential battery locations.

All these locations have advantages and drawbacks. The engine-compartment
mount is pretty standard on production aircraft. But you may not
have enough room, under the cowl.
Placing the battery on the floorboards between the pilot's legs is fairly
common in homebuilts. It does rob a bit of room from the pilot, and
can make it harder to stretch your legs during a long flight. Some
builders put the battery far-forward, between the rudder pedals.
This is a pretty good location, but is a bit harder to get to for installing
and removing.
 My own Fly
Baby has the battery installed under the floorboards. It's out of
the way, but access requires the addition of a belly
inspection panel. The Belly Pan is a good idea, in any case.
My own Fly
Baby has the battery installed under the floorboards. It's out of
the way, but access requires the addition of a belly
inspection panel. The Belly Pan is a good idea, in any case.
On the other hand Drew Fidoe built a shallow battery tray into the floorboards
between the rudder pedals and the Station 3 bulkhead. It's a simple
aluminum tray, about 7/8 flush to the deckplate forward of station 3.
The last two potential battery-installation spots are behind the pilot's
seat, either in a recess in the baggage shelf, or a new mount somewhere
lower in the fuselage.
Keep in mind that if you mount an unsealed battery anywhere but in the
engine compartment, you'll want to have a top for the battery box to prevent
any gases from reaching the pilot.
Installing My Odyssey Dry Cell
Back in Fall, 2003, I had to so some fairly major work on my airplane.
While it was going to be laid up anyway, I decided to fix several items
that had been bugging me for a while.
The process started with my discovery that the tailwheel bracket was
loose (Job #1). I knew I was going
to have to remove the rudder, necessitating fabric work to patch up where
the old fabric gap seals were cut away. Since I was doing fabric
work, I decided to cut the long inspection hole in the belly fabric (Job
#2). The inspection hole in the belly would give me good access
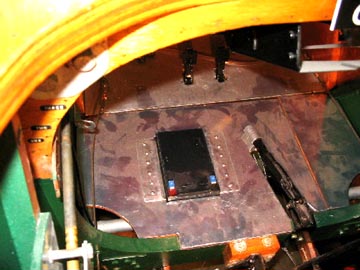
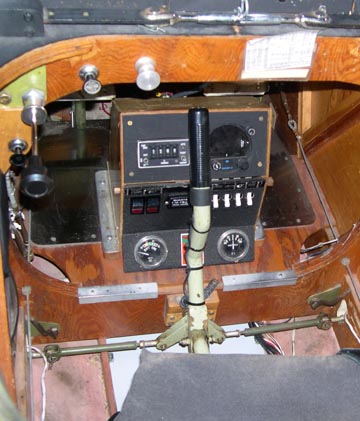
to the avionics box installed on the floorboards forward of the instrument
panel bulkhead. Under that avionics box, my battery box was installed
partially under the floorboards.
 Since I
was experiencing starting problems, I decided to replace the battery.
I ordered all the parts at once, and started planing out a brand-new battery
box.
Since I
was experiencing starting problems, I decided to replace the battery.
I ordered all the parts at once, and started planing out a brand-new battery
box.
Why a new battery box? Why not just put a new battery in the old
one and be done with it?
The way my old box was set up, I could not access the battery terminals
without removal of the avionics box that mounted atop the area on the floorboards
where the battery box sat semi-flush on the floor (note picture). I really,
REALLY, didn't like having to disassemble "hot" electronics without the
ability to disconnect the battery first. To disconnect the terminals,
the avionics box had to come up, then the top of the battery box (which
sat about 1.5" above the level of the floorboards) had to be shoved aside
just enough to get a wrench on the battery terminals.
I'd had one instance in the past where I'd accidentally shorted the
positive terminal to ground while moving my metal foot panels around...I
*seriously* wanted to change it.
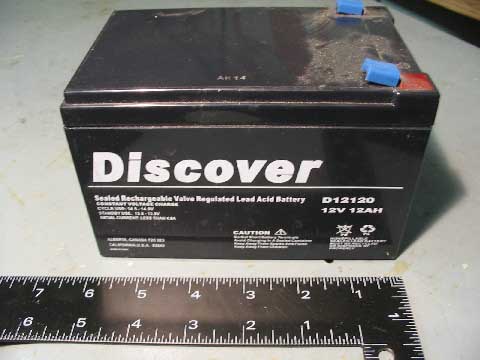
I bought one of the new Odyssey drycell batteries for the Fly Baby.
It doesn't have any free electrolyte in it; if it breaks, nothing spills.
While the Odyssey PC-680 didn't have the same amp-hour capacity of my existing
G-25 battery, it promised higher cranking current. My 'Baby has gotten
real hard cranking over the past year. Charging the battery immediately
before flying helped, but the next day it would return to the hard-cranking
regimen.
I hoped the new battery would fix the problem. Add to that the
fact that the battery was literally half the size of the old one...a little
shorter in length, a little less in height, and half the width. It
did leave me with some options, relative to battery box design.
First step was to remove the old one. I popped off the belly panel,
pulled out the seat and the turtledeck, and dropped a square of plywood
where the seat normally went. I sat down on the plywood, with my
feet dangling out the new hole in the belly.

Unscrew the four bolts holding the avionics box down, then lift it up
enough to access the battery terminals. Unbolt the plus and minus
cables. Then try to maneuver the avionics box out of the way enough
to get the battery out.
Tough going...the box was too close to the fuel tank, and the cable
from the encoder and the three wires from the regulator made it hard to
find a position where the battery could come clear out of its well on the
floor. I disconnected the two antenna cables and the connector from
the COMM radio, disconnected the connector for the nav lights and strobe,
and snipped one of the ty-wraps holding the encoder cable. Finally
got the battery clear.
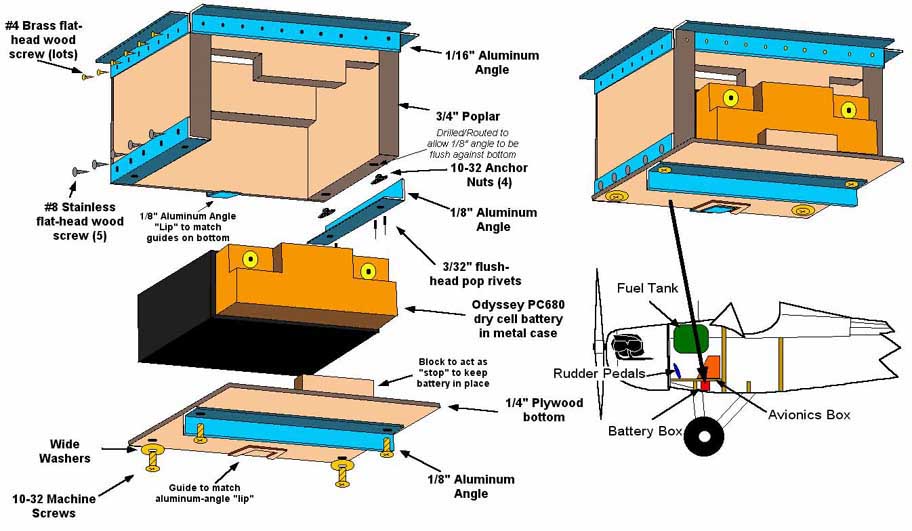
Now the box. What held the box in place? All I saw was a
thin aluminum-angle flange.
As it turns out, that *was* all that was holding it. A 1/16" aluminum
angle, with brass countersunk screws. The flange held it up, and
the avionics box itself apparently was all that clamped the battery box
down. I was able to reach over and snake out the battery box like
I did the battery.
Doesn't sound like much, but it showed absolutely no damage from that
4-G landing I made a few years ago.
I had decided that the new battery would mount flat under the floorboards
and be accessed via the new inspection panel. Quick work with a tape
measure showed that the battery was about 1.5" narrower than the existing
hole in my floorboards.
Three-quarters of an inch on either side...perfect for dimensioned lumber.
Not having a good source of spruce around, I went out and bought a 3/4"
by 7" oak plank from Lowes' Aerospace. I cut out a shallow box, leaving
the bottom open for sliding the battery in from below. I couldn't
have it slide in from the end, as the mounting location was immediately
aft of the first belly bulkhead (STA 2), and just in front of the tubes
for the wing-folding pivots.
I tacked the box together with #8 wood screws, and took it to my next
EAA meeting...to get laughed at. "Oak!??? That's too heavy!"
Umm, well. I *like* oak. It doesn't splinter, and screws
don't strip out of it. I was planning on both screws and epoxy when
I assembled the box for good, and knew the oak wouldn't have any trouble
with the screws.
"Ummm...what about poplar," I asked my Tech Counselor. He felt
poplar was fine, though one RC-model builder in the chapter mentioned that
he'd found that poplar plywood tended to 'explode' on impact.
Well...poplar sounded all right. So I went back to Lowes', bought
a poplar plank, and made another box.
For anyone who's keeping track: The oak box was 1.75 pounds.
The poplar one was 1.25 pounds...a half-pound lighter. I took it
out to the plane, and it fit down through the hole fine, with what looked
like sufficient clearance for the 1/16" aluminum support flanges.
I duplicated previous support flanges at the top using #4 brass wood
screws and 6063 aluminum angle. Neither are structural, but I figured
that even if the angle bent, it would still be catching in the hole.
#4 screws are small...but I used about 30 of them. I figured they'd
easily hold three pounds each in shear.
The biggest problem I was facing was what to use for the removable bottom,
and how to hold it securely in place. It would have to be able to
withstand the entire weight of the battery under 6 Gs... call it 150 pounds.
Wood screws directly into the bottom might work, but I fretted that if
I had to remove and replace the battery several times, the screws would
get loose.
Flanges attached to the outside of the box would probably be best, but
the box had to fit down the square hole the old battery box came out of.
It wouldn't go down, with flanges sticking out the sides. If the
flanges were attached to the INSIDE of the box, the battery wouldn't fit
through the bottom.
I got a bit sneaky here: I put flanges on the outside, but facing
inwards! They acted like "boots" over the ends of the wooden sides.
I installed anchor nuts on the inside, and routed out the bottom of the
sides enough to clear them. The flanges (1/8" 6061T-6) were screwed
in place with five #8 stainless steel screws. With this setup, the
screws were loaded in shear, not tension.
For the bottom, I used a piece of 1/4" ply with another piece of the
1/8" aluminum angle as a backup. Experimentation showed it might
be tough to position the battery in place while fitting the bottom on,
so I attached a piece of angle to the back wall of the box and some "guides"
underneath the bottom plywood. These let me quickly position the
bottom (with the battery on it) so that I could feed the bolts up though
the bottom and angle into the anchor plates.
Examining the electrical connections on the airplane revealed another
problem. There were two connections that had to be made to each terminal...one
a #4 cable running forward to the starter, and one a regular #14 wire for
the avionics.
The old battery was set up for a 3/8" bolt to screw down the terminals.
The new battery was 1/4"
The lug on the #14 avionics power wires was the easy part. It
had a 1/2" lug that had been really too big for the old battery ANYWAY.
Plenty of wire, so I snipped it off and crimped on a 1/4" lug.
The #4 cable was another problem. I needed another couple of inches
in length, since the cable had been exactly the right size to go to the
terminals atop the battery and the new terminals were now ~5" below the
floorboards. Plus, one lug had to go to the 1/4" allen bolt for the
battery terminal.
The old cables were 24". I had trouble finding anything but 24"
or 36" at the local autoparts store. My tech counselor told me to
make one, but I haven't any experience soldering to really heavy wire.
I finally found a 29" set at NAPA.
Still had 3/8" lugs on each end, though. I dug up some brass bushing
stock 3/8" OD and 1/4" ID and soldered it in place in the middle of the
big lugs. Even if the solder joint wasn't the best (and my little
Weller gun had a hard time heating all that metal up) the bushing wouldn't
go anywhere even if the solder turned loose.
One last bit, before reassembly. The power cables had attached,
bare, to the battery terminal and a stud on the inside of the firewall.
I wanted insulating boots on the positive cables, at least.
I'd installed a set on the firewall sides of the cables several years
ago...but do you think I could remember WHERE I'd bought the boots?
It turned out to be a REAL hassle. I went to three different hardware
store chains, three different auto-parts chains, two Radio Shacks, an independent
electronics store, even an auto-electric rebuilder. Nobody had the
boots, or where to find them.
I finally called a buddy of mine who works at the aviation parts store
at Boeing Field. "Sure, I got 'em, all sorts of sizes...."
Finally, then, I was ready to reassemble. The new cables and boots
installed easily. I set the battery box in place...the bottom flanges
fit down through the hole find, but NOT the screw heads holding the top
support flange. I figured they just needed to be countersunk a bit
more. The new flange was actually another 1/4" wider than the old
one, and covered the mounting holes for the avionics box. Good, really,
since bolting down the avionics box would clamp the battery box in place
by more than just its presence.
Anyway, even with the battery box not going into the hole like it should,
I marked the locations of the hold-down bolts on the flanges. I took
it out, countersunk the brass-screw holes a bit more, and drilled holes
in the flanges for the avionics box. Back into place, and it fit.
The battery installed easily in the bottom of the box. Now the
cables.
But as hard as I tried, I couldn't connect the cables and wires to the
battery terminals. They were set too close to the pivot tubes for
the wing-folding...I just couldn't get my fingers up there to hold the
cables in place while starting the battery terminal screw.
Finally, I removed the aftmost bottom screws, and backed out the front
screws almost all the way. I let the cover sag down with the battery
still on it. This loaded that piece of guide angle all wrong, but
I now had good access to the terminals. Two minutes later, they were
all hooked up. I slid the battery up, tightened the four bottom screws,
and the battery installation was complete. Button down the avionics
box, reinstall all the inspection panels.
Just before I put everything together, I took some weights:
Old Battery (G-25): 20 pounds
Old Battery Box: 5 pounds
New Battery (PC680): 14 pounds
New Battery Box: 2.5 pounds.
I ended up with a weight savings of about 8.5 pounds.
Not, if this were a classic Fly Baby fairy story, I'd tell about how
quickly the new battery turned the prop. It didn't really...the starter
shows some of the same hesitation, but once it makes it past the first
blade, the starter DOES show some alacrity in spinning the prop. In any
case, I subsequently discovered that the problem was in my starter
clutch.
I've had the Odyssey installed for about ten months now. It's
been working fine...it charges normally, and spins the prop nicely.
One day when I had to taxi back and forth to get my transponder checked,
I ended up starting the engine five times without an opportunity to fly
the plane to charge the battery. The Odyssey worked just fine.
Please note, this battery box is *Not* the one I'd use if I were starting
from scratch. I'd put the battery in about the same location, but
a bit further forward to use the Station 2 bulkhead as one of the supports.
I wouldn't cut a big square hole in my floorboards... but since I already
had one, I used it.
Ron Wanttaja
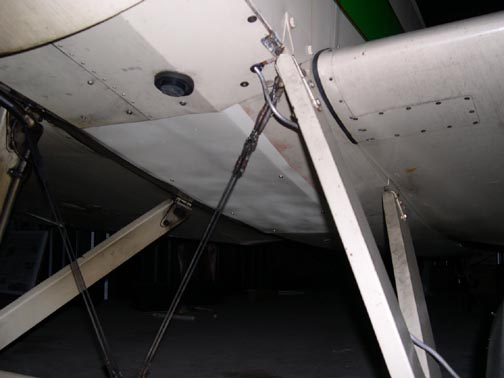
External Battery-Charging Port
If your battery is hard to get at, or if you install a battery in
an aircraft without a generator or alternator, you may want to install
an exterior jack to enable hooking up a charger without having to disassemble
aircraft structure. My airplane has such a feature...it's the black
disk on the bottom of the airplane just in front of light-colored belly
panel.
Comments? Contact Ron Wanttaja
.